


Image created by Bing Chat
Introduction
Traditional automation testing by using open-source framework, it shows the flexibility and control during software development process but also introduce many disadvantages:
- Requires a higher degree of proficiency in programming languages and frameworks.
- Creating and maintaining tests is time-consuming, especially for complex applications with frequent changes.
- Flaky tests along with factors such as synchronization issues, dynamic content, or environmental variations can contribute to the instability of tests.
- Open-source tools may require dedicated resources for script development, leading to higher costs.
- Scaling test automation efforts with open-source tools is challenging especially when the application’s functionalities increase, leading to increased complexity.
- Test scripts in open-source tools may lack reusability.
- Developers need a lot of hands-on experience with programming languages before they can be productive.
- Development of applications takes more time.
Shifting to low code/no code platforms can offer a more accessible and efficient testing process, especially for teams looking to enhance collaboration and accelerate testing cycles.
What is Low code/No code
Definition
Low Code platforms, also known as low-code application development platforms, minimize or eliminate the manual coding required to develop and deploy software applications. They have a panel of visual elements that enable development without programming.
No Code platforms allow people with no knowledge or technical training in software development to create applications without programming a single line of code.
Teams can use Low-Code/No-Code (LCNC) technologies to radically change how work gets done. It can enable teams to automate more tedious, error-prone processes that can occasionally take attention away from more strategic, higher-level work that adds greater value to the company.
According to the Mckinsey report, there will be 70% growth in the market and adoption of new application development that will leverage low-code/no code by 2025 (vs <25% in 2020).
Low Code/No Code has many benefits:
- Faster development, shorter time to market.
- Reduced learning curve.
- Accelerated test creation and maintenance.
- Reduced costs.
- Increased Productivity.
- Reusability.
- Scale with ease.
- Enhanced collaboration between teams.
An example of Low code / no code tool
In this first blog post of the series, we will look at BugBug, a low-code software testing tool for web applications. It allows you to create and run automated tests without writing any code. You can use a simple drag-and-drop interface to design test scenarios or record your actions on the browser and replay them as tests. BugBug also supports cross-browser testing, parallel execution, and cloud-based testing.
Some of the features of BugBug are:
- Test Recorder: You can use the Chrome extension to record your clicks and keyboard typing on your website, and BugBug will automatically generate test steps for you. You can also edit, delete, or add test steps as you wish. Link to install the extension: https://chromewebstore.google.com/detail/bugbug-automation-testing/oiedehaafceacbnnmindilfblafincjb.
- Test Runner: You can run your tests on demand or schedule them to run regularly. You can also run your tests in the cloud, or on your local machine. You can choose from different browsers, devices, and platforms to test your web application.
- Test Reports: You can view the test results and identify any defects, errors, or issues in your web application. You can also generate test reports and share them with your stakeholders. You can integrate BugBug with other tools like Jira, Github, Zapier, etc .
- Test Components: You can create reusable test components that can be shared across multiple tests. This helps you to maintain your tests easily and avoid duplication.
Now we are looking into how to use BugBug to record and implement automation.
There is a video introduce about the tool https://youtu.be/Cbk8i0A27no, show us how easy to implement and run a test.
Instead writing code to control the behavior, BugBug like other LowCode/NoCode tool, it records all interaction of user on a feature then generate script that allow us to run/rerun and see the result.
Creating first test via Recording
- Create a new project

- Name it “Secret Project” and enter a URL that will be the starting point of your app
In our example use https://marmelab.com/react-admin-demo/

For the tool to record, we will need to install the extension
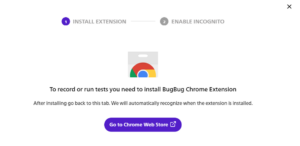
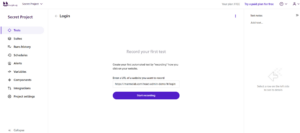
- Create a new test
We’re going to create a test that checks if login to our app works, so we will name it simply “Login”. In this case we are using functional testing – a type of software testing where the application under test is checked against its functional requirements.

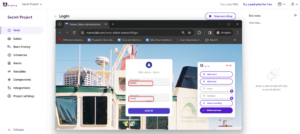
- Start the recording
Your test is empty for now. That means that it has no instructions – no test steps. The URL you entered before is already pre-filled, so you can click “start recording”.
- Wait 5-10 seconds until BugBug loads your page in an incognito window
Why incognito? Testing needs to always start from a clean state. There should be no cookies or browser cache for your page before starting the test.
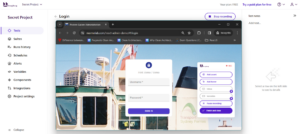
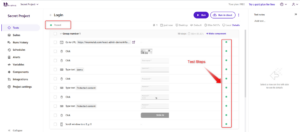
On the right side of the page, you can see a BugBug panel with actions dedicated to recording. We call it “recording overlay”. By default, BugBug records every click and keyboard typing, but using this panel you can also record additional special actions. BugBug is providing automation scripts as you click and navigate on the website.
- Carefully enter login credentials using “demo” for login and password fields
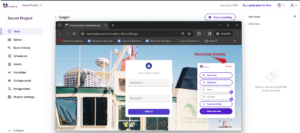
Why carefully? BugBug records every click, so it’s better to be slow while recording and think about every click. You don’t want to accidentally click in the empty background!
BugBug shows “Saved” after each click or keyboard typing. Each of these recorded actions will become a “test step”.
- Click “Sign in”
You should now see the “Secret Project” admin panel.
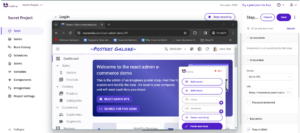
- Add an assertion
We’ve successfully logged in, now we need to create an instruction for BugBug that will check if the page actually has logged in. What should appear on the page that clearly tells us that the login worked? What should we assert?
Assertion = a test step that checks if something specific appears on the page, or if the page matches some specific expectations.
The simplest way of checking if the login has been successful is to check if the page shows some specific text. In our case we can assert if the text “Welcome to the react admin e-commerce demo” is visible. If it is visible everything is fine, if not, the test will fail.
Click “Assert” in the recording overlay

Click the text on the page that you want to check every time BugBug runs this test.
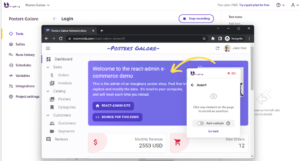
- Finish recording the test

See that everything you clicked is now recorded as “test steps”.
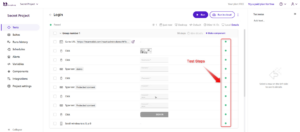
- Run the test to see if it works
We can check if the test passed or failed.
All your test steps are green! The login works as it should.
For a detailed guidance, please visit here https://docs.bugbug.io/in-depth-guides/beginners-tutorial-to-automation-testing
To be continued in the next posts …
Enjoy reading!!!
Reference:
https://bugbug.io/solutions/test-automation-for-qa/
https://bugbug.io/https://bugbug.io/solutions/test-automation-for-qa/