


If you’ve built modern web or mobile applications, you’ve almost certainly come across OAuth 2.0 and OpenID Connect (OIDC). They’re often mentioned in the same breath, sometimes confused with one another, and occasionally treated as if they’re the same thing.
But they’re not the same thing.
In this post, I’ll explain:
- What OAuth 2.0 actually does
- What OpenID Connect adds on top of it
- How PKCE and state parameters protect your OAuth flows
- When and why you should use each one
The Problem They Solve
Modern applications rarely work in isolation:
- Your frontend (web or mobile) talks to APIs
- APIs call other APIs
- Users sign in with Google, Apple, Microsoft, or enterprise identity providers
- You don’t want to handle passwords yourself (and you shouldn’t)
You need a secure, standardized way to:
- Authenticate users
- Let applications access APIs on behalf of users
- Avoid sharing credentials
- Support multiple clients (web, mobile, backend services)
This is where OAuth 2.0 and OIDC come in.
OAuth 2.0: Authorization, Not Authentication
What OAuth 2.0 Is
OAuth 2.0 is an authorization framework.
Its core purpose is straightforward:
Allow an application to access a resource on behalf of a user—without ever knowing the user’s credentials.
OAuth answers the question:
“Is this client allowed to do X on resource Y?”
But it does not answer:
“Who is the user?”
This distinction is critical.
Real-World Explain
Think of OAuth like a hotel key card:
- The card grants you access to certain rooms
- It doesn’t prove who you are
- It only proves what you’re allowed to access
Core OAuth Roles
OAuth defines four main roles:
- Resource Owner The user who owns the data.
- Client The application requesting access (web app, mobile app, or backend service).
- Authorization Server Issues tokens after the user grants consent (e.g., Auth0, Azure AD, Google).
- Resource Server The API that holds the protected data.
OAuth Tokens
OAuth introduces Access Tokens:
- Short-lived
- Sent with API requests (
Authorization: Bearer <token>) - Represent permissions (scopes), not identity
Example scopes:
read:photosupload:mediamanage:billingLimitation of OAuth
One thing to note that the access token from OAuth doesn’t necessarily have to be JWT, it means that it can be a string, a text such as ‘A21AAJxz_Pvi7ZIUPzFf9H3cUp’ or ‘$E@c&et’. So that it cannot reliably authenticate users.
- Access tokens are designed for APIs, not identity verification
- They can be opaque (unreadable)
- They may not contain user identity information
- OAuth doesn’t standardize how to identify a user
This is where OIDC comes in.
OpenID Connect (OIDC): Authentication Built on OAuth
What OIDC Is
OpenID Connect is an identity layer built on top of OAuth 2.0.
OIDC answers the question:
“Who is the user?”
What make the OIDC and OAuth different is the value ‘openid’ in the scope attribute, consider the below authorization_url of PayPal. When requesting an openid in the scope, the authorization server automatically know that you want to not only authorize user but also authenticate user, it will then response the idToken back along with accessToken
{ "access_token": "A21AAJxz_Pvi7ZIUPzFf9HebQ9ZSZsVM8hf0z9Y0", "id_token": "eyJhbGciOiJSUzI1NiIsImtpZCI6IjE2In0.eyJpc3MiOiJodHRwczovL2F1dGguZXhhbXBsZS5jb20iLCJzdWIiOiI4MzkyMDA5OCIsImF1ZCI6Im15LWNsaWVudC1pZCIsImVtYWlsIjoidXNlckBleGFtcGxlLmNvbSIsIm5hbWUiOiJKYW5lIERvZSIsImlhdCI6MTcxMjM0MDAwMCwiZXhwIjoxNzEyMzQzNjAwfQ.XYZ…", "token_type": "Bearer", "expires_in": 3600, "scope": "openid profile email"}
The ID Token
The key innovation in OIDC is the ID Token.
An ID Token is:
- A JWT (JSON Web Token)
- Issued by the authorization server
- Cryptographically signed
- Intended for the client, not APIs
Example claims inside an ID Token:
{ "iss": "<https://auth.example.com>", "sub": "123456789", "email": "user@example.com", "name": "Jane Doe", "exp": 1712345678}Common OAuth / OIDC Flows
Authorization Code Flow
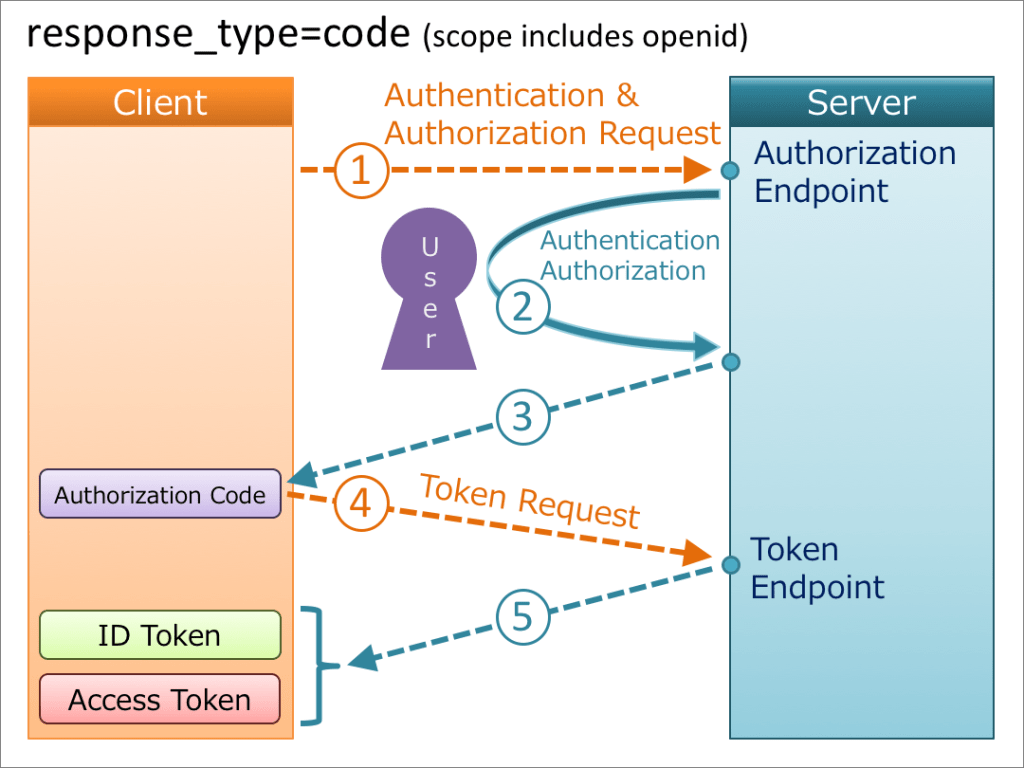
- The user is redirected to the Authorization Server
- The user authenticates (via password, MFA, biometrics, or SSO)
- The Authorization Server issues:
- ID Token → for the client (to verify identity)
- Access Token → for APIs (to grant authorization)
- The client:
- Reads user information from the ID Token
- Stores the Access Token
- The client calls the API with the Access Token
- The API validates the token and checks its scopes
Client Credentials Flow
The Client Credentials flow is used in server-to-server authentication. Since this flow does not include authorization, only endpoints that do not access user information can be accessed.
The following diagram shows how the Client Credentials Flow taken from Spotify works:
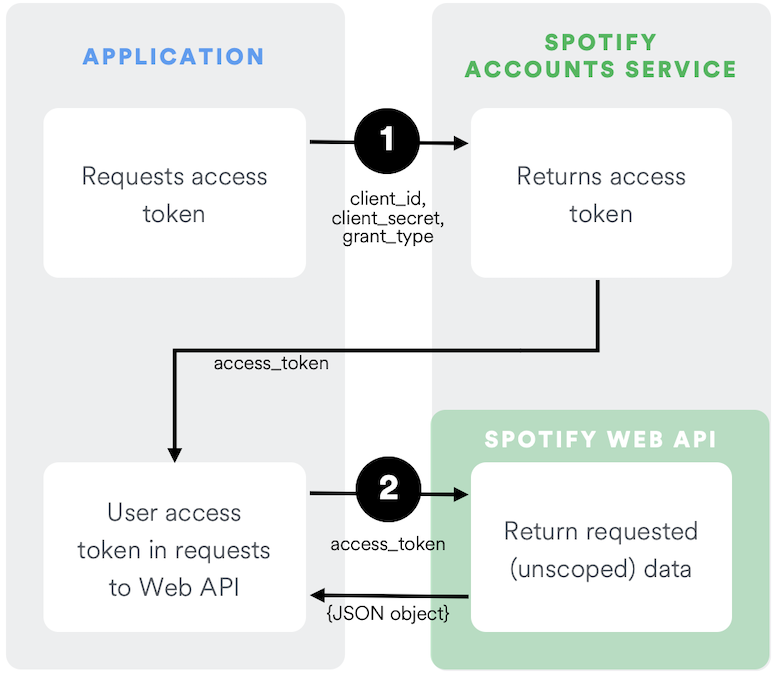
Reference: https://developer.spotify.com/documentation/web-api/tutorials/client-credentials-flow
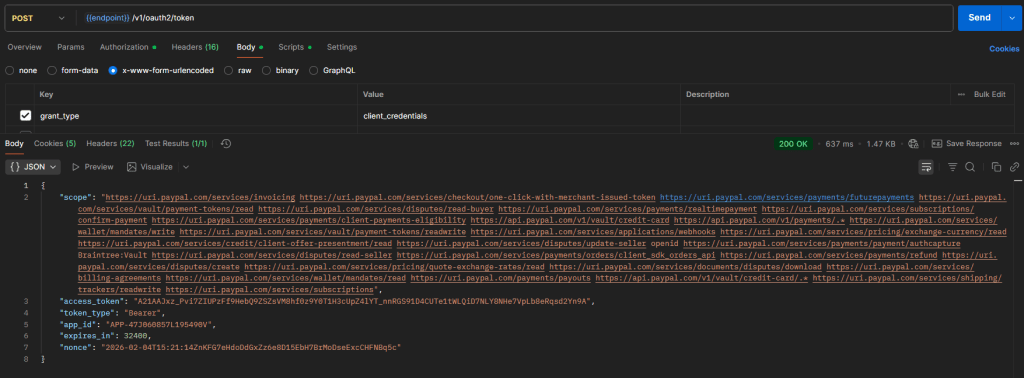
I prepare an example request which is from PayPal like this, it return the responses which contain the accessToken, and use Bearer token which combines ClientId, and Client Secret
PKCE (Proof Key for Code Exchange)
The Problem: Authorization Code Interception
In the traditional Authorization Code flow, there’s a vulnerability for public clients (apps that can’t securely store secrets):
- Attacker intercepts the authorization code (from the redirect URL)
- Attacker exchanges the code for tokens at the token endpoint
- Attacker gains access to the user’s account
This is especially risky for:
- Mobile apps (custom URL schemes can be hijacked)
- Single-page applications (no backend to hide secrets)
- Any scenario where the client secret can’t be kept confidential
The core issue: Without a client secret, anyone who intercepts the authorization code can use it.
How PKCE Solves This
PKCE adds a dynamic, one-time secret to the authorization flow.
Here’s how it works:
Step 1: Client creates a secret
// Generate a random code verifierconst codeVerifier = generateRandomString(43);// Create a code challenge from the verifierconst codeChallenge = base64UrlEncode(sha256(codeVerifier));Step 2: Authorization request
GET /authorize? response_type=code &client_id=myapp &redirect_uri=https://myapp.com/callback &code_challenge=E9Melhoa2OwvFrEMTJguCHaoeK1t8URWbuGJSstw-cM &code_challenge_method=S256The client sends the code challenge (hashed version) but keeps the code verifier secret.
Step 3: Token exchange
POST /tokenContent-Type: application/x-www-form-urlencodedgrant_type=authorization_code&code=AUTH_CODE_HERE&redirect_uri=https://myapp.com/callback&client_id=myapp&code_verifier=ORIGINAL_CODE_VERIFIERThe authorization server:
- Hashes the
code_verifier - Compares it to the
code_challengefrom step 2 - Only issues tokens if they match
Why this works:
- The attacker can intercept the authorization code
- But they don’t have the code verifier (it never left the client)
- Without the correct verifier, they can’t exchange the code for tokens
The State Parameter
The Problem: CSRF Attacks
Without proper protection, your OAuth flow is vulnerable to Cross-Site Request Forgery (CSRF) attacks:
Attack scenario:
- Attacker initiates an OAuth flow and captures the authorization response
- Attacker tricks the victim into visiting a malicious page
- The malicious page triggers the OAuth callback with the attacker’s authorization code
- The victim’s session is now linked to the attacker’s account
- The victim unknowingly uploads data to the attacker’s account
How State Solves This
The state parameter acts as a CSRF token for OAuth flows.
How it works:
Step 1: Generate a unique state value
// Before redirecting to authorization serverconst state = generateRandomString(32);// Store it in session or local storagesessionStorage.setItem('oauth_state', state);Step 2: Include state in authorization request
GET /authorize? response_type=code &client_id=myapp &redirect_uri=https://myapp.com/callback &scope=openid profile email &state=xyzABC123RandomStringStep 3: Validate state in callback
// In your callback handlerconst receivedState = urlParams.get('state');const storedState = sessionStorage.getItem('oauth_state');if (receivedState !== storedState) { throw new Error('Invalid state - possible CSRF attack');}Why this works:
- Each OAuth flow has a unique, unpredictable state value
- The attacker can’t guess or obtain the victim’s state value
- If the state doesn’t match, the flow is rejected
- Ties the authorization response to the specific user’s session