


Introduction
Daily status reporting is one of those small tasks that quietly consumes a lot of time. Every day, team members update an Excel sheet, and someone manually copies the latest status into an email, formats it, and sends it to stakeholders.
This process is simple, but it is repetitive. It also creates room for missed updates, formatting issues, delays, and manual errors.
To solve this, I created an automated workflow using Microsoft Excel, Power Automate, and Outlook. The final solution automatically reads daily status updates from an Excel table, formats the data into an email-friendly table, and sends the report to stakeholders at a scheduled time. It also skips weekends and can be configured to skip public holidays.
Business Problem
The original process looked like this:
- Team members updated a daily status Excel file.
- I opened the Excel file every day.
- I copied the relevant status rows.
- I pasted the content into Outlook.
- I formatted the email manually.
- I sent the report to stakeholders.
This worked, but it was not scalable. The goal was to automate the process so that the report could be sent without manual effort.
Objectives
The automation needed to:
- Read status updates from an Excel table.
- Include all valid rows from the daily status table.
- Remove blank rows.
- Format the status data into a clean email table.
- Send the email through Outlook.
- Run at a scheduled time every working day.
- Skip Saturdays and Sundays.
- Skip public holidays.
- Reduce manual copy-paste work.
Final Solution Overview
The final automation uses the following Microsoft 365 tools:
| Tool | Purpose |
| Excel Online | Stores daily status data |
| Power Automate | Runs the automation workflow |
| Outlook | Sends the stakeholder email |
| Holiday Table | Controls public holiday exclusions |
The flow runs on a schedule, checks whether the current day is a working day, reads the Excel table, filters the rows, creates an HTML table, styles the table, and sends the final email.
End-to-End Process Flow
Below is the flow diagram of the end-to-end process flow:
Team updates Excel
↓
Power Automate runs on schedule
↓
Check weekend / holiday
↓
Read DailyStatusTable
↓
Remove blank rows
↓
Create and style HTML table
↓
Send Outlook email to stakeholders
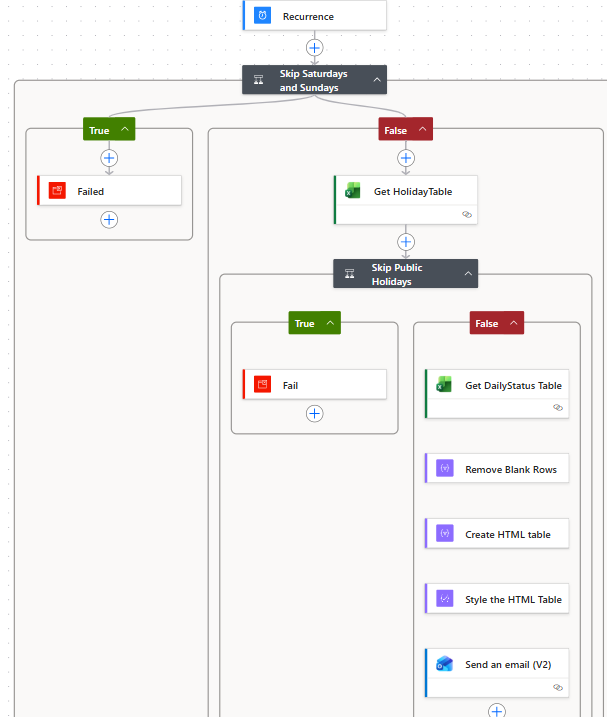
Step-by-Step guide
Step 1: Prepare the Excel Status Tracker
The first step is to prepare the Excel file properly.
Power Automate works best when Excel data is stored in a structured table, not just a normal range of cells. Therefore, the daily status data should be converted into an Excel table.
Example table columns:
| Date | Team Member | Project | Status | Completed Today | Plan for tomorrow | Blockers | RAG |
The table can be named: DailyStatusTable
This makes it easier to identify inside Power Automate.
A separate holiday table can also be created:
| HolidayDate | HolidayName |
| 2026-01-26 | Republic Day |
| 2026-08-15 | Independence Day |
| 2026-10-02 | Gandhi Jayanti |
This table can be named: HolidayTable
Step 2: Create a Scheduled Cloud Flow
In Power Automate, I created a scheduled cloud flow using the Recurrence trigger.
The recurrence trigger allows the flow to run automatically at a specific time every day.
Example schedule:
Frequency: Day
Interval: 1
Time zone: India Standard Time
Run time: 6:00 PM
This means the flow will start every day at the configured time.
However, because the report should not be sent on weekends or public holidays, additional checks are required after the schedule trigger.
Step 3: Skip Saturdays and Sundays
The next step is to check whether the current day is Saturday or Sunday.
In Power Automate, this can be done using a Condition action after the Recurrence trigger.
The weekend check expression is:
or(
  equals(dayOfWeek(convertTimeZone(utcNow(),'UTC','India Standard Time')),0),
  equals(dayOfWeek(convertTimeZone(utcNow(),'UTC','India Standard Time')),6)
)
Power Automate treats Sunday as 0 and Saturday as 6.
So this expression checks: Is today Sunday OR Saturday?
If the answer is yes, the flow terminates successfully and does not send the email.
If the answer is no, the flow continues.
Step 4: Skip Public Holidays
Weekends are predictable, but public holidays vary by country, company, and year. To make this flexible, I used a separate holiday table in Excel.
The flow reads the HolidayTable and checks if today’s date exists in that table.
If today is found in the holiday table, the flow stops.
If today is not found, the flow continues and prepares the report.
This approach is easy to maintain because public holidays can be updated directly in Excel without changing the Power Automate flow.
Step 5: Read Rows from the Daily Status Table
After passing the weekend and holiday checks, the flow reads the DailyStatusTable from Excel.
The Power Automate action used is:
Excel Online (Business) → List rows present in a table
This action pulls the rows from the Excel table and makes them available for the next steps.
One important lesson learned here is that Power Automate only reads rows that are inside the actual Excel table range. If rows are filled outside the table range, they may not be picked up.
To fix this, the Excel table should be resized to include all required rows.
Step 6: Remove Blank Rows
When the Excel table range includes extra empty rows, Power Automate may also include those blank rows in the email.
To avoid this, I added a Filter array action after reading the Excel rows.
The filter keeps only rows where a required column is not blank.
Example filter condition:
@not(empty(item()?[‘Team Member’]))
This means:
Keep only rows where Team Member is not empty.
You can use any column that should always be filled for a valid status row, such as Project, Status, or Team Member.
Step 7: Create an HTML Table
Once only valid rows remain, the next step is to convert the data into a table format suitable for email.
The Power Automate action used is:
Data Operations → Create HTML table
The input to this action should be the output of the Filter array step.
The table can be configured with custom columns so that only stakeholder-relevant fields are included.
Example columns:
| Header | Value |
| Team Member | Team Member |
| Project | Project |
| Status | Status |
| Completed Today | Completed Today |
| Plan for Tomorrow | Plan for Tomorrow |
| Blockers | Blockers |
| RAG | RAG |
This creates an HTML table that can be inserted into the Outlook email body.
Step 8: Style the HTML Table
The default HTML table generated by Power Automate can look very plain. To make the email more professional, I added a Compose action to apply basic styling.
The Compose action replaces the default table, header, and cell tags with styled versions.
Example styling expression:
replace(
replace(
replace(
body('Create_HTML_table'),
'<table>',
'<table style="border-collapse:collapse;width:100%;font-family:Arial;font-size:13px;">'
),
'<th>',
'<th style="border:1px solid #999;padding:8px;background-color:#f2f2f2;text-align:left;">'
),
'<td>',
'<td style="border:1px solid #999;padding:8px;text-align:left;">'
)
This improves the table by adding:
- Borders
- Padding
- Font styling
- Header background color
- Left alignment
- Full-width layout
Step 9: Send the Email Through Outlook
The final step is to send the report using Outlook.
The Power Automate action used is:
Office 365 Outlook → Send an email (V2)
The email body includes a short message and the styled HTML table.
Example email body:
Hello All,

Please find below today's status report.

@{outputs('Style_HTML_Table')}

Regards,
Prince
One important issue I faced was that the email initially included the table inside this type of output:
{“body”:”<table>…</table>”}
This happened because I inserted the full output object instead of only the HTML body.
The fix was to use:
body(‘Create_HTML_table’)
or, after styling:
outputs(‘Style_HTML_Table’)
This ensures only the actual HTML table is inserted into the email.
Benefits of the Automation
This automation provides several benefits:
- Saves time every day.
- Removes repetitive copy-paste work.
- Reduces formatting errors.
- Ensures consistent stakeholder communication.
- Sends the report on schedule.
- Skips weekends automatically.
- Can skip public holidays.
- Improves reliability and visibility.
- Allows the team to focus on project delivery instead of manual reporting.
Key Learnings
The biggest learning from this automation was that small repetitive tasks are great candidates for automation.
A process does not need to be complex to be worth automating. If a task is repeated daily, involves structured data, and follows predictable rules, it can usually be automated.
Another important learning was that Excel table structure matters. Power Automate reads official Excel tables, not just visually filled cells. Keeping the Excel file clean and structured makes the automation much more reliable.
Conclusion
By combining Excel, Power Automate, and Outlook, I was able to automate a daily stakeholder status report that previously required manual effort.
The solution reads status updates from Excel, filters valid rows, creates a formatted HTML table, and sends the email automatically at a scheduled time. It also includes logic to skip weekends and public holidays.
This type of automation is a practical example of how low-code tools can improve project management operations. It saves time, improves consistency, and reduces the chances of human error.
For project managers, implementation leads, and operations teams, this is a simple but powerful way to use automation in daily work.
The best part is that the same approach can be reused for many other recurring reports, such as:
- Weekly project summaries
- Risk and issue reports
- UAT progress reports
- Deployment readiness reports
- Team task updates
- Customer implementation reports
Automation does not always need to be large or complicated. Sometimes, the most valuable automation is the one that quietly saves time every single day.
If you want to learn more about Power Automate visit.
If you want to learn about the PESTEL Analysis, please click here.