


ESLint statically analyzes your code to quickly find problems. It is built with most text editors, and you can run ESLint as part of your continuous integration pipeline.
Prerequisite
To use ESLint, you must have Node.js (^18.18.0, ^20.9.0, or >=21.1.0) installed and built with SSL support. (If you are using an official Node.js distribution, SSL is always built in.)
We need to have a node.js project with a package.json file.
npm initInstall and Configure ESLint
Step 1: Install eslint
Install ESlint as the global library.
npm install eslint -gTest ESlint with the command
eslint -vStep 2: Install and Configure ESLint
Run the command
npm init @eslint/config@latest
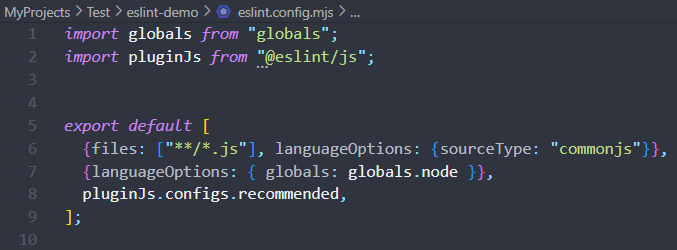
After that, we will have the eslint.config.mjs file
Step 3: Create a file and check ESLint
Create file eslint-check.js
for (let i = 0; i < 10; i--) {
}
for (let i = 10; i >= 0; i++) {
}
for (let i = 0; i > 10; i++) {
}
for (let i = 0; 10 > i; i--) {
}
const n = -2;
for (let i = 0; i < 10; i += n) {
}
class A extends B {
constructor() { } // Would throw a ReferenceError.
}
// Classes which inherits from a non constructor are always problems.
class C extends null {
constructor() {
super(); // Would throw a TypeError.
}
}
class D extends null {
constructor() { } // Would throw a ReferenceError.
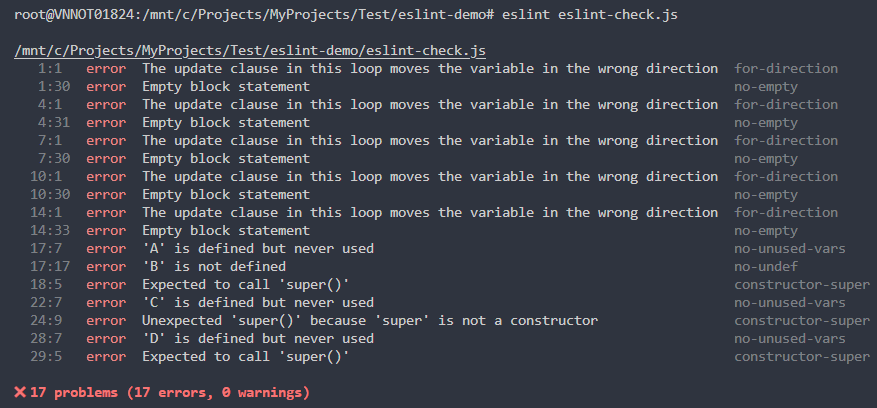
}Run Eslint to check
Step 4: ESLint check Security
We can use ESLint plugins to check security. Using this command to install eslint-plugin-security
npm install estlint-plugin-securityUpdate file eslint.config.mjs to allow check security with eslint.
import globals from "globals";
import pluginJs from "@eslint/js";
import pluginSecurity from "eslint-plugin-security";

export default [
  {files: ["**/*.js"], languageOptions: {sourceType: "commonjs"}},
  {languageOptions: { globals: globals.node }},
  pluginJs.configs.recommended,
  pluginSecurity.configs.recommended
];
Create index.js file to check security plugin
const fs = require('node:fs');
const testFunc = () => 'Test xemsao',

 myArray = ['a', 'b', 'c'],
 indexMap = myArray.reduce((memo, item, index) => {
    memo[item] = index;
    return memo;
  }, {});

  const path = req.body.userinput;
fs.readFile(path);

const userinput = req.body.userinput;
eval(userinput);

const unsafe = new RegExp('/(x+x+)+y/)');

console.log(indexMap);

const insecure = crypto.pseudoRandomBytes(5);

testFunc();
Run this command to check the security.
eslint index.jsAfter that, we can see some security issues in this file.

Step 5: Setup pre-git to ensure code quality
You can efficiently run the pre-commit and pre-push Git hooks to avoid breaking the local master branch or the remote master.
npm install pre-git --save-devSpecify commands to run on commit and push in your package.json under config > pre-git object.
"config": {
  "pre-git": {
    "enabled": true,
    "commit-msg": "simple",
    "pre-commit": [
      "eslint"
    ],
    "post-commit": "git status",
  }
}
Summary
When we start the Node.js project, we must install ESLint to ensure our code quality. By applying ESLint and pre-git in our project, we can ensure it is consistent with our project.