


In today’s fast-paced development landscape, automating deployment processes is not just a convenience but a necessity. If you’re a Spring Boot developer looking to deploy your application seamlessly to the cloud, you’re in the right place. This guide will walk you through the entire process of deploying your Spring Boot app to Azure App Service using the power of GitHub Actions.
Why Choose Azure App Service and GitHub Actions?
Before we dive into the deployment process, let’s take a moment to understand why Azure App Service and GitHub Actions are a winning combination.
Azure App Service offers a fully managed platform for building, deploying, and scaling web apps. Its seamless integration with various programming languages and frameworks, including Spring Boot, makes it an ideal choice for developers. Plus, features like auto-scaling, continuous deployment, and easy monitoring provide a robust environment for your applications.
GitHub Actions, on the other hand, provides powerful automation directly within your GitHub repository. It allows you to define custom workflows that trigger on various events, such as code pushes. This means you can automate your entire deployment process, reducing the risk of manual errors and ensuring consistent deployments every time.
Prerequisites: Setting the Stage for Deployment
Before we get our hands dirty with deployment, let’s ensure we have everything in place:
- Azure Account: To utilize Azure services, you’ll need an active Azure account. If you don’t have one, you can sign up for a free trial.
- GitHub Account: GitHub is a developer’s best friend. If you’re not on board yet, sign up for an account. You’ll use this to host your code and trigger deployment workflows.
- Java & Maven: You should have Java Development Kit (JDK) and Apache Maven installed. These tools are crucial for building your Spring Boot application before deployment.
With these prerequisites covered, let’s dive into the deployment process.
Step-by-Step Deployment Guide
1. Creating an Azure Web App:
start the deployment process, follow these steps to create an Azure Web App:
- Log in to Your Azure Portal: Access your Azure portal and initiate the creation of a new Web App.
- Define Resource Group: Choose or create a resource group to systematically organize and manage your resources collectively.
- Specify Web App Name: Select a distinctive name for your web app. This name will be a crucial part of the URL and should accurately depict the purpose of your application.
- Choose Operating System: Opt for the operating system that best aligns with your application’s requirements. Azure supports both Windows and Linux operating systems.
- Select Region: Decide on the geographical region of the data center where your web app will be hosted. This choice should consider your target audience and any latency considerations.

- Review and Validation: Before proceeding, meticulously review all the details you’ve provided. This ensures accuracy in the setup.

- Create: Once confident in the details, click the “Create” button to initiate the creation of your Azure Web App.
2. Pushing Your Code to GitHub:
Before we proceed further, it’s essential to have your Spring Boot application’s code hosted on GitHub. Here’s how to get it done:
- Create a GitHub Repository: If you haven’t already, create a new repository on GitHub to host your Spring Boot application’s code.
- Upload Your Code: Upload your application’s source code, ensuring that you include all necessary files, especially the
pom.xmlfile, which contains the project configuration. - Commit Changes: Commit your code changes to the repository. This establishes a version history and prepares your code for deployment.
3. Integrating Source Code and Deployment Workflow:
- Navigate to Deployment Centre: Within the newly created Web App, proceed to the “Deployment Centre” section. Here, you’ll configure the integration of your source code repository.
- Choose GitHub as Repository: As our chosen platform, select GitHub as the source code repository.
- Add Your Repository: Add your project repository from GitHub to the Azure Deployment Centre.
- Validation and Preview: After configuring the repository, ensure that the automated deployment YAML file (.yml) is correctly recognised by previewing it.

After choosing the project you need to click on Preview button to check .yml file
test.yml Code
# Docs for the Azure Web Apps Deploy action: https://github.com/Azure/webapps-deploy
# More GitHub Actions for Azure: https://github.com/Azure/actions

name: Build and deploy JAR app to Azure Web App - test-springboot-application

on:
  push:
    branches:
      - main
  workflow_dispatch:

jobs:
  build:
    runs-on: ubuntu-latest

    steps:
      - uses: actions/checkout@v2

      - name: Set up Java version
        uses: actions/setup-java@v1
        with:
          java-version: '8'

      - name: Build with Maven
        run: mvn clean install

      - name: Upload artifact for deployment job
        uses: actions/upload-artifact@v2
        with:
          name: java-app
          path: '${{ github.workspace }}/target/*.jar'

  deploy:
    runs-on: ubuntu-latest
    needs: build
    environment:
      name: 'Production'
      url: ${{ steps.deploy-to-webapp.outputs.webapp-url }}

    steps:
      - name: Download artifact from build job
        uses: actions/download-artifact@v2
        with:
          name: java-app

      - name: Deploy to Azure Web App
        id: deploy-to-webapp
        uses: azure/webapps-deploy@v2
        with:
          app-name: 'test-springboot-application'
          slot-name: 'Production'
          publish-profile: ${{ secrets.AZUREAPPSERVICE_PUBLISHPROFILE_B92DFA52B39242089E0A48785F5E86BE }}
package: '*.jar'- Save and Commit: Confirm your configuration and save it. This will automatically trigger a commit to your GitHub repository, initiating the deployment process.
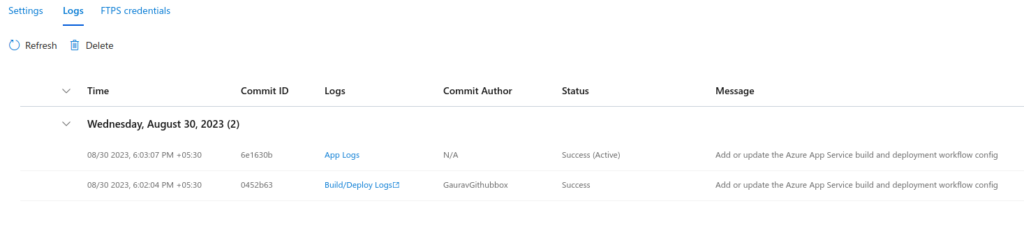
4. Monitoring Deployment and Application Status:
- GitHub Actions Status: Visit the GitHub Actions tab in your repository. Here, you’ll observe the build and deployment status. Both should ideally be indicated as successful (green).

- Deployment Confirmation: The successful deployment status indicates that your application has been successfully deployed to Azure App Service.
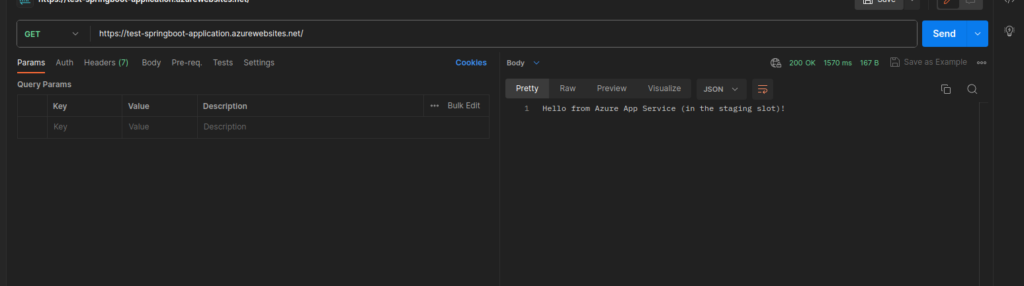
- Application Verification: Access your deployed application by using the URL associated with your Azure Web App. Confirm its functionality by assessing the response.
Conclusion:
With these well-defined steps, you’ve effectively deployed your Spring Boot application to Azure App Service using GitHub Actions. This streamlined process enhances both efficiency and consistency in your deployment workflow. The combination of Azure’s powerful hosting capabilities and GitHub Actions’ automation facilitates a seamless development experience.
By following these steps and understanding the integration of Azure and GitHub, you’ve embraced modern DevOps practices, equipping yourself with the skills to navigate the dynamic landscape of software deployment.