


Welcome back to our journey to Akka Agentic AI! In Akka Agentic AI: Our First Hello to Agentic AI System, we got introduced to our first ever Akka AI Agent. The next article, Akka Agent AI: Secret to Planning a Perfect Trip – Part 1, provides a step-by-step guide to get started with Akka Agentic AI.
We saw how Akka Agentic AI can help us plan our trip, suggesting places to visit, and ideal trip duration. However, the AI Agent lacked a hint of personalization in its recommendations. Imagine, the AI Agent suggesting a mountain for hiking to the User, but the User doesn’t like hiking. Also, what if recommendations for 2 or more users gets mixed up, since, AI Models are stateless.
This article will guide us through adding personalized recommendations for Users by:
- Creating an entity for User preferences
- Using the preferences from the AI Agent
- And, including a User Id in the endpoint
Add Preferences Entity
- Extend EventSourcedEntity, with the type of state this entity represents, and the interface for the events it persists.
- Annotate the class so Akka can identify it as an event-sourced entity.
- Define the command handler method to add a preference text.
- Define another command handler to retrieve all preferences.
- Updates of the Preferences state is performed from the persisted events.
import akka.Done;
import akka.javasdk.annotations.ComponentId;
import akka.javasdk.eventsourcedentity.EventSourcedEntity;
import com.example.domain.Preferences;
import com.example.domain.PreferencesEvent;

import java.util.List;

@ComponentId("preferences")
public class PreferencesEntity extends EventSourcedEntity<Preferences, PreferencesEvent> {

    public record AddPreference(String preference) {}

    @Override
    public Preferences emptyState() {
        return new Preferences(List.of());
    }

    public Effect<Done> addPreference(AddPreference command) {
        return effects()
                .persist(new PreferencesEvent.PreferenceAdded(command.preference()))
                .thenReply(__ -> Done.done());
    }

    public Effect<Preferences> getPreferences() {
        return effects().reply(currentState());
    }

    @Override
    public Preferences applyEvent(PreferencesEvent event) {
        return switch (event) {
            case PreferencesEvent.PreferenceAdded evt -> currentState()
                    .addPreference(evt.preference());
        };
    }
}
We also need the Preferences and the PreferencesEvent classes. For this use case, we are using simple text preferences, but you can use any structure.
Preferences
import java.util.ArrayList;
import java.util.List;

public record Preferences(List<String> entries) {
    public Preferences addPreference(String preference) {
        var newEntries = new ArrayList<>(entries);
        newEntries.add(preference);
        return new Preferences(newEntries);
    }
}
PreferencesEvent
import akka.javasdk.annotations.TypeName;

public sealed interface PreferencesEvent {
    @TypeName("preference-added")
    record PreferenceAdded(String preference) implements PreferencesEvent {}
}
Inject Preferences In Planning Agent
- Inject ComponentClient.
- Include user id in the request to the agent.
- Retrieve the preferences for the given user id.
- In addition to the original message, include the preferences in the user message to the LLM.
import akka.javasdk.agent.Agent;
import akka.javasdk.annotations.ComponentId;
import akka.javasdk.client.ComponentClient;
import com.example.entity.PreferencesEntity;

import java.util.stream.Collectors;

@ComponentId("planning-agent")
public final class PlanningAgent extends Agent {

    public record Request(String userId, String message) {}

    private static final String SYSTEM_MESSAGE =
            """
            You are a planning agent. Your job is to suggest places in the
            real world. Like for example, a metropolitan city, hill station, a costal region,
            a cruise trip, etc.
            """.stripIndent();

    private final ComponentClient componentClient;

    public PlanningAgent(ComponentClient componentClient) {
        this.componentClient = componentClient;
    }

    public Effect<String> query(Request request) {
        var allPreferences = componentClient
                .forEventSourcedEntity(request.userId())
                .method(PreferencesEntity::getPreferences)
                .invoke();

        String userMessage;
        if (allPreferences.entries().isEmpty()) {
            userMessage = request.message();
        } else {
            userMessage = request.message() +
                    "\nPreferences:\n" +
                    allPreferences.entries().stream().collect(Collectors.joining("\n", "- ", ""));
        }

        return effects()
                .systemMessage(SYSTEM_MESSAGE)
                .userMessage(userMessage)
                .thenReply();
    }
}
Making AI Agent Aware of User Preferences
The last step of making the Akka AI Agent’s recommendations more personalized is making it aware of User preferences.
It is a 2-step process:
1. Add userId to Planning Endpoint
- Add userId as a path parameter.
- Call the agent with the new PlanningAgent.Request record that includes the userId.
2. Provide Preferences via Endpoint
- Add a method to add a preference.
- Call the PreferenceEntity for the given userId.
import akka.javasdk.annotations.Acl;
import akka.javasdk.annotations.http.HttpEndpoint;
import akka.javasdk.annotations.http.Post;
import akka.javasdk.client.ComponentClient;
import com.example.application.PlanningAgent;
import akka.http.javadsl.model.HttpResponse;
import akka.javasdk.http.HttpResponses;
import com.example.entity.PreferencesEntity;

import java.util.UUID;

@Acl(allow = @Acl.Matcher(principal = Acl.Principal.INTERNET))
@HttpEndpoint
public class PlanningEndpoint {

    public record Request(String message) {}
    public record AddPreference(String preference) {}

    private final ComponentClient componentClient;

    public PlanningEndpoint(ComponentClient componentClient) {
        this.componentClient = componentClient;
    }

    @Post("/plans/{userId}")
    public String suggestActivities(String userId, Request request) {
        var sessionId = UUID.randomUUID().toString();
        return componentClient
                .forAgent()
                .inSession(sessionId)
                .method(PlanningAgent::query)
                .invoke(new PlanningAgent.Request(userId, request.message()));
    }

    @Post("/preferences/{userId}")
    public HttpResponse addPreference(String userId, AddPreference request) {
        componentClient
                .forEventSourcedEntity(userId)
                .method(PreferencesEntity::addPreference)
                .invoke(new PreferencesEntity.AddPreference(request.preference()));

        return HttpResponses.created();
    }
}
Last Step: Plan a Personalized Trip!
1. Set OpenAI API Key as environment variable
set OPENAI_API_KEY=<your-openai-api-key>2. Start the service locally
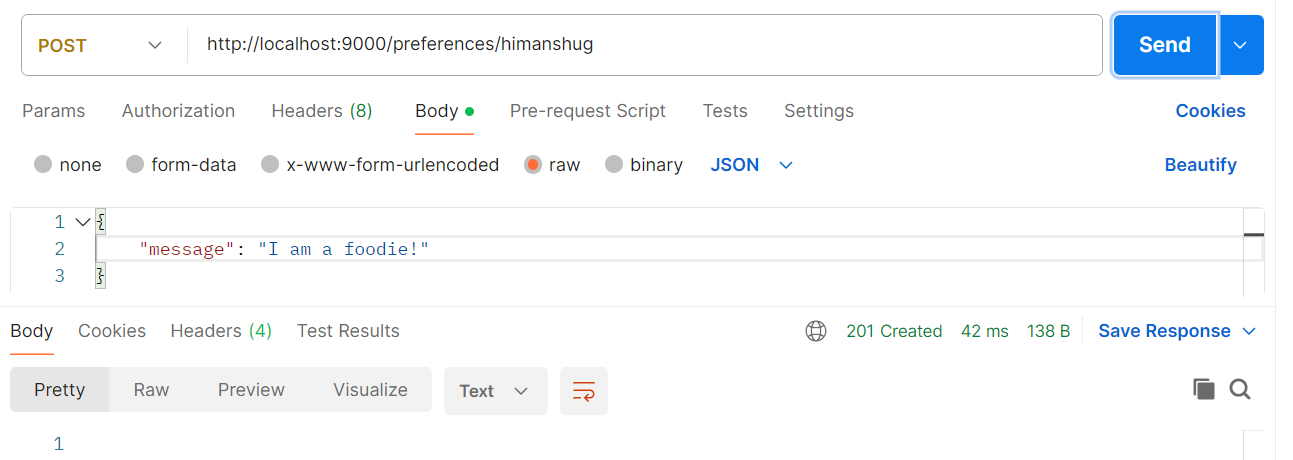
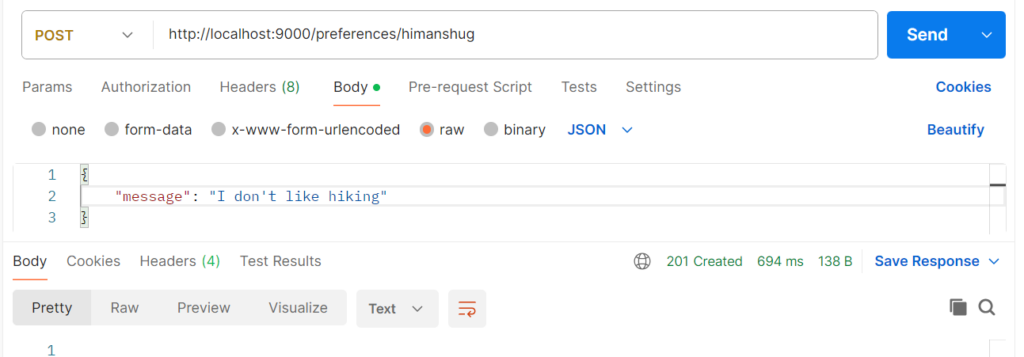
mvn compile exec:java3. Provide your Preferences
4. Plan Trip!
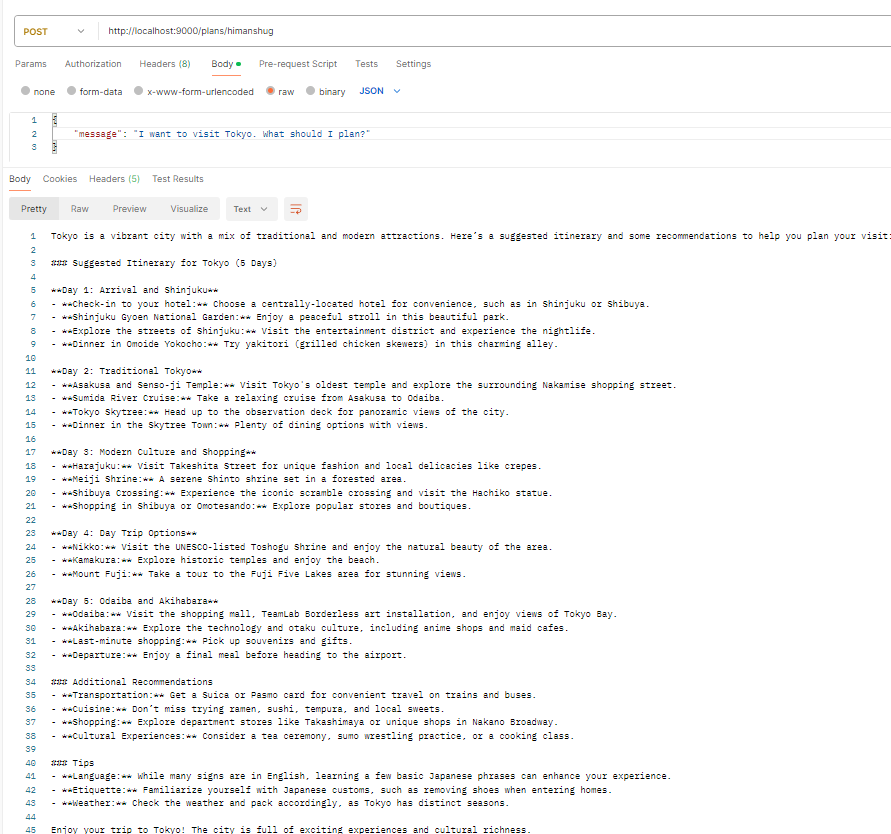
If you take a closer look at the recommendations, it has included more of dinning options in the itinerary.
Next Steps
In future we will take a deeper look at how we can align Planning AI Agent to consider the weather forecast before planning the trip. Also, we will learn more about the EventSourceEntity component to persist not just the current state but all events that led to the current state. This will help us in recovering in case of a failure.