


The core of every Angular application are components and directives, two essential building blocks that enable developers to create reusable and modular user interface elements. In this blog, we will dive into the world of Angular components and directives, exploring their functionalities, differences, and how they work together to enhance the development process.
Components
Angular components are the building blocks of an Angular application’s user interface. They are responsible for defining the visual elements, behavior, and interactions of a specific part of the UI. Each component encapsulates its own template, styles, and logic, making it a self-contained and reusable entity. By dividing the application into smaller, self-contained components, developers can efficiently manage complexity and enhance code reusablity.
Creating a component using Angular CLI
- From a terminal window, navigate to the directory containing your application.
- Run the ng generate component command, where is the name of your new component.
for example: ng generate component component_name - After generating the component, you will have the following files:

Building Reusable Components
By following the best practices and adopting a component-based architecture. Developers can create reusable components that easily integrate into different parts of the application or even share across projects.
Component Lifecycle Hooks
Angular provides several lifecycle hooks that allow developers to tap into specific moments in the lifecycle of a component. Commonly used hooks are ngOnInit, ngOnChanges, and ngOnDestroy.
Using a component in Angular
- Go to the component.html file and write the necessary HTML code.
<div class="center">
  <h1>NashTech</h1>
  <button class="btn" (click)="getNashTech()">Enter</button>
</div>- Go to the component.css file and write the necessary CSS code.
h1 {
line-height: .95;
color: #E14B22;
font-weight: 900;
font-size: 150px;
}- Write the corresponding code in component.ts file.
export class NashtechComponent {
  getNashTech() {
    window.open('https://www.nashtechglobal.com', '_blank');
  }
}- Run the Angular app using ng serve –open
Directives in Angular
Directives are special functions that execute whenever the Angular compiler encounters them. These Angular Directives extend the functionality of HTML elements by associating custom behaviors with the Document Object Model (DOM).
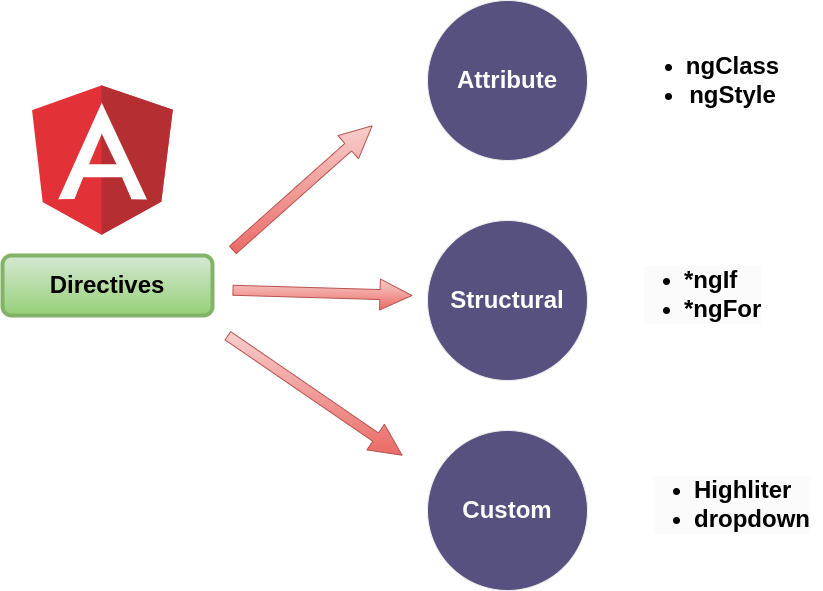
At a fundamental level, angular directives are classified into three different categories.
- Attribute Directives
- Structural Directives
- Custom Directives
Attribute Directives
Attribute Directives are components in Angular that allow you to modify the behavior or appearance of HTML elements by attaching them as attributes to those elements. These directives are responsible for manipulating the attributes of DOM elements, enabling dynamic changes to the way elements are displayed or behave based on certain conditions. for example-
- NgClass: This directive allows you to conditionally apply CSS classes to an element based on certain conditions. It’s commonly used to dynamically switch classes on or off. For instance in the below code we are applying bootstrap class to this element if
isShowDobis false then'bi bi-eye'else ‘bi bi-eye-slash‘.
<i [ngClass]="!user.isShowDob ? 'bi bi-eye': 'bi bi-eye-slash'"></i>
- NgStyle: NgStyle lets you dynamically set CSS styles on an element based on conditions or variables in your component.
[ngStyle]="{'background': 'blue'}"Structural Directives
Structural Directives are a type of directive in Angular that manipulate the structure of the DOM by adding, removing, or replacing elements based on certain conditions. These directives control the layout and composition of the HTML elements in your application. Structural directives have the ability to change the structure of the view by adding or removing elements from the DOM.
In Angular, Structural Directives are preceded by an asterisk (*) before their attribute name in the HTML code. Some of the commonly used Structural Directives are:
- NgIf: This directive conditionally adds or removes elements from the DOM based on a given expression. It’s often used to show or hide elements based on certain conditions. for example-
<td appRenderHighlight *ngIf="user.isShowDob">{{user.Age}}</td>- NgFor: NgFor is used to iterate over a collection (such as an array) and generate HTML elements for each item in the collection. It’s commonly used to render lists of items dynamically. For example, in this code we iterate over a list and creating rows for each item value in the list.
<tr *ngFor="let user of usersList">
  <th scope="row">{{user.id}}</th>
  <td>{{user.Name}}</td>
  <td>{{user.Email}}</td>
  <td>{{user.Mobile}}</td>
</tr>
Custom Directives
Creating custom directives in Angular allows you to extend HTML with your own behaviors and functionalities. Here’s a step-by-step guide on how to create custom directives:
1. Create a New Directive:
To begin, you need to create a new directive. You can generate one using Angular CLI or create the necessary files manually. Let’s assume you want to create a custom directive called mouseHover.
2. Generate the Directive:
If you’re using Angular CLI, open your terminal and navigate to your project directory. Run the following command to generate a new directive:
ng g d directives/mouseHoverThis will generate the directive files in the directives folder.
3. Define the Directive:
In your mouse-hover.directive.ts file, you’ll define your custom directive.
import { Directive, ElementRef, HostListener, Renderer2 } from '@angular/core';

@Directive({
  selector: '[appMouseHover]'
})
export class MouseHoverDirective {

  constructor(private element: ElementRef, private rederer: Renderer2) { }

  @HostListener('mouseenter') onmouseover(event: Event){
    this.rederer.setStyle(this.element.nativeElement, 'background-color','MediumSeaGreen')
  }

  @HostListener('mouseleave') onmousleave(event: Event){
    this.rederer.setStyle(this.element.nativeElement, 'background-color','grey')
  }

}
In this example, the directive changes the background color to ‘MediumSeaGreen’ of an element when the mouse enters and it change the color ‘grey’ when the mouse leaves.
4. Using the Custom Directive:
Now that your directive is created, you can use it in your HTML templates.
<div appMouseHover>
  Hover over me to highlight
</div>
5. Testing Your Directive:
Run your Angular application to see the custom directive in action. When you hover over the element with the appMouseHover directive, it should change its background color.
We have created a template you can get and run – https://github.com/NashTech-Labs/angular-custom-directives-example
Conclusion
Structural Directives empower developers to build dynamic and responsive views in Angular applications. By manipulating the structure of the DOM, these directives facilitate the creation of complex UI layouts and interactive components.