


Introduction
Azure Databricks is a powerful analytics platform built on Apache Spark, tailor-made for Azure. It fosters collaboration between data engineers, data scientists, and machine learning experts, facilitating their work on large-scale data and advanced analytics projects. On the other hand, Terraform, an open-source Infrastructure as Code (IaC) tool developed by HashiCorp, empowers users to define and provision infrastructure resources using a declarative configuration language.
Objective
In this guide, I’ll delve into the seamless integration of these two technologies using the Databricks Terraform provider. After that I will create CI/CD by writing YAML files then do the configuration on Azure DevOps. This combination offers several compelling advantages and is the recommended approach for efficiently managing Databricks workspaces and their associated resources in Azure.
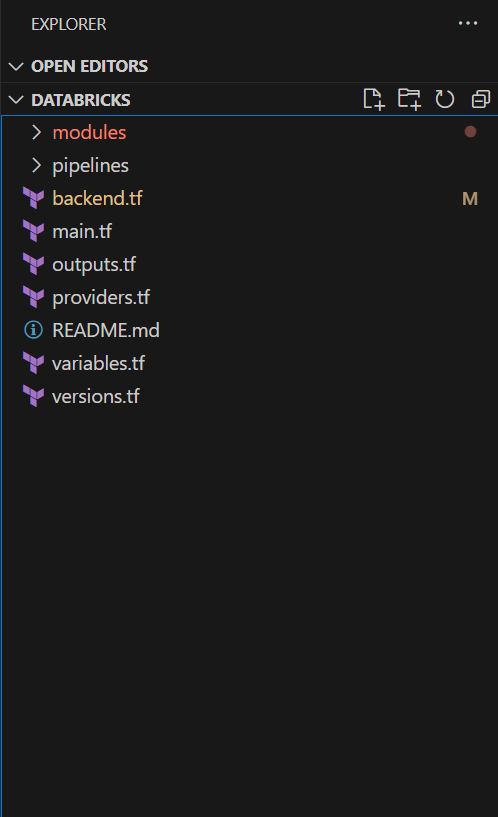
The Terraform code will be writent by using modular. This is best practice and more popular to use. Today, I will show you the way I provision Azure Databrick and other necessary resources as exhibit below:

Let’s get start write Terraform script by using modular
Setting Up Your Terraform Environment
Before we dive into the specifics, there are some prerequisites for successfully using Terraform and the Databricks Terraform provider:
Azure Account: Ensure you have an Azure account.
Azure Admin User: You need to be an account-level admin user in your Azure account.
Development Machine Setup: On your local development machine, you should have the Terraform CLI and Azure CLI installed and configured. Make sure you are signed in via the az login command with a user that has Contributor or Owner rights to your subscription.
Project Structure
Organize your project into a folder for your Terraform scripts, let’s call it “databricks.” We will create several configuration files to handle authentication and resource provisioning.
In your Terraform project, create a versions.tf file to specify the Terraform version and required providers:
Version and Provider Configuration
terraform {
  required_version = ">= 1.2, < 1.5"
  required_providers {
    azurerm = {
      source = "hashicorp/azurerm"
    }
    databricks = {
      source  = "databricks/databricks"
      version = "1.28.0"
    }
  }
}
Now, let’s define the providers in a providers.tf file:
provider "azurerm" {
features {}
}
provider "databricks" {
# We'll revisit this section later
}
We’ll return to the Databricks provider configuration shortly.
Backend Configuration
terraform {
  backend "azurerm" {
  }
}
Getting started writing the Terraform script to build Azure Databricks infrastructure.
First, I will create a project struture like
Step 1: Write Microsoft Entra ID module
I need this module, because it will help to create an App registrations in Microsoft Entra ID and it is also create client secret so we can write the output the usage later. For example: I will store in the Azure Keyvault let Databricks can retrieve this data more secure.
data "azurerm_client_config" "current" {
}

data "azuread_client_config" "current_ad" {

}

resource "azuread_application" "app" {
  display_name = join("-", [var.resource_type,var.application,var.application_environment,var.region_short])
  owners       = [data.azuread_client_config.current_ad.object_id]
}

resource "azuread_service_principal" "sp" {
  application_id = azuread_application.app.application_id
  use_existing   = true
}

resource "time_rotating" "tro" {
  rotation_days = var.rotation_days
}

resource "azuread_application_password" "pass" {
  application_object_id = azuread_application.app.object_id
  display_name = join("-", [var.resource_type,var.application,var.application_environment,var.region_short])
  rotate_when_changed = {
    rotation = time_rotating.tro.id
  }
}
This module will help to create an app registrations, client secret and service principle in Microsoft Entra ID. It will require the permission when we deploy it later. Please refer the document for more detail https://registry.terraform.io/providers/hashicorp/azuread/latest/docs/resources/application#api-permissions.
Step 2: Create a resource group
# Create a resource group
resource "azurerm_resource_group" "rg" {
  name     = join("-", [var.resource_type,var.application,var.application_environment,var.region_short])
  location = var.region
  tags = merge(var.default_tags,{
    Env = var.application_environment
  })
}
Step 3: Create a Virtual Network (Vnet) – Optional, but Important
Whether to create a Vnet depends on your specific use case. If you’re exclusively using Azure Databricks and don’t require outbound access or a high level of security, you can skip this step. However, if you need to interact with services outside of Azure, it’s advisable to create a Vnet.
Consider the scenario where you want Azure Databricks to access MongoDB Atlas, which resides outside of Azure. MongoDB Atlas secures its infrastructure by allowing specific IPs in a whitelist. However, exposing Azure Databricks to the internet isn’t an ideal solution. Instead, you can create a Vnet and set up peering or a private endpoint.
It’s essential to note that you can’t add a Vnet to an existing workspace. Once a workspace is created, its configurations are registered in the Control Plane and can’t be modified.
Within this Vnet, we’ll create two subnets: a public subnet and a private subnet. We’ll also implement a network security group (NSG) to manage security for the Vnet.
resource "azurerm_virtual_network" "vnet" {
  name                     = join("-", [var.resource_type,var.application,var.application_environment,var.region_short])
  resource_group_name      = var.resource_group_name
  location                 = var.region
  address_space            = [var.cidr]

   tags = merge(var.default_tags,{
    Env                  = var.application_environment,
    ApplicationName      = "Databricks"
  })
}

resource "azurerm_network_security_group" "nsg" {
  name                = join("-", ["nsg",var.application,var.application_environment,var.region_short])
  resource_group_name      = var.resource_group_name
  location                 = var.region
}

resource "azurerm_subnet" "public" {
  name                 = "subnet-public"
  resource_group_name  = var.resource_group_name
  virtual_network_name = azurerm_virtual_network.vnet.name
  address_prefixes     = [cidrsubnet(var.cidr, 3, 0)]

  delegation {
    name = "databricks"
    service_delegation {
      name = "Microsoft.Databricks/workspaces"
      actions = [
        "Microsoft.Network/virtualNetworks/subnets/join/action",
        "Microsoft.Network/virtualNetworks/subnets/prepareNetworkPolicies/action",
        "Microsoft.Network/virtualNetworks/subnets/unprepareNetworkPolicies/action"]
    }
  }
}

resource "azurerm_subnet_network_security_group_association" "public" {
  subnet_id                 = azurerm_subnet.public.id
  network_security_group_id = azurerm_network_security_group.nsg.id
}

resource "azurerm_subnet" "private" {
  name                 = "subnet-private"
  resource_group_name  = var.resource_group_name
  virtual_network_name = azurerm_virtual_network.vnet.name
  address_prefixes     = [cidrsubnet(var.cidr, 3, 1)]

  delegation {
    name = "databricks"
    service_delegation {
      name = "Microsoft.Databricks/workspaces"
      actions = [
        "Microsoft.Network/virtualNetworks/subnets/join/action",
        "Microsoft.Network/virtualNetworks/subnets/prepareNetworkPolicies/action",
        "Microsoft.Network/virtualNetworks/subnets/unprepareNetworkPolicies/action"]
    }
  }
}

resource "azurerm_subnet_network_security_group_association" "private" {
  subnet_id                 = azurerm_subnet.private.id
  network_security_group_id = azurerm_network_security_group.nsg.id
}
Step 4: Create a Storage account and Data Lake
Azure has 2 services about Data Lake. But now the Azure Data Lake Storage Gen 2 is more popular. Azure Data Lake Storage Gen2 is a set of capabilities dedicated to big data analytics, built on Azure Blob Storage. Data Lake Storage Gen2 makes Azure Storage the foundation for building enterprise data lakes on Azure. So we only write a module for Storage account then we can flexible create Storage account or Data Lake by custom the parameters.
Here is the module for Storage Account or Data Lake
# Create a Storage Account
resource "azurerm_storage_account" "st" {
  # the below will create a unique number for each resource if required, as long as the for_each command is uncommented in the random integer block above

  name                            = join("", [var.resource_type,var.application,var.application_environment,var.region_short])
  resource_group_name             = var.resource_group_name
  location                        = var.region
  account_tier                    = "Standard"
  account_replication_type        = "LRS"
  min_tls_version                 = "TLS1_2"
  allow_nested_items_to_be_public = false
  account_kind                    = "StorageV2"
  is_hns_enabled                  = var.is_hns_enabled

  static_website {
    error_404_document = "errors.html"
    index_document     = "index.html"
  }

  tags = merge(var.default_tags,{
    Env = var.application_environment
    ApplicationName = "Databricks"
  })
}

resource "azurerm_storage_container" "st_container" {
  name                  = var.container_name
  storage_account_name  = azurerm_storage_account.st.name
  container_access_type = "private"
}
Step 5: Create Azure Databricks service
resource "azurerm_databricks_workspace" "dbw" {
  name                          = join("-", [var.resource_type,var.application,var.application_environment,var.region_short])
  resource_group_name      = var.resource_group_name
  location                 = var.region
  sku                           = "premium"
  managed_resource_group_name   = join("-", ["rg","databrick-managed",var.application_environment,var.region_short])
  public_network_access_enabled = var.public_network_access_enabled
  custom_parameters {
    no_public_ip                                         = var.no_public_ip
    virtual_network_id                                   = var.vnet_id
    private_subnet_name                                  = var.private_subnet_name
    public_subnet_name                                   = var.public_subnet_name
    public_subnet_network_security_group_association_id  = var.public_nsg_ass_id
    private_subnet_network_security_group_association_id = var.private_nsg_ass_id
  }
  depends_on = [var.public_nsg_ass, var.private_nsg_ass ]

   tags = merge(var.default_tags,{
    Env = var.application_environment,
    ApplicationName = upper(var.application)
  })
}

data "databricks_node_type" "dbr_node_type" {
  local_disk = true
  depends_on = [azurerm_databricks_workspace.dbw]
}

data "databricks_spark_version" "dbr_spark" {
  long_term_support = true
  depends_on        = [azurerm_databricks_workspace.dbw]
}

resource "databricks_instance_pool" "dbr_instance_pool" {
  instance_pool_name = join("-", ["pool",var.application,var.application_environment,var.region_short])
  min_idle_instances = 0
  max_capacity       = 5
  node_type_id       = data.databricks_node_type.dbr_node_type.id

  idle_instance_autotermination_minutes = 30

  azure_attributes {
    availability       = "ON_DEMAND_AZURE"
    spot_bid_max_price = -1
  }

  disk_spec {
    disk_type {
      azure_disk_volume_type = "PREMIUM_LRS"
    }
    disk_size  = 80
    disk_count = 1
  }
}

resource "databricks_cluster" "cluster" {
  cluster_name  = join("-", ["dbc",var.application,var.application_environment,var.region_short])
  spark_version = data.databricks_spark_version.dbr_spark.id
  node_type_id = data.databricks_node_type.dbr_node_type.id
  autotermination_minutes = 30
  autoscale {
    min_workers = 2
    max_workers = 5
  }
  spark_conf = {
    "spark.databricks.io.cache.enable" : true
  }
  depends_on       = [azurerm_databricks_workspace.dbw]
}
When creating a Azure Databrick service, it will be automatically provisioned one more managed resource group that is managed by Azure. So, I would like to custom the managed resource group name. In addition, I setup some default configuration like: scaling, autoterminal, vnet, subnet with network security group rule. Because, everything resource will be depended on Azure Databricks workspace then it must be require list out the depends_on to make sure the workspace will be created first.
Step 6: Create Azure Key Vault
To store the sensitive data for secure configuration. Here I also configured the service principle above will have a permission to access and retrieve the content of KV service.
resource "azurerm_key_vault" "kv" {
  # The key vault name is glboally unique across all azure tenants
  name                     = join("-", [var.resource_type,var.application,var.application_environment,var.region_short])
  resource_group_name      = var.resource_group_name
  location                 = var.region
  enabled_for_disk_encryption = true
  tenant_id                   = var.tenant_id
  #soft_delete_enabled         = true       # no longer configurable, enabled by default
  soft_delete_retention_days  = 7
  purge_protection_enabled    = false

  sku_name = "standard"


  lifecycle {
    # prevent_destroy = true
  }

  access_policy {
    tenant_id = var.tenant_id
    object_id = var.object_id

    key_permissions = [
          "Get",
          "List",
          "Purge",
          "Create",
          "Update",
        ]

      ## this sets the permissions for the object
        secret_permissions = [
          "Get",
          "List",
          "Delete",
          "Set",
          "Purge",
        ]

        storage_permissions = [
          "Get",
          "List",
          "Set",
        ]


        certificate_permissions = [
          "Get",
          "List",
          "Create",
          "Purge",
          "Import",
          "Update",
        ]
  }

  ## This sets the access policy for the Managed Identity so that development can access the secrets/certs
  access_policy {
    tenant_id = var.tenant_id
    object_id = var.service_principal_id  ## id of the identity created for the application
    key_permissions = [
      "Get",
      "List",
    ]

  ## this sets the permissions for the object
    secret_permissions = [
      "Get",
      "List",
    ]

    storage_permissions = [
      "Get",
      "List",
    ]


    certificate_permissions = [
      "Get",
      "List",
    ]
  }

  tags = merge(var.default_tags,{
    Env = var.application_environment,
    ApplicationName = upper(var.application)
  })
}
Step 7: Write role assignment module
This module we use a lot. This help us easy to assign the resources to the scope we want with the role needed. For example: We need to make configuration for Databricks can ingest data using Autoloader feature with file notification or Databricks can access the blob storage account…
resource "azurerm_role_assignment" "role" {
scope = var.scope
role_definition_name = var.role_definition_name
principal_id = var.principal_id
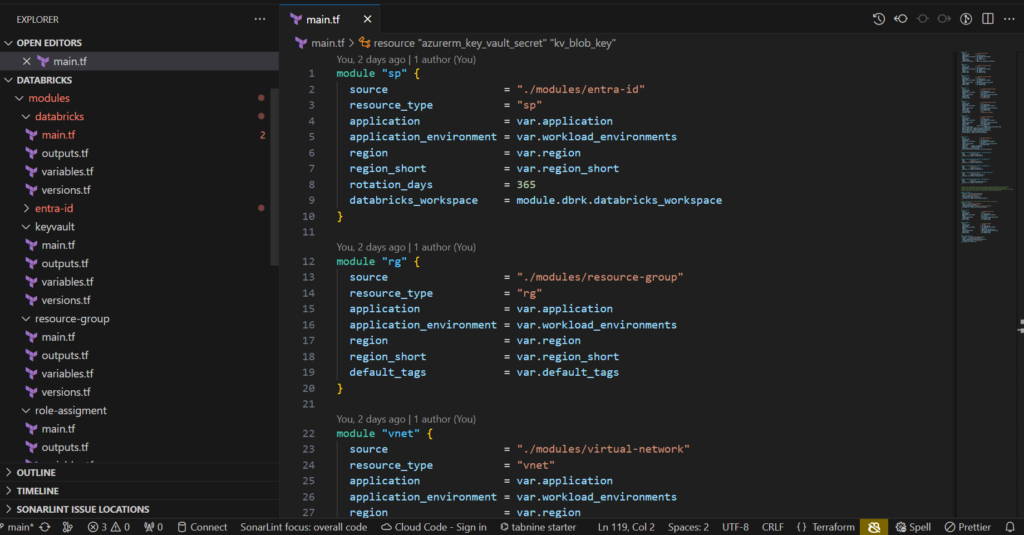
}Step 8: Call modules to main.tf file to complete the code
Let’s finish the code by calling all modules needed to main file
module "sp" {
  source                  = "./modules/entra-id"
  resource_type           = "sp"
  application             = var.application
  application_environment = var.workload_environments
  region                  = var.region
  region_short            = var.region_short
  rotation_days           = 365
  databricks_workspace    = module.dbrk.databricks_workspace
}

module "rg" {
  source                  = "./modules/resource-group"
  resource_type           = "rg"
  application             = var.application
  application_environment = var.workload_environments
  region                  = var.region
  region_short            = var.region_short
  default_tags            = var.default_tags
}

module "vnet" {
  source                  = "./modules/virtual-network"
  resource_type           = "vnet"
  application             = var.application
  application_environment = var.workload_environments
  region                  = var.region
  resource_group_name     = module.rg.resource_group_name
  region_short            = var.region_short
  default_tags            = var.default_tags
}

module "st" {
  source                          = "./modules/storage-account"
  resource_type                   = "st"
  application                     = var.application
  application_environment         = var.workload_environments
  region                          = var.region
  resource_group_name             = module.rg.resource_group_name
  region_short                    = var.region_short
  default_tags                    = var.default_tags
  container_name                  = "insights-data"
}

module "dl" {
  source                          = "./modules/storage-account"
  resource_type                   = "dl"
  application                     = var.application
  application_environment         = var.workload_environments
  region                          = var.region
  resource_group_name             = module.rg.resource_group_name
  region_short                    = var.region_short
  default_tags                    = var.default_tags
  is_hns_enabled                  = true
  container_name                  = "application-insights"
}

module "dbrk" {
  source                          = "./modules/databricks"
  resource_type                   = "dbw"
  application                     = var.application
  application_environment         = var.workload_environments
  region                          = var.region
  resource_group_name             = module.rg.resource_group_name
  region_short                    = var.region_short
  default_tags                    = var.default_tags
  vnet_id                  = module.vnet.vnet_id
  private_subnet_name                  = module.vnet.private_subnet_name
  public_subnet_name = module.vnet.public_subnet_name
  public_nsg_ass_id = module.vnet.public_nsg_ass_id
  private_nsg_ass_id = module.vnet.private_nsg_ass_id
  public_nsg_ass = module.vnet.public_nsg_ass
  private_nsg_ass = module.vnet.private_nsg_ass

}

module "kv" {
  source                         = "./modules/keyvault"
  resource_type                  = "kv"
  application                    = var.application
  application_environment        = var.workload_environments
  region                         = var.region
  resource_group_name            = module.rg.resource_group_name
  region_short                   = var.region_short
  tenant_id      = module.sp.tenant_id
  object_id      = module.sp.object_id
  default_tags = var.default_tags
  service_principal_id = module.sp.service_principal_id
}

resource "azurerm_key_vault_secret" "kv_client_secret" {
  name         = "client-secret"
  value        = module.sp.app_secret
  key_vault_id = module.kv.key_vault_id
}

resource "azurerm_key_vault_secret" "kv_client_id" {
  name         = "client-id"
  value        = module.sp.client_id
  key_vault_id = module.kv.key_vault_id
}

resource "azurerm_key_vault_secret" "kv_tenant_id" {
  name         = "tenant-id"
  value        = module.sp.tenant_id
  key_vault_id = module.kv.key_vault_id
}

resource "azurerm_key_vault_secret" "kv_subscription_id" {
  name         = "subscription-id"
  value        = module.sp.subscription_id
  key_vault_id = module.kv.key_vault_id
}

resource "azurerm_key_vault_secret" "kv_blob_key" {
  name         = "blob-key"
  value        = module.st.account_access_key
  key_vault_id = module.kv.key_vault_id
}


# Assign the role to DBW can work with storage and using Autoloader file notifications
# https://docs.databricks.com/en/ingestion/auto-loader/file-notification-mode.html
# https://learn.microsoft.com/en-us/azure/databricks/getting-started/connect-to-azure-storage
# Grant permission to read blobs as cloud files on Azure Storage Account

module "st_roles" {
  for_each = var.roles_definition_name
  source = "./modules/role-assigment"
  scope = module.st.account_id
  role_definition_name = each.value
  principal_id = module.sp.service_principal_id
}

# Grant permission to create blobs as external table on Data Lake
module "dl_roles" {
  source = "./modules/role-assigment"
  scope = module.dl.account_id
  role_definition_name ="Storage Blob Data Contributor"
  principal_id = module.sp.service_principal_id
}


module "dbw_roles" {
  for_each = var.databricks_administrators
  source = "./modules/role-assigment"
  scope = module.dbrk.databricks_workspace_id
  role_definition_name = "Contributor"
  principal_id = each.value
}
One thing very important here: Because I am using write Terraform by using module concept so it requires to have a versions.tf file on each module. If not specify this it may have an error occurs when the required_providers block is not defined in every module that uses the Databricks Terraform provider. https://kb.databricks.com/en_US/terraform/terraform-registry-does-not-have-a-provider-error.
Creating a YAML CI/CD Configuration
Writing a build.yaml file for the CI
parameters:
- name: buildTag # defaults for any parameters that aren't specified
  default: ''
- name: vmImage
  default: ''

stages:
- stage: CI
  pool:
    vmImage: ${{ parameters.vmImage }}
  jobs:
  - job: Build
    displayName: Build
    steps:
    - checkout: self
      clean: 'true'
      path: s

    - task: Bash@3
      inputs:
        targetType: 'inline'
        script: "GIT_COMMIT=$(git rev-parse --short HEAD)\necho \"GIT_COMMIT: ${GIT_COMMIT}\"         \n# set env variable to allow next task to consume\necho \"##vso[task.setvariable variable=GIT_COMMIT]${GIT_COMMIT}\"\n"

    - task: PublishBuildArtifacts@1
      displayName: 'Publish Artifact: drop'
      inputs:
        PathtoPublish: '$(Build.SourcesDirectory)'
        ArtifactName: 'drop-${{ parameters.buildTag }}'
        publishLocation: 'Container'
Writing a deploy.yaml file for the CD
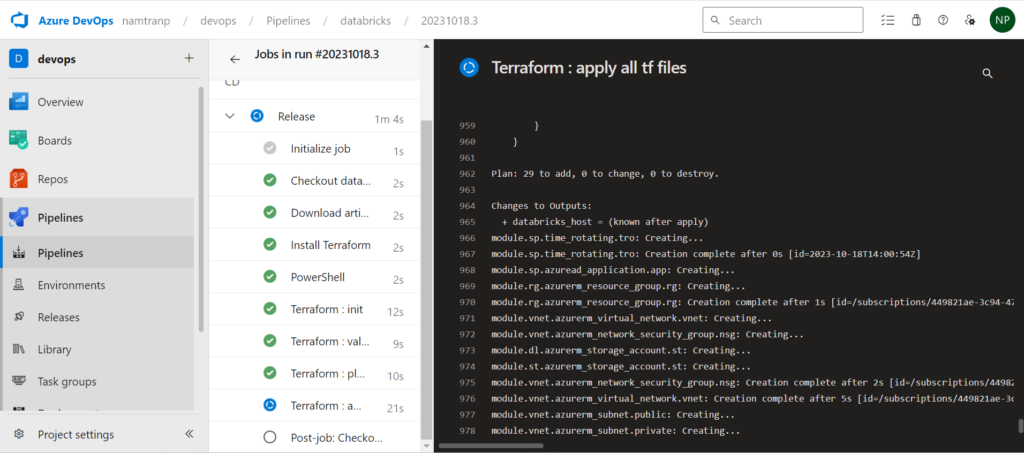
The best practice for deploying Terraform that we should use remote state. In this article I use a separate storage account to store the state. From the agent which will run the pipeline will install the Terraform then initialize the state and backend info. Next it will runs checks that verify whether a configuration is syntactically valid and internally consistent, regardless of any provided variables or existing state. After that execution plan, which lets you preview the changes that Terraform plans to make to your infrastructure. I also prepared destroy task if needed, but now I disable it, if you need you can enable it later. Finally it will apply with auto approve option.
stages:
- stage: CD
  jobs:
  - job: Release
    displayName: Release
    continueOnError: false
    pool:
      vmImage: $(vmImageName)
    steps:
    - task: DownloadPipelineArtifact@2 # Use the Download Pipeline Artifact task
      displayName: 'Download artifact'
      inputs:
        buildType: 'current'
        targetPath: '$(Pipeline.Workspace)'
        artifactName: 'drop-$(tag)'

    - task: TerraformInstaller@1
      displayName: 'Install Terraform'
      inputs:
        terraformVersion: 1.3.7

    - powershell: "$env:TF_LOG = \"DEBUG\"\ndir \"$(Pipeline.Workspace)\" \n"
      enabled: true

    - task: TerraformTaskV4@4
      displayName: 'Terraform : init'
      inputs:
        provider: 'azurerm'
        workingDirectory: '$(Pipeline.Workspace)'
        backendServiceArm: 'databricks-nonprod'
        backendAzureRmResourceGroupName: 'rg-terraform-non-prod-weu'
        backendAzureRmStorageAccountName: 'stteranonprodweu'
        backendAzureRmContainerName: 'pipeline-databricks'
        backendAzureRmKey: 'terraform.tfstate'

    - task: TerraformTaskV4@4
      displayName: 'Terraform: validate - validation tf'
      inputs:
        command: validate
        workingDirectory: '$(Pipeline.Workspace)'
        provider: 'azurerm'
        environmentServiceNameAzureRM: 'databricks-nonprod'

    - task: TerraformTaskV4@4
      displayName: 'Terraform: plan - list out resources'
      inputs:
        command: plan
        workingDirectory: '$(Pipeline.Workspace)'
        commandOptions: '-no-color'
        provider: 'azurerm'
        environmentServiceNameAzureRM: 'databricks-nonprod'
      enabled: true

    - task: TerraformTaskV4@4
      displayName: 'Terraform: destroy - delete all resources'
      inputs:
        command: destroy
        workingDirectory: '$(Pipeline.Workspace)'
        provider: 'azurerm'
        environmentServiceNameAzureRM: 'databricks-nonprod'
      enabled: false

    - task: TerraformTaskV4@4
      displayName: 'Terraform : apply all tf files'
      inputs:
        command: apply
        workingDirectory: '$(Pipeline.Workspace)'
        commandOptions: '-no-color'
        provider: 'azurerm'
        environmentServiceNameAzureRM: 'databricks-nonprod'
      enabled: true
Create an Azure pipelines
I’ve crafted an azure-pipelines.yaml file designed to invoke the two YAML files mentioned above using templates. This approach offers a streamlined way to segment the code, making it simpler to handle and maintain.
# azure-pipeline.yml
trigger:
- main

variables:
  tag: '$(Build.BuildNumber)-$(Build.SourceBranchName)-$(Build.BuildId)'
  vmImageName: 'ubuntu-latest'

stages:
- template: build.yaml # Template reference to ci.yml
  parameters:
    buildTag: $(tag)
    vmImage: $(vmImageName)
- template: deploy.yaml # Template reference to cd.yml
Setting up Azure DevOps
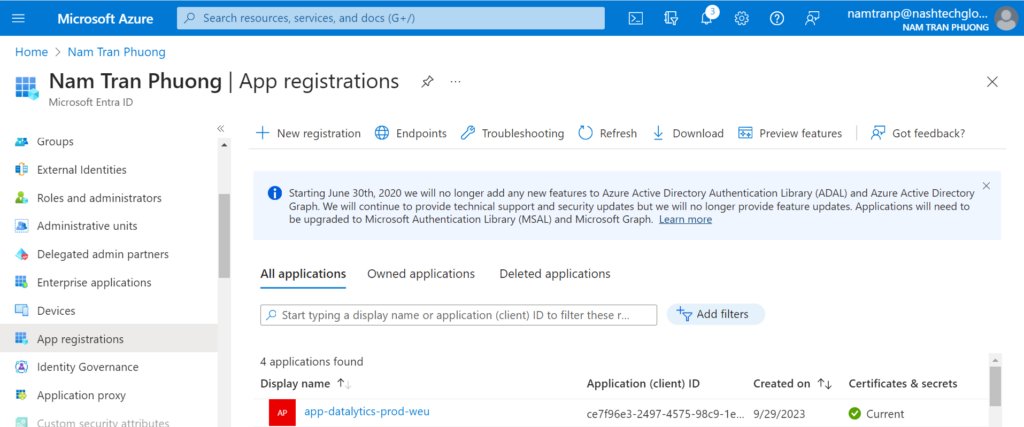
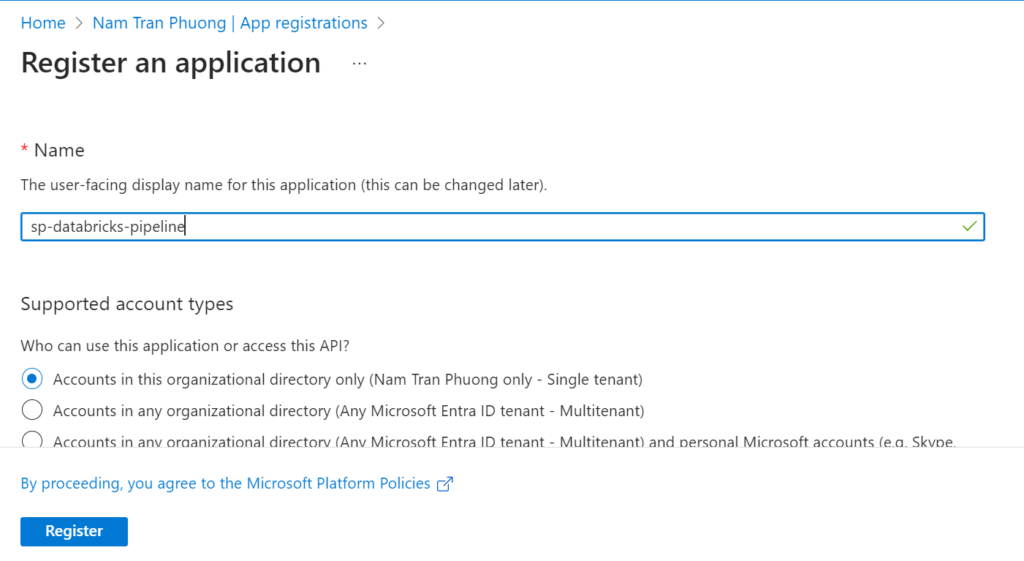
Create a service principle from Azure Portal
To establish a connection between Azure DevOps and the Azure Portal for Azure resource creation, there are several methods available. In this guide, I’ll demonstrate one of the approaches to configuration.
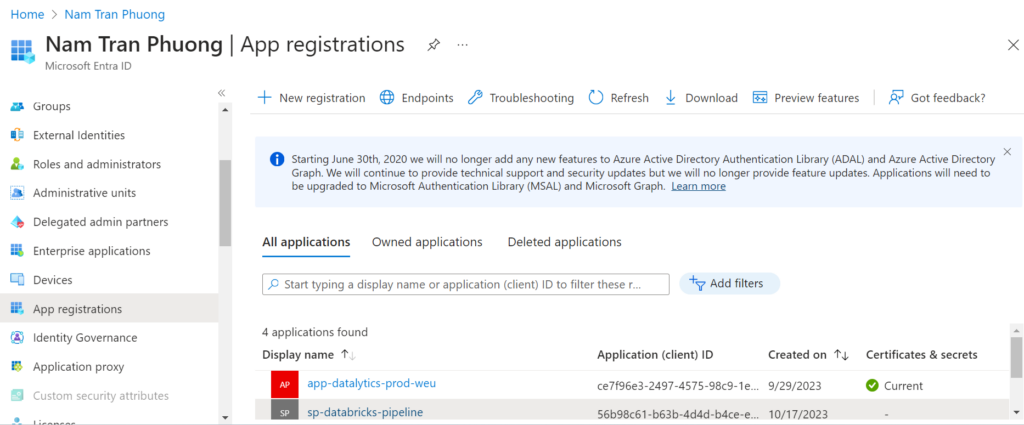
Go to the Microsoft Entra ID, choose the App registrations then create a new app with name: sp-databrick-pipeline
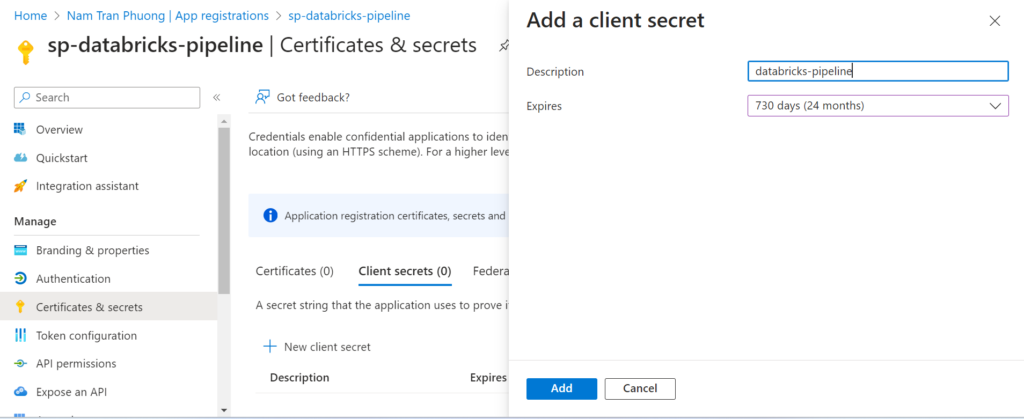
Next, we need to generate a password that will need for next steps when we create a service connection in Azure DevOps.
Go to inside of the service principle, then select the Certificates & secrets

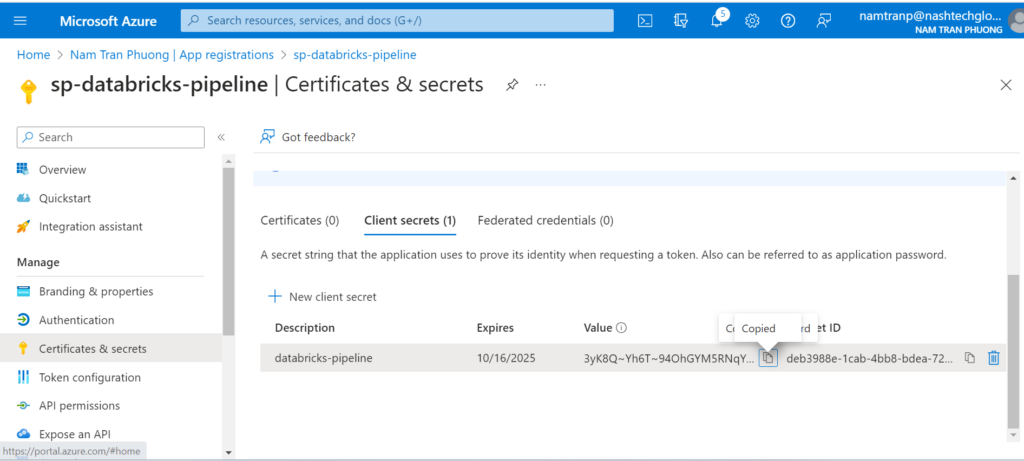
Please copy some sensitive information like: client secret, client id, tenant id, subcription id to secure place then it will be used later.
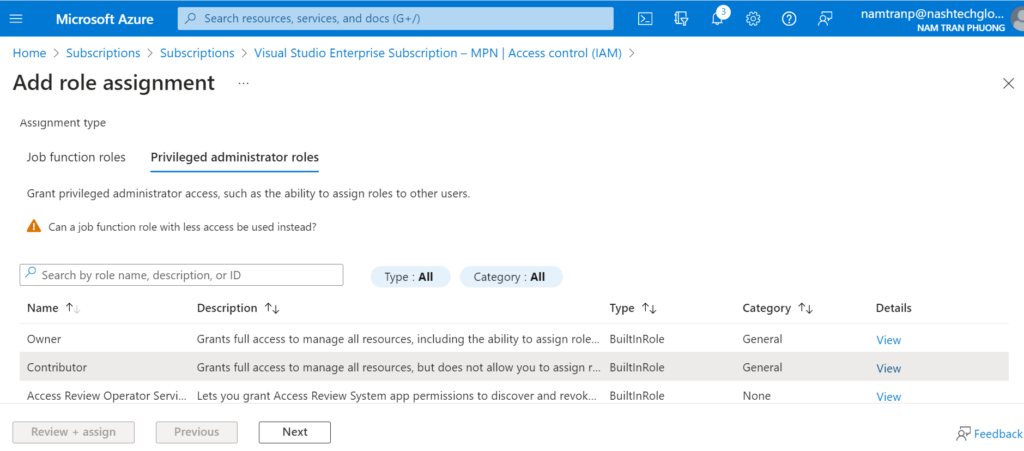
Granting permission the service principle
Go the the subscription and choose the IAM
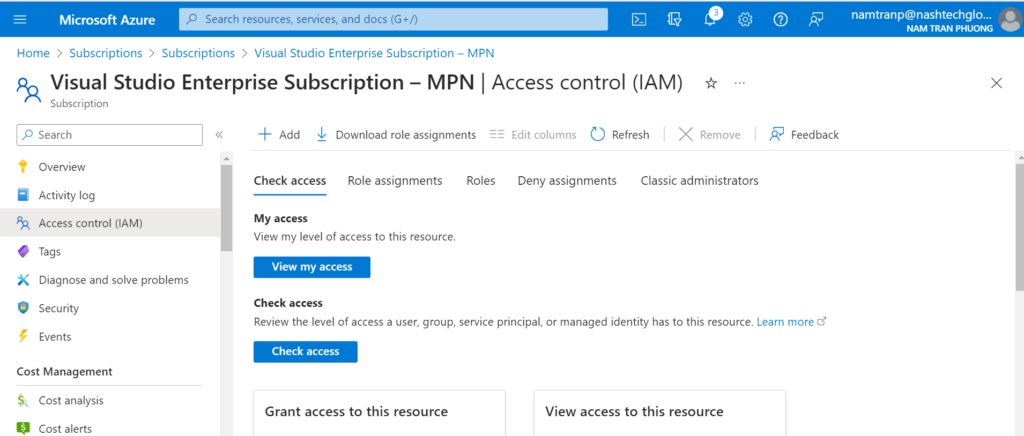
Then Add role asssignment
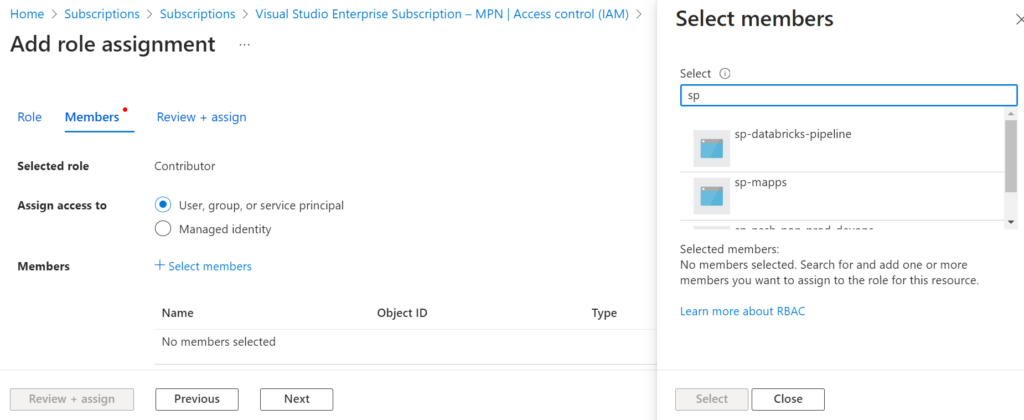
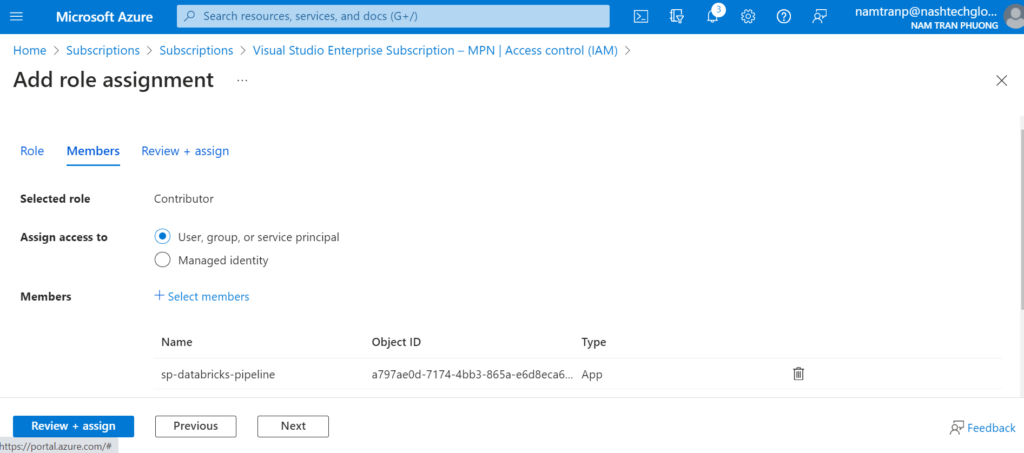
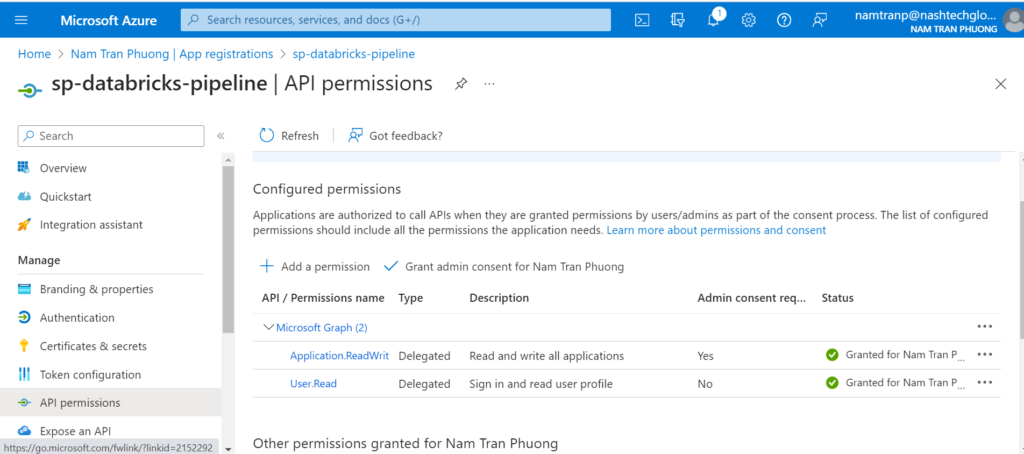
Once we have added the role assignment done, we need to back to the service principle to add more permission. Because it need permission to create the App registrations in the Microsoft Entra ID. Select the sp-databricks-pipeline and choose the API permission then add Application.ReadWrite.All from Microsoft Graph with Delegated permissions.
Create a service connection
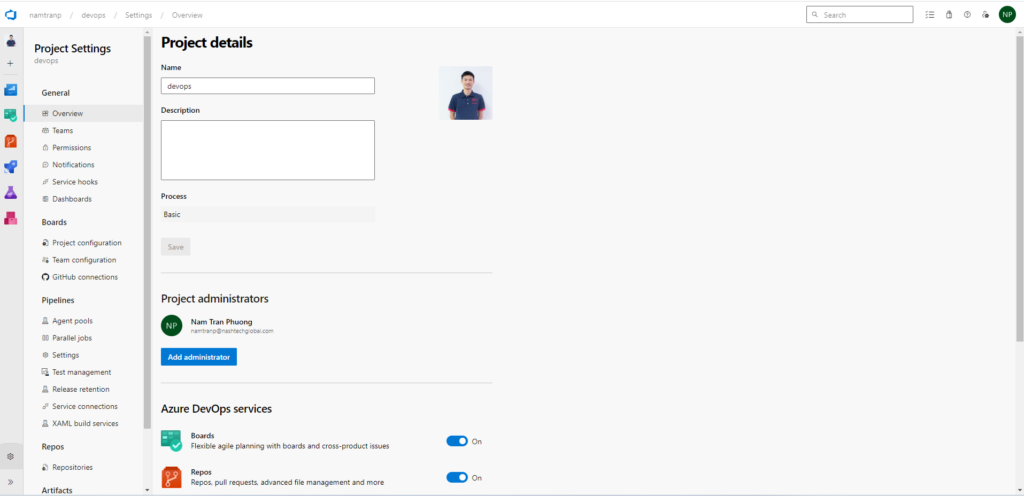
Go to the project setting

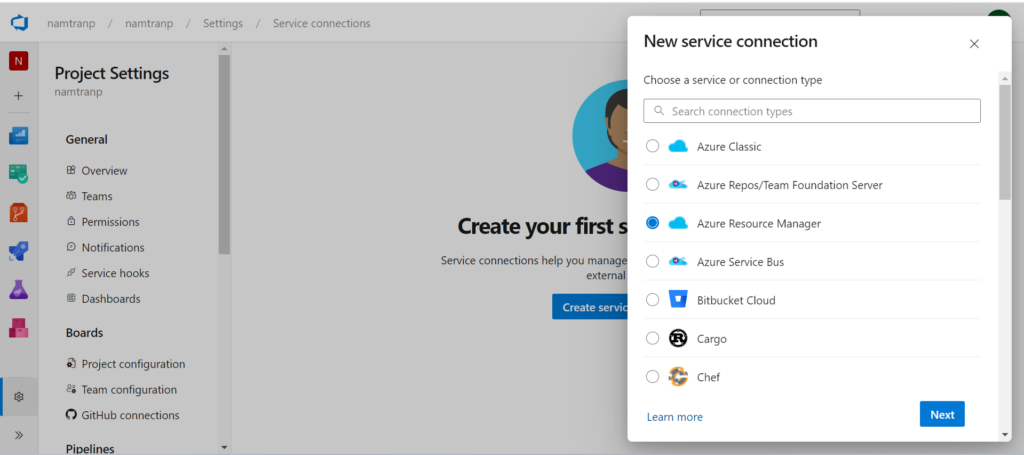
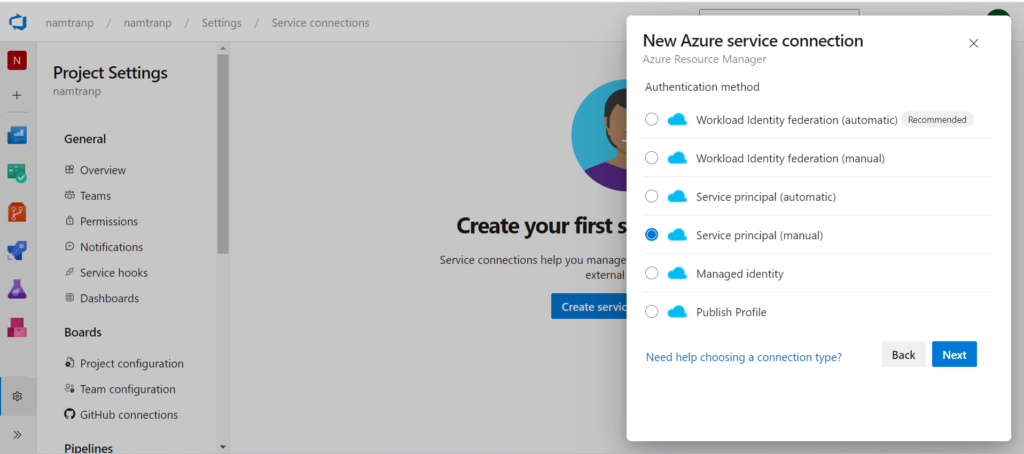
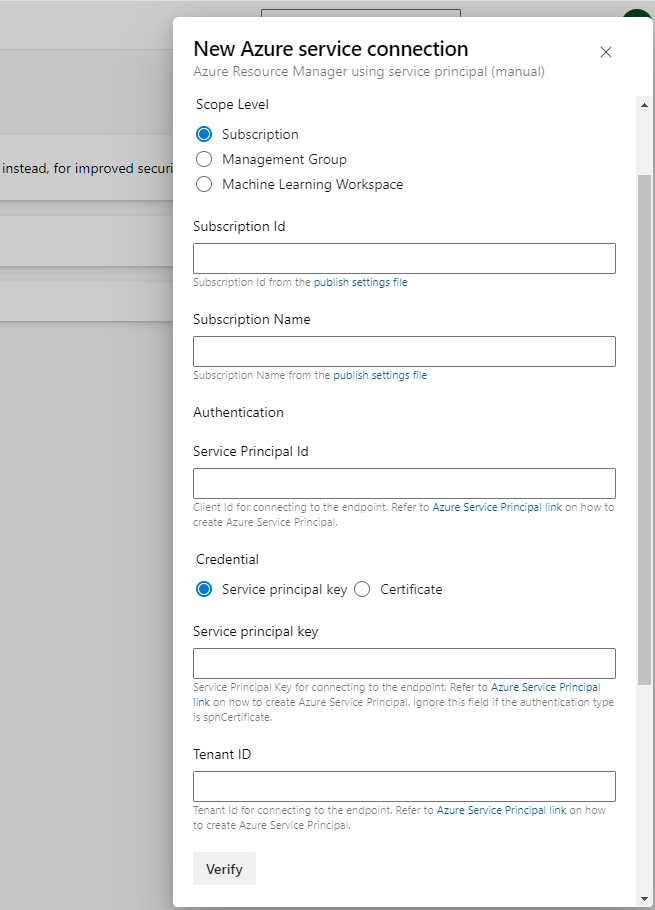
Here we need to fill the information with the information that I have saved from previous steps. Once, it’s filled in, we can save with the name then verify before saving this connection.

Please be noted that, the service connection name will be used afterward. It will be used in CI/CD YAML files.
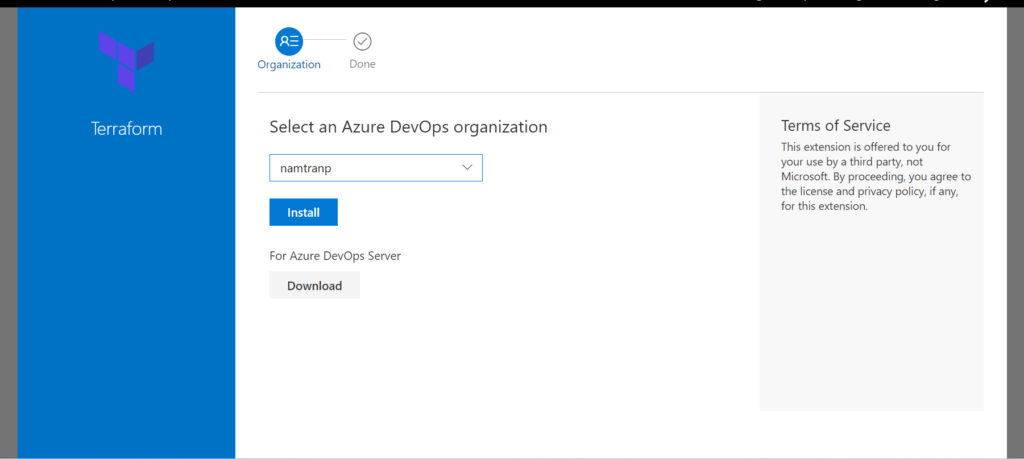
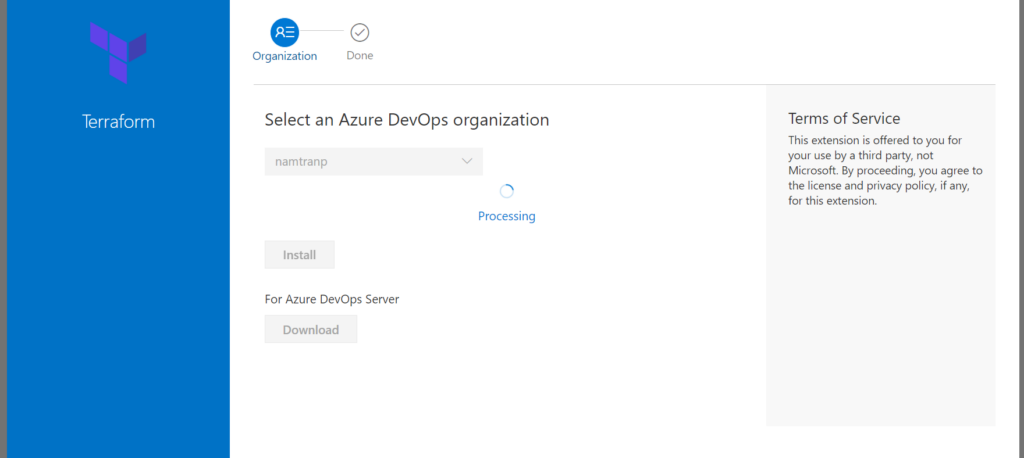
Install Terraform
If you have already installed Terraform in Azure DevOps you can ignore this step. However, if you not, you need to install the extension from Market. Here are some steps you need to follow:
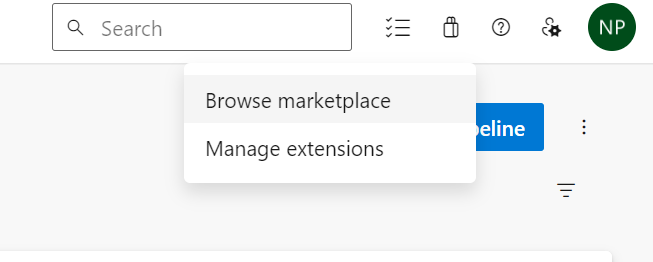

There are some providers but I suggest you will use Terraform that providing by Microsoft. That is the first one.

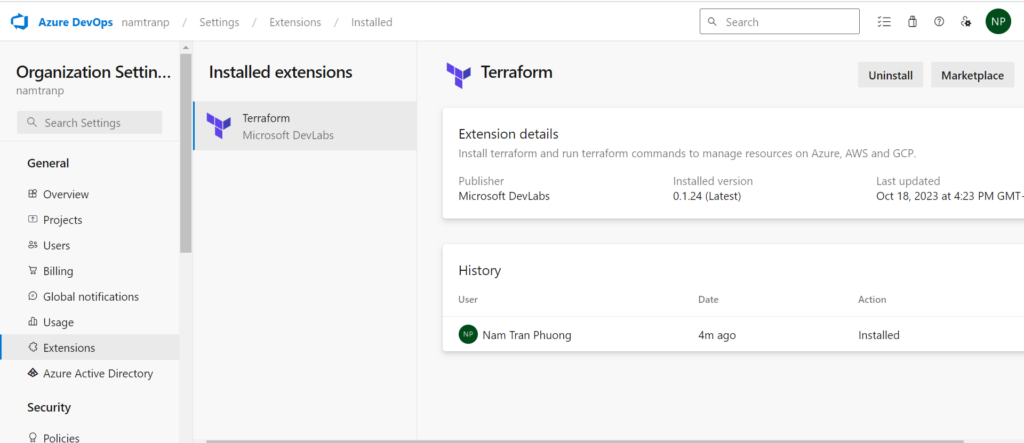
Now, in your organization has already been installed Terraform. That is good.
Create a pipeline and executing
Go to the pipeline, then clicking to the button new pipeline
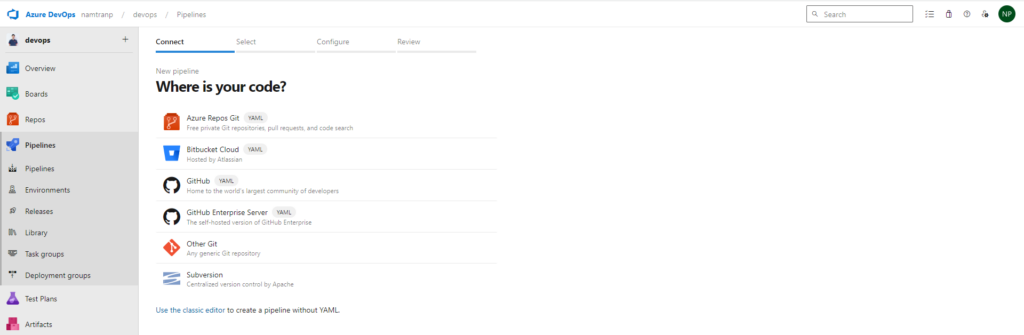
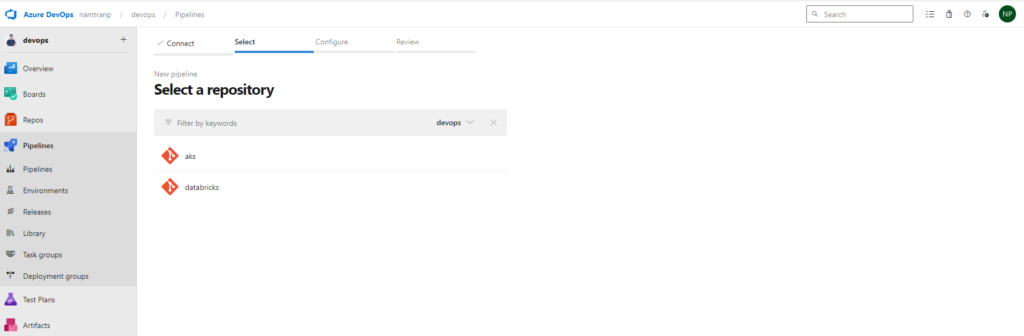
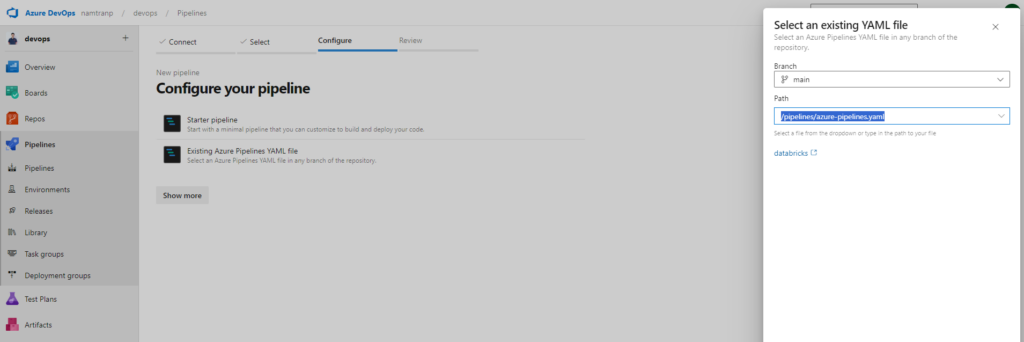
Select the kind of place you store yaml file. For me I use the first one, Azure repos. Once you select that, it required you select the repository and doing configure the pipeline. Here I have already write yaml file as above. So I will choice the option Existing Azure Pipeline YAML file.
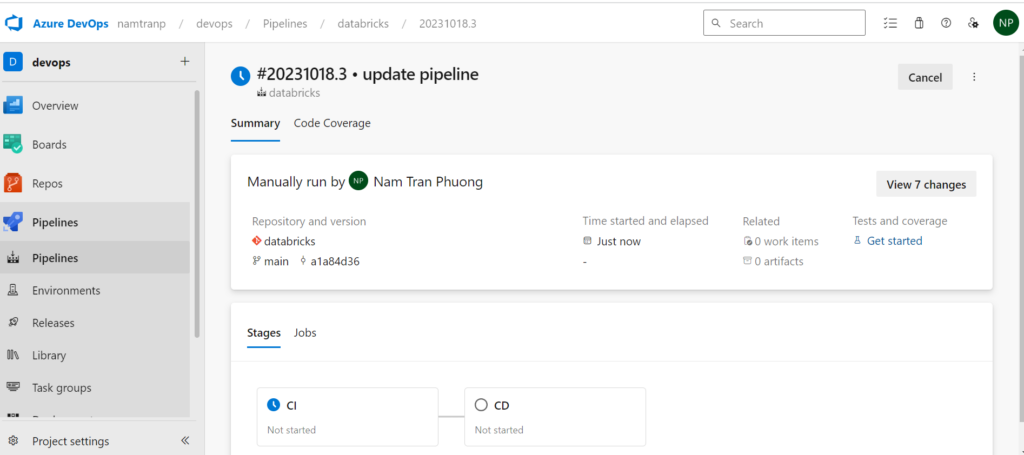
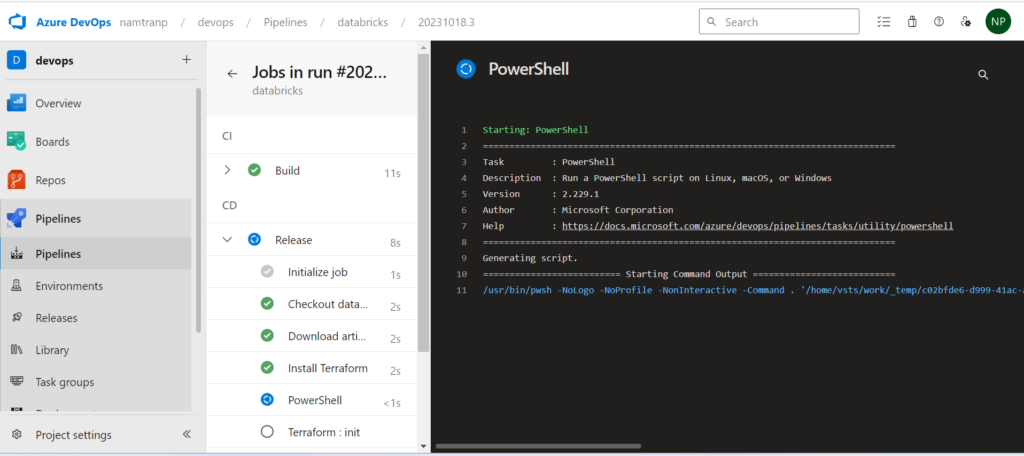
All the things are done! now it’s time to test the Terraform code
Conclusion
In today’s rapidly evolving tech landscape, efficiently deploying and managing cloud resources is paramount. In this article, we’ve explored a powerful approach to streamline the setup and management of Databricks infrastructures on Azure. By harnessing the versatility of Terraform modules, we’ve not only automated the provisioning process but also enhanced scalability and maintainability.
Additionally, we’ve delved into the world of CI/CD by utilizing YAML configuration files to orchestrate the continuous integration and delivery pipeline. This automation ensures that our Databricks environments are always up-to-date and in sync with our development efforts.
Lastly, we’ve seen how configuring Azure DevOps to collaborate seamlessly with the Azure portal is pivotal for a cohesive cloud development experience. This integration empowers teams to leverage the full potential of Azure services while maintaining a centralized and streamlined workflow.
In the dynamic realm of cloud computing, the ability to provision and manage resources efficiently, alongside automated CI/CD pipelines and robust collaboration tools, is a recipe for success. With these strategies in place, we are well-equipped to tackle the challenges of the Azure cloud with agility and precision.