


Getting Started With Kotlin Programming Language
Kotlin is a modern, statically-typed programming language that is designed to be concise, expressive, and safe. It was first released in 2011 by JetBrains, the company behind popular development tools like IntelliJ IDEA, and has since gained popularity among developers for its ease of use and compatibility with the Java Virtual Machine (JVM).
Kotlin is an object-oriented language that supports functional programming paradigms, making it a versatile language for a wide range of applications.
How Kotlin works with the JVM?
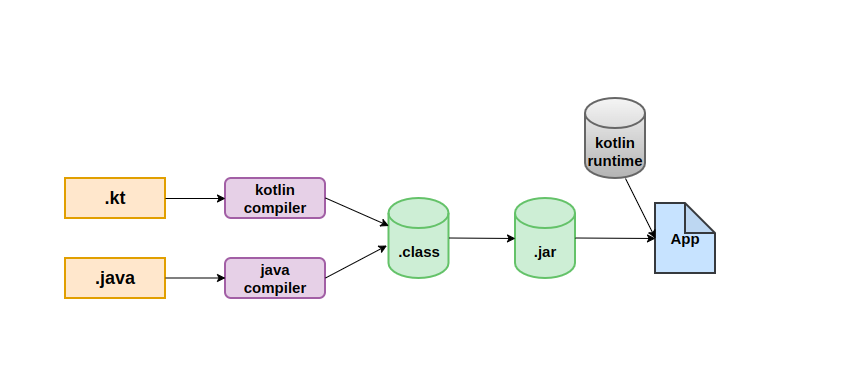
Kotlin is a statically-typed programming language that is designed to be fully compatible with the Java Virtual Machine (JVM). This means that Kotlin can be compiled to bytecode, just like Java, and then executed on any device or platform that supports the JVM.
Kotlin code is compiled to bytecode using the Kotlin compiler, which generates Java Virtual Machine bytecode (.class files). These bytecode files can then be executed on the JVM, just like any other Java application. This makes Kotlin an ideal choice for developing applications for the JVM, especially for those who want to leverage the power of the Java ecosystem.
Kotlin is fully interoperable with Java, which means that Kotlin code can call Java code and vice versa. This allows developers to easily integrate Kotlin into existing Java projects or libraries and vice versa.
In addition, Kotlin also offers some features that are not available in Java, such as null safety, extension functions, and coroutines. These features make Kotlin code more concise, readable, and easier to maintain. Overall, Kotlin’s compatibility with the JVM and its interoperability with Java make it a great choice for developing applications for the Java platform.
Features of Kotlin
Some features of the Kotlin are:
- Null safety: Kotlin’s type system is designed to eliminate the possibility of null pointer exceptions, making code safer and more reliable.
- Interoperability with Java: Kotlin is fully compatible with existing Java libraries and frameworks, allowing developers to easily integrate Kotlin into their existing Java projects.
- Concise syntax: Kotlin’s syntax is designed to be concise and expressive, reducing the amount of boilerplate code required to perform common tasks.
- Extension functions: Kotlin allows developers to add new methods to existing classes without modifying the original class, making it easy to extend the functionality of third-party libraries.
- Coroutines: Kotlin includes support for coroutines, which are a lightweight concurrency model that allows developers to write asynchronous code in a more natural, sequential style.
Kotlin Fundamentals
Hello World in Kotlin
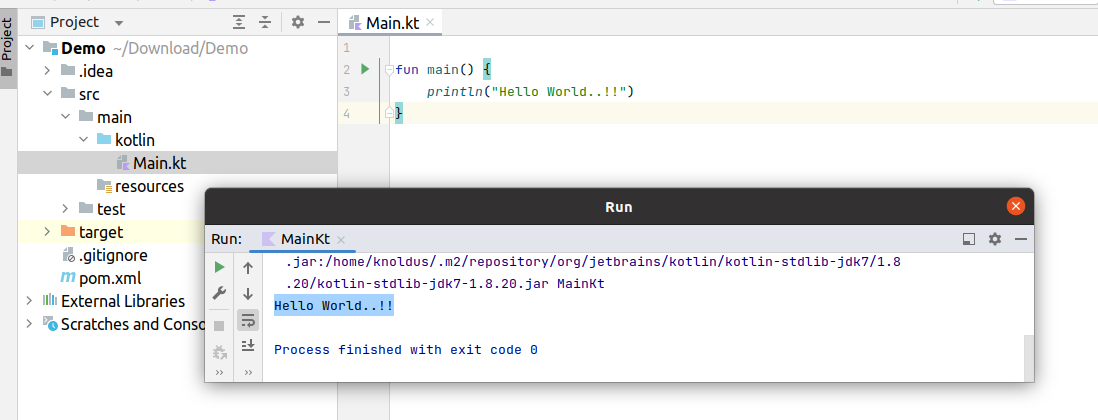
Printing “Hello World!” is the first basic program in any language. Let’s see how we can write our first program in kotlin. We need an IDE, as of now, I’m using IntelliJ Idea so create a new Kotlin project in it and inside that project create a Main.kt file. To make a class or file executable we need a “main” function. So create a main function and inside that write a message “Hello World!” and run that file we can see the output in the logs.
Kotlin Variables
In Kotlin, variables are declared using the “var” or “val” keywords, where “var” is used to declare a mutable variable, meaning its value can be changed, and “val” is used to declare an immutable variable, meaning its value cannot be changed once it’s been initialized.
var age: Int = 30 // mutable variable
val name: String = "Nash Tech Global" // immutable variable
Conditional – if and when block in kotlin
Kotlin provides two types of conditional statements: the “if” expression and the “when” expression.
If Expression: The if expression in Kotlin is similar to other programming languages. It is used to make decisions based on a condition and execute different code blocks accordingly. The basic syntax of the if expression in Kotlin is as follows:
if (condition) {
    // execute this code if the condition is true
} else {
    // execute this code if the condition is false
}
When Expression: The when expression in Kotlin is similar to a switch statement in other programming languages. It is used to check a value against multiple conditions and execute different code blocks accordingly. The basic syntax of the when expression in Kotlin is as follows:
when (value) {
    condition1 -> {
        // execute this code if the value matches condition1
    }
    condition2 -> {
        // execute this code if the value matches condition2
    }
    else -> {
        // execute this code if none of the conditions match
    }}
Ranges and loops in kotlin
Ranges and loops are fundamental constructs in programming. Kotlin provides powerful features for handling ranges and loops in an efficient and concise way.
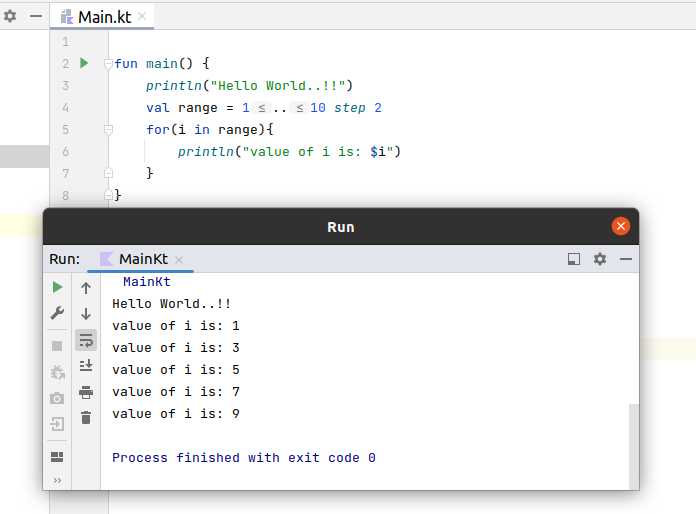
- Ranges: A range is a sequence of values that have a start value and an end value. In Kotlin, we can define a range using the “..” operator.
Here’s an example:
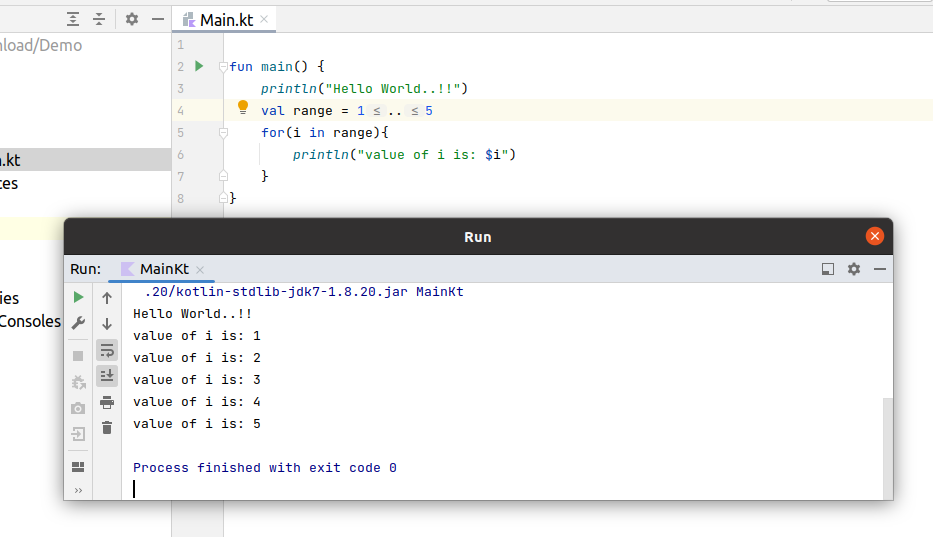
In this example, the “range” variable is defined as a range of integers from 1 to 10, inclusive. We can also define a range in reverse order:
val range = 10 downTo 1In this example, the “range” variable is defined as a range of integers from 10 down to 1, inclusive. We can also define a range with a step value:
- Loops: Kotlin provides a variety of loop constructs to iterate over ranges and collections.
For loop: The for loop is used to iterate over a range or a collection. The basic syntax of the for loop in Kotlin is as follows:
for (i in 1..10) {
    println(i)
}
While loop: The while loop is used to execute a block of code repeatedly as long as a certain condition is true. The basic syntax of the while loop in Kotlin is as follows:
while (condition) {
// execute this code as long as the condition is true
}
Here’s an example of a while loop:
var i = 1
while (i <= 10) {
    println(i)
    i++
}
Do-while loop: The do-while loop is similar to the while loop, except that it executes the code block at least once before checking the condition. The basic syntax of the do-while loop in Kotlin is as follows:
do {
    // execute this code at least once
} while (condition)
Here’s an example of a do-while loop:
var i = 1
do {
    println(i)
    i++
} while (i <= 10)
Break, Labels and Return in Kotlin
In Kotlin, we can use break, continue, labels, and return statements to control the flow of a loop or a function.
- Break statement: The break statement is used to exit a loop prematurely. When a break statement is encountered inside a loop, the loop is terminated immediately and the program continues executing from the next statement. Here’s an example:
for (i in 1..10) {
    if (i == 5) {
        break
    }
    println(i)
}
In this example, the for loop iterates over a range of integers from 1 to 10, inclusive, and prints each value to the console. However, when the value of i is equal to 5, the break statement is executed, causing the loop to terminate prematurely.
- Continue statement: The continue statement is used to skip the current iteration of a loop and move on to the next iteration. When a continue statement is encountered inside a loop, the remaining statements inside the loop for the current iteration are skipped and the loop continues with the next iteration. Here’s an example:
for (i in 1..10) {
    if (i % 2 == 0) {
        continue
    }
    println(i)
}
In this example, the for loop iterates over a range of integers from 1 to 10, inclusive, and prints each odd value to the console. However, when the value of i is even, the continue statement is executed, causing the remaining statements inside the loop for the current iteration to be skipped.
- Labels: A label is used to identify a loop or a block of code, and is prefixed with an “@” symbol. Labels can be used with break and continue statements to control the flow of execution. Here’s an example:
loop@ for (i in 1..10) {
    for (j in 1..10) {
        if (j == 5) {
            break@loop
        }
        println("i=$i, j=$j")
    }
}
In this example, the outer loop is labeled as “loop”. When the value of j is equal to 5, the break statement is executed with the label “loop”, causing the outer loop to terminate prematurely.
- Return statement: The return statement is used to exit a function prematurely and return a value. When a return statement is encountered inside a function, the function is terminated immediately and the value is returned to the caller. Here’s an example:
fun sum(a: Int, b: Int): Int {
    if (a < 0 || b < 0) {
        return -1
    }
    return a + b
}
In this example, the sum function takes two integers as input, and returns their sum. However, if either input is negative, the function returns -1 using the return statement to terminate the function prematurely and return a value to the caller.
Overall, break, continue, labels, and return statements are powerful constructs that allow us to control the flow of execution in loops and functions in Kotlin.
Functions in Kotlin
In Kotlin, a function is a reusable block of code that performs a specific task. A function can take input arguments and return a value. In this way, functions provide code modularity and help to make the code more organized and readable.
Defining and Invoking Functions
In Kotlin, functions are defined using the fun keyword followed by the function name, argument list, return type (if any), and function body enclosed in curly braces. Here is the syntax for defining a function in Kotlin:
fun functionName(argument1: type1, argument2: type2, ...): returnType {
    // Function body
    return returnValue
}
Here’s an example of a simple function that takes two integer arguments and returns their sum:
fun sum(a: Int, b: Int): Int {
    return a + b
}
In this example, the function name is sum, and it takes two integer arguments, a and b. The function returns their sum, which is an integer.
To call a function in Kotlin, you simply write its name followed by the argument list enclosed in parentheses. Here’s an example of calling the sum function:
val result = sum(5, 3)Kotlin also supports default parameter values for function arguments, which allows you to omit an argument when calling a function, and it will use the default value. Here’s an example:
fun printMessage(message: String, repeat: Int = 1) {
    for (i in 1..repeat) {
        println(message)
    }
}
In this example, the printMessage function takes two arguments, message of type String, and repeat of type Int with a default value of 1. If you call the function with only the message argument, the repeat argument will use its default value. Here’s an example:
printMessage("Hello, World!")This will print the message "Hello, World!" to the console once because the repeat argument uses its default value of 1.
Kotlin also supports named arguments, which allows you to specify function arguments by name rather than their position. Here’s an example:
printMessage(message = "Hello, World!", repeat = 3)In this example, we’re calling the printMessage function with named arguments. This allows us to specify the message and repeat arguments in any order. The function will print the message "Hello, World!" to the console three times because we specified a value of 3 for the repeat argument.
Overall, defining and invoking functions in Kotlin is straightforward, and the language provides many features such as default parameter values and named arguments to make writing and calling functions more flexible and convenient.
Top Level Functions, Top Level Properties
In Kotlin, functions and properties can be defined at the top level of a file, outside of any class or interface. These are called top-level functions and top-level properties, respectively.
Top-level Functions: A top-level function is defined using the fun keyword followed by the function name, parameter list, return type (if any), and function body enclosed in curly braces. Here is an example of a top-level function that takes two integer arguments and returns their sum:
fun sum(a: Int, b: Int): Int {
    return a + b
}
This function can be called from anywhere in the same module by simply using its name and passing in the required arguments, just like any other function.
Top-level Properties: A top-level property is defined using the val or var keyword followed by the property name and its data type. Here is an example of a top-level property:
val PI = 3.14159This defines a top-level property called PI of type Double with the value 3.14159. This property can be accessed from anywhere in the same module by simply using its name.
Top-level functions and properties can also be declared as private, protected, or internal to restrict their visibility to certain parts of the same module.
Top-level functions and properties are a convenient way to define utility functions and constants that can be used across different classes and objects in a module without the need to define them within a specific class or object.
In addition to top-level functions and properties, Kotlin also supports defining functions and properties within objects, classes, and interfaces. This allows for greater organization and encapsulation of code within a module.
Nulls in Kotlin
Nullable & Non – Nullable types in Kotlin
- Nullable types: Nullable types are types that can hold null values. In other words, a variable of a nullable type can either hold a non-null value or a null value. Nullable types are denoted by adding a question mark “?” after the data type name. For example,
String?is a nullable string type. - Non-nullable types: Non-nullable types are types that cannot hold null values. In other words, a variable of a non-nullable type can only hold a non-null value. Non-nullable types are denoted by not adding a question mark “?” after the data type name. For example,
Stringis a non-nullable string type.
It is important to note that when using nullable types, you need to take special care to avoid null pointer exceptions. You can use the safe call operator (?.) or the not-null assertion operator (!!.) to handle nullable types.
Here is an example of declaring nullable and non-nullable types in Kotlin:
// Nullable type
var nullableString: String? = null

// Non-nullable type
var nonNullableString: String = "Hello, World!"
Safe Call (?), Elvis Operator(?:), Non-Null Assertion(!!) to deal with Null in Kotlin
- Safe call operator (?.): The safe call operator is used to access properties or methods of nullable types without causing a null pointer exception. If the variable is null, the safe call operator returns null. For example:
val nullableString: String? = null
val length: Int? = nullableString?.length
In the above example, if nullableString is null, length will also be null.
- Elvis operator (?:): The Elvis operator is used to provide a default value if a nullable value is null. If the variable is not null, the Elvis operator returns its value, otherwise it returns the default value. For example:
val nullableString: String? = null
val length: Int = nullableString?.length ?: 0
In the above example, if nullableString is null, length will be 0.
- Non-null assertion operator (!!): The non-null assertion operator is used to assert that a nullable value is not null. If the variable is null, a null pointer exception will be thrown. For example:
val nullableString: String? = null
val length: Int = nullableString!!.length
In the above example, if nullableString is null, a null pointer exception will be thrown when trying to access length.
It is important to note that while these operators can be useful to handle null values, it is generally recommended to avoid using null values whenever possible and use non-nullable types instead.
Invoking or assigning a nullable type
When invoking or assigning a nullable type in Kotlin, we have to take into consideration the possibility that the value might be null.
- Invoking a nullable type: When invoking a nullable type, you can use the safe call operator (?.) to prevent a null pointer exception.
For example:
val nullableString: String? = null
val length: Int? = nullableString?.length
In the above example, if nullableString is null, the safe call operator will return null and length will also be null. If nullableString is not null, length will contain the length of the string.
Alternatively, you can also use the non-null assertion operator (!!.) to assert that the value is not null. However, if the value is null, a null pointer exception will be thrown. For example:
val nullableString: String? = null
val length: Int = nullableString!!.length
In the above example, if nullableString is null, a null pointer exception will be thrown when trying to access length.
- Assigning a nullable type: When assigning a value to a nullable type, you can simply assign a null value or a non-null value.
For example:
var nullableString: String? = null
nullableString = "Hello, World!" // non-null value
nullableString = null // null value
In the above example, nullableString is a nullable string type that can hold null or non-null values. You can assign a non-null value, such as “Hello, World!”, or a null value.
It is important to use nullable types only when necessary and handle null values appropriately using the safe call operator or the non-null assertion operator to avoid null pointer exceptions.
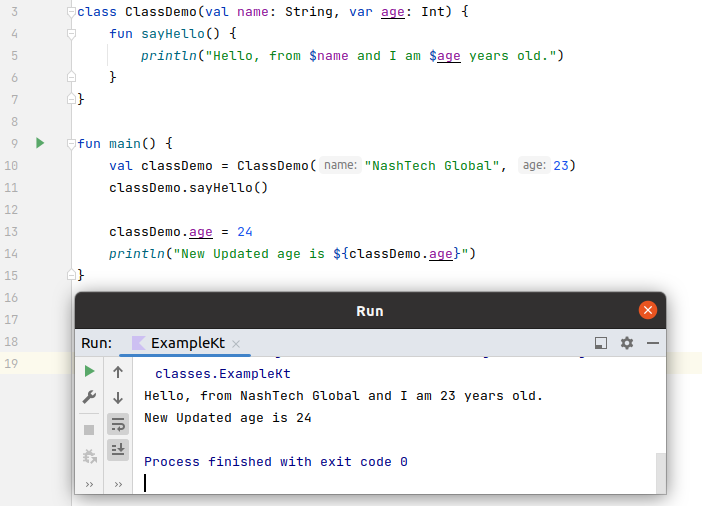
Classes and Objects in Kotlin
In Kotlin, a class is a blueprint for creating objects with certain properties and behaviors. You can define a class using the class keyword followed by the class name and its properties and functions. To create an object of a class, you can simply call the constructor of the class with the necessary parameters enclosed in parentheses.
Let’s see an example, how we can create an class and instance of that class.
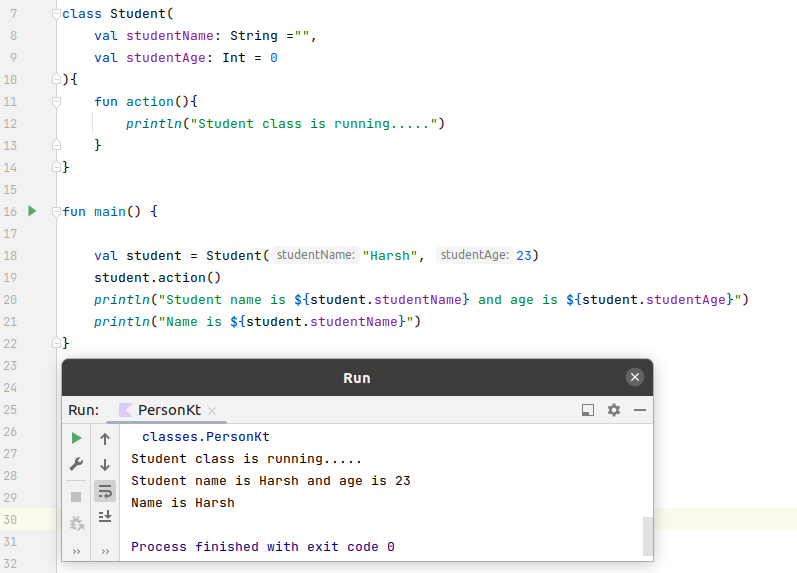
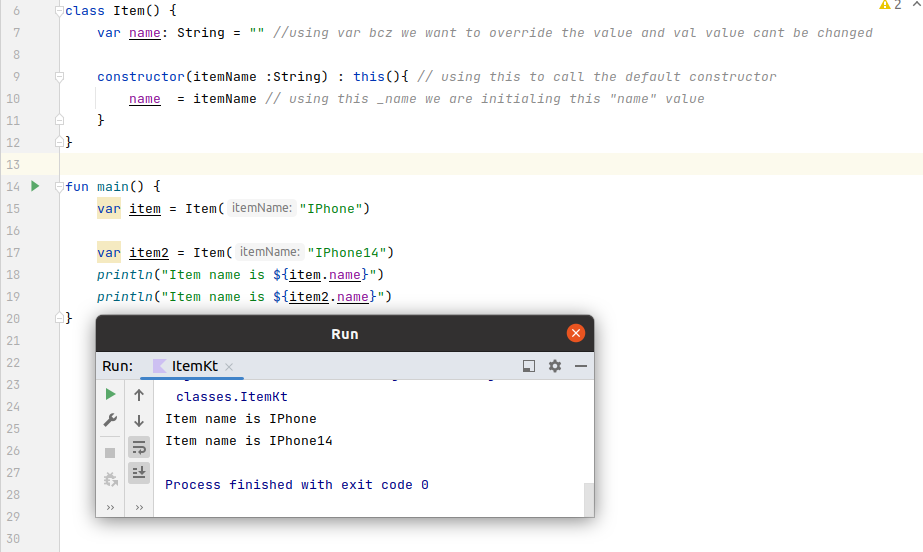
Constructors in kotlin
In Kotlin, constructors are used to initialize the properties of a class when an object of the class is created. There are two types of constructors in Kotlin:
Primary constructors and Secondary constructors.
Primary constructors are defined as a part of the class header and are used to define the properties of the class. They can have parameters and can be used to initialize the properties of the class.
Secondary constructors, on the other hand, are used to provide additional ways to create objects of a class. They are defined using the constructor keyword and can have different parameter lists than the primary constructor.
Initializer code using init block
In Kotlin, the init block is a special type of block that is used to initialize the properties of a class. It is executed whenever an object of the class is created and can contain initialization code that is executed before the class’s constructors.
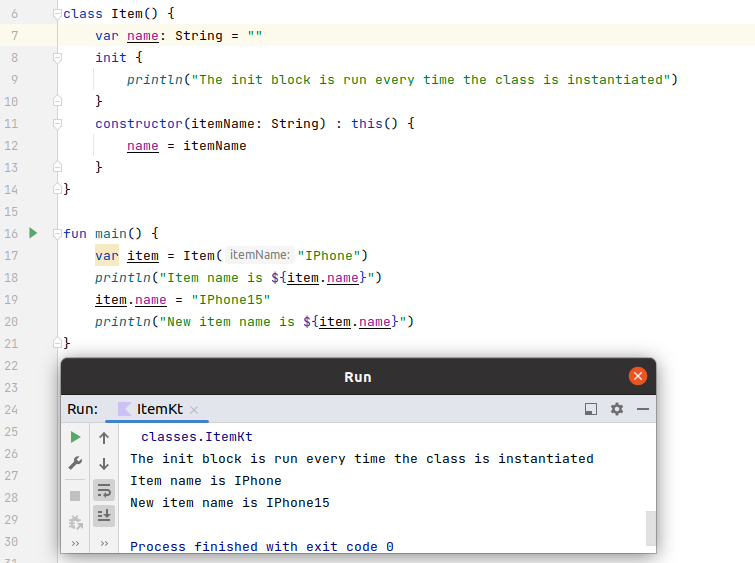
The init block is defined within the class body and does not take any parameters. It can access the properties and methods of the class and can be used to perform any required initialization.
Custom Getters and Setters in kotlin
In Kotlin, custom getters and setters can be defined for class properties. Custom getters and setters allow you to customize the behavior of a property when it is accessed or modified.
To define a custom getter for a property, you can use the get() function. Similarly, to define a custom setter, you can use the set() function. Here’s an example of a class with a custom getter and setter:
import java.lang.IllegalArgumentException

/**
 * We use Getter and Setter when we have the need to implement the custom logic
 * for setting and retrieving the properties.
 */

class Item() {
    var name: String =""
    var price: Double = 0.0

        get() {
            println("Inside the getter..!")
            return field
        }
        set(value) {
            if (value>=0.0){
                println("Inside the setter..!")
                field=value;
            } else{
                throw IllegalArgumentException("Negative values not allowed..!")
            }
        }

    constructor(itemName :String) : this(){
        name = itemName
    }
}

fun main() {
    var  item = Item(itemName = "IPhone")
    println("Item name is ${item.name}")

    item.name = "IPhone14"
    println("Item name is ${item.name}")

    item.price = 5000.0
    println("Item price is ${item.price}")
}
Overall, custom getters and setters are a powerful feature in Kotlin that allow you to customize the behavior of class properties, providing greater control over the behavior of your classes.
Inheritance in Kotlin
Inheritance is a powerful feature of object-oriented programming that allows you to create new classes that inherit the properties and methods of existing classes. In Kotlin, inheritance is implemented using the open keyword. A class that is declared open can be inherited from, while a class that is not declared open cannot be inherited from.
To inherit from a class, you use the : keyword to specify the name of the superclass. For example:
open class User(var name: String){
     fun login(){
        println("Inside user login...!!")
    }
}
class Student(name: String) : User(name){
override fun login(){
println("Inside student login..")
}
}The Student class inherits all of the properties and methods of the User class. You can access the inherited properties and methods in the Studentsuper keyword.
fun main() {
    var student = Student("Harsh")
    println("Student name is ${student.name}")
    student.login()
}
Companion object keyword
The companion object keyword in Kotlin is used to declare a companion object inside a class. A companion object is a singleton object that is associated with a class. This means that there is only one instance of the companion object, regardless of how many instances of the class there are. Companion objects can be used to define class-level members, such as constants, functions, and properties. They can also be used to implement interfaces and abstract classes.
class MyClass {
    companion object {
        const val CONSTANT = "Hello, world!"

        fun greeting() {
            println(CONSTANT)
        }
    }
}
The CONSTANT constant and the greeting() function are both members of the MyClass companion object. You can access them using the MyClass class name, followed by a dot (.). For example:
println(MyClass.CONSTANT)

MyClass.greeting()
Companion objects can be a convenient way to define class-level members. They can also be used to implement interfaces and abstract classes.
Interface in Kotlin
An interface in Kotlin is a blueprint of a class. It contains abstract method declarations as well as implementation of method. Interfaces in Kotlin are similar to interfaces in other programming languages like Java, but they offer some additional features. To define an interface in Kotlin, we use the interface keyword. For example, the following code defines an interface named Drawable:
interface Drawable {
    fun draw()
    val color: String
}
In the example above, we define an interface named Drawable that has two members: a function draw() and a read-only property color. The classes that implement this interface must provide an implementation for the draw() function and a value for the color property.
To implement an interface, a class should use the : InterfaceName syntax after the class name in the class declaration. The class must provide implementations for all the members defined in the interface. Here’s an example:
class Circle : Drawable {
    override fun draw() {
        println("Drawing a circle")
    }

    override val color: String
        get() = "Red"
}
In the example above, the Circle class implements the Drawable interface. It provides an implementation for the draw() function and defines the color property.
You can also implement multiple interfaces in Kotlin by separating them with commas:
class Square : Drawable, Rotatable {
    // Implementations for draw(), color, and rotate() go here
}
Interfaces in Kotlin can also have default implementations for functions. This allows you to provide a default behavior that implementing classes can choose to override or use as is. To provide a default implementation, you use the default keyword:
interface Printable {
    fun print() {
        println("Printing...")
    }
}

class Document : Printable {
    // No need to override the print() function, it will use the default implementation
}
In the example above, the Printable interface defines a print() function with a default implementation. The Document class implements the interface but doesn’t override the function, so it will use the default implementation.
Conclusion
In conclusion, Kotlin is a powerful and versatile programming language that is quickly gaining popularity. It is a great choice for both beginners and experienced developers, and it offers a number of advantages over other languages, such as Java. If you are looking for a new language to learn, Kotlin is definitely worth considering. In this blog we have covered almost everything about the basics of kotlin. Starting from “Hello World!” to inhterface, inheritance we have covered everything.