


In this article, we are going to learn how to build inter-service communication for .Net 8 Microservices.
You will learn how to manage more than one container and communicate between them. Managing multiple containers requires container orchestration and requires an orchestrator such as Docker Compose.
Motivation:
Last week, I was working on a .Net 5 Microservice project. We have to upgrade this project to .Net8. We updated all the necessary things like SDK versions, NuGet packages etc. Now it was the time for the testing. Boom!!!, Now one microservice can’t make a request to another one.
This article will lead you get started developing microservices with .Net 8 and we will figure out why did we get the issue.
Overall Picture:
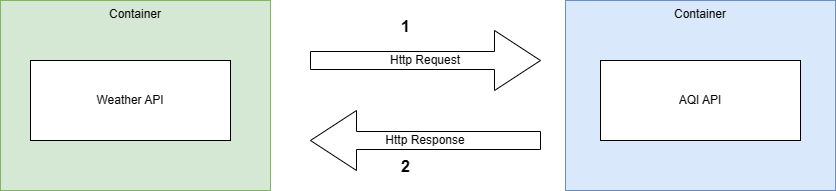
As shown below, we will have 2 microservices. We will use Weather API to get the weather forecast information. This Api communicates with AQI(Air Quality Index) API to get the air quality level.
Prerequisites:
- Install the .NET 8 or above SDK
- Install Visual Studio 2022 v17.x or above
- Docker Desktop — Memory: 4 GB
Create Asp.Net Core Web API Projects For AQI API And Weather API:
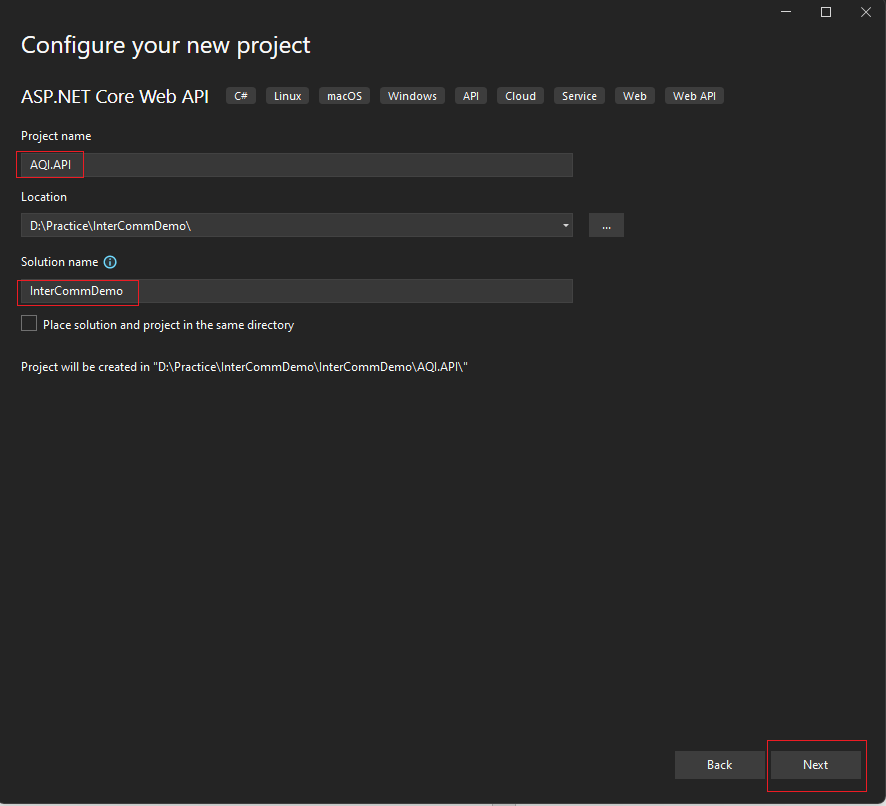
First open Visual Studio and create a new ASP.NET Core Web API project. Please specify the project and Solution name as shown below. Click on the next button.
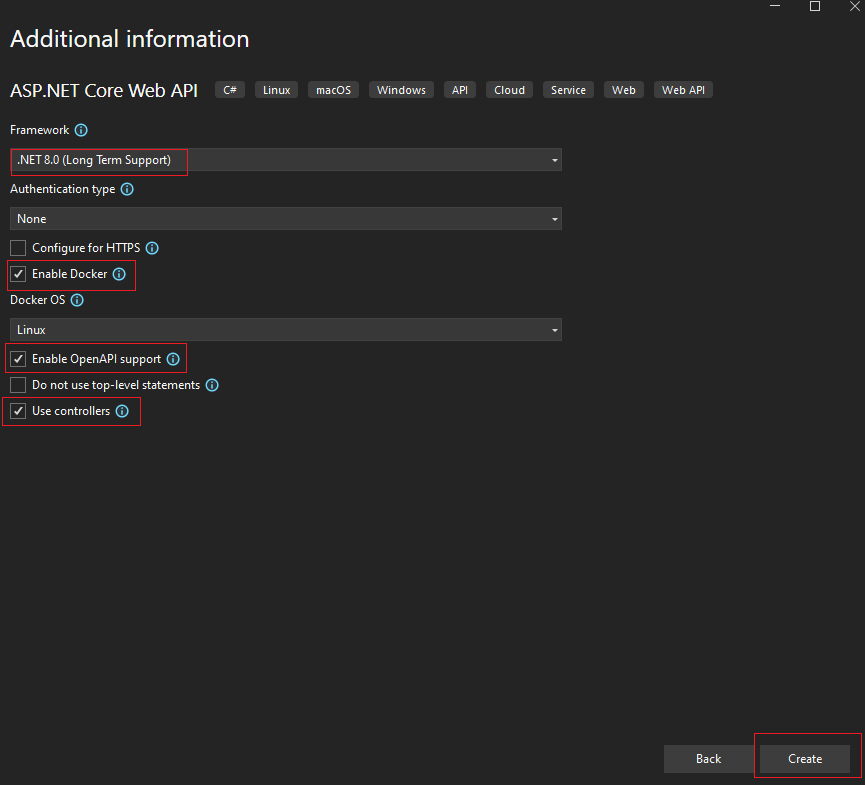
On the next page, do the additional configuration as shown below and click on the create button.
In the same solution, Add another “ASP.NET Core Web API” project, name it as “Weather.API” and with the same configuration as we did for the “AQI.API” Project.
Now try to build the solution using Ctrl+Shift+B. I hope there will be no errors.
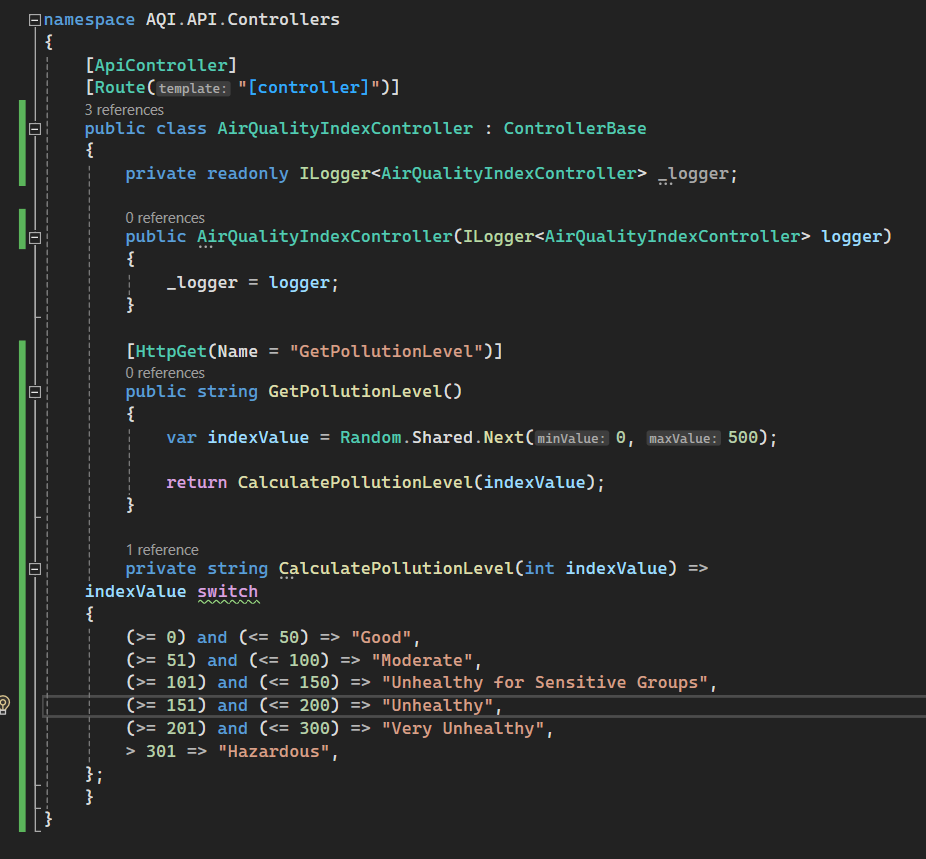
Create a “AirQualityIndexController” Controller in AQI.API project and add the following code
Add Docker Compose support
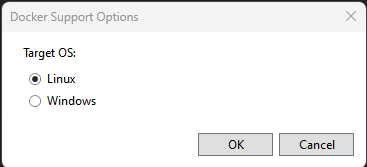
- Right-click on the AQI.API project > choose Add > Container Orchestrator Support. The Docker Support Options dialog appears.
- Choose Docker Compose.
- Choose your Target OS, for example, Linux
It creates a docker-compose.yml file and a .dockerignore file in the docker-compose node in the solution.
Docker-compose.yml: Main configuration file for defining services, networks, and volumes in a Docker Compose application.
Dockerignore: It’s like the gitIgnore file where we specify the items which will exclude when building the Docker image.
Docker-compose.override.yml: Used to extend or override the configuration specified in the docker-compose file. So, we can have different configuration files for environments like development, testing and production.
Now repeat the same steps for the Weather.API project to add the Container Orchestrator support. Open the Docker-compose.override.yml and you will notice that default internal and external port number is 8080 instead of 80. But why?
Answer lies in updates to docker images in the .Net 8. Some of the most important points are:
- Support for chiseled containers : Now in .Net8 Microsoft will ship docker images on the Chiseled Containers. As they are smaller in size and have less attack surface area.
- Running container images with non-root users: When you run a container as a non-root user, so we have least privilege and reduces the chance of damage.
- ASP.NET Core apps now use port 8080 by default: As you know port 80 is “privileged“ and it is required to run with the “root” user. Now by default container will run in the non-root users and to support the change to non-root users, In .Net 8 new default port is 8080.
Update Docker Compose Configuration:
Now open Docker-compose.override.yml file and make changes as shown below.

In the first service “aqi.api” we have changed the external port to 8000 which maps to default internal port 8080. In the “weather.api” service we add a new environment variable which stores the address of “aqi.api” container and points to default internal port 8080. As we will do an inter-service communication, so we must specify the internal port instead of external port.
Add Code to Call the AQI API From Weather API:
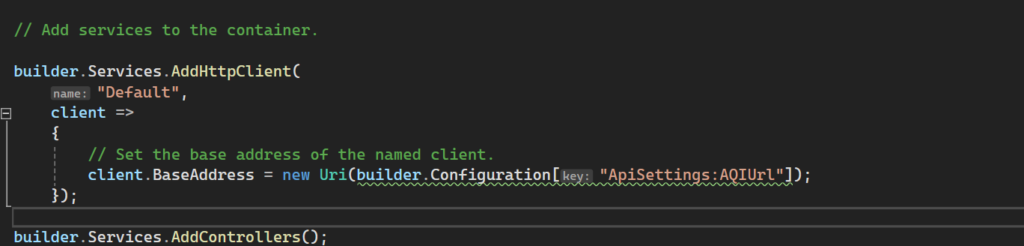
Add a new HttpClient in the Program.cs
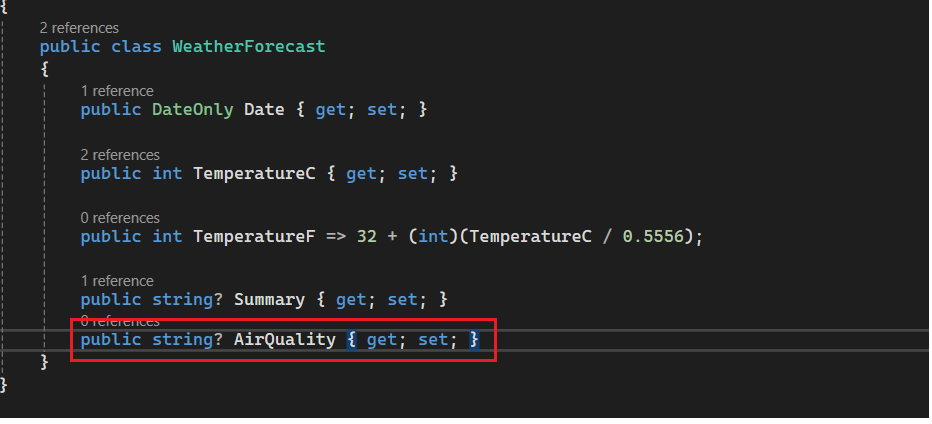
Add a new property WeatherForecast.cs as show below
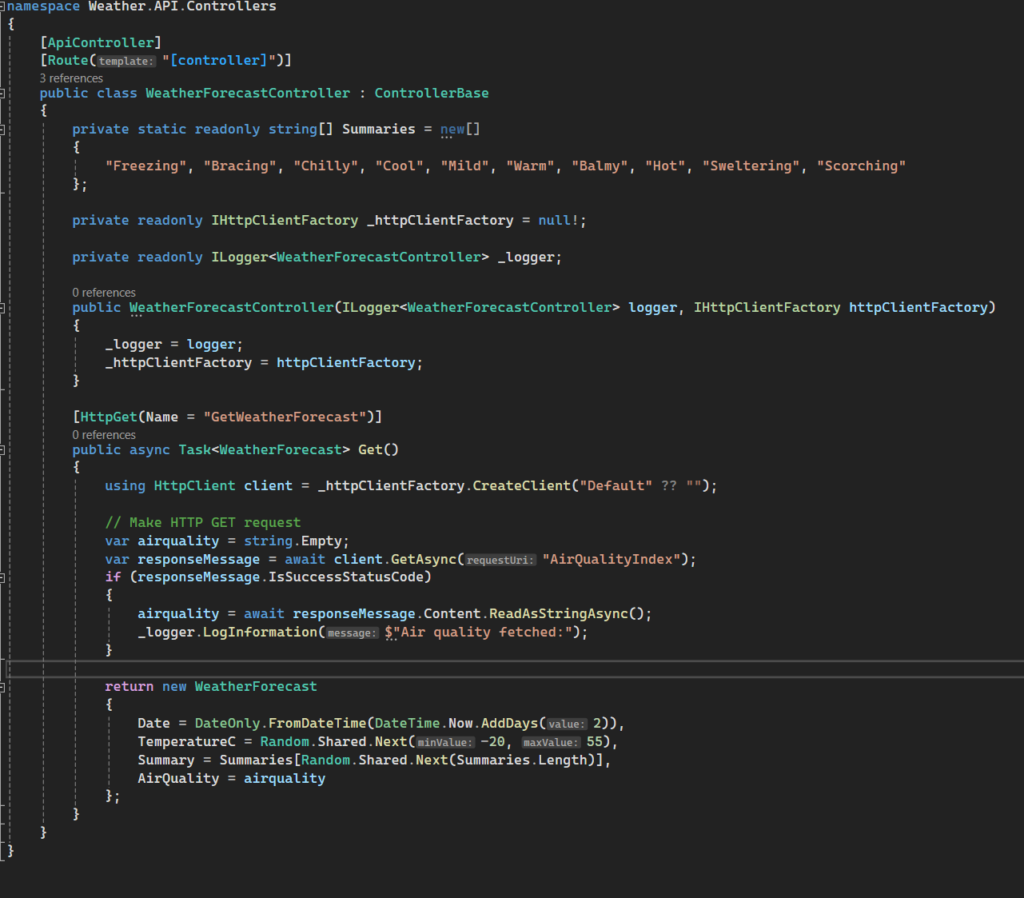
Update the WeatherForecastController in Weather.API project as show. We are using a Named Client pattern to create a HttpClient from the HttpClientFactory.
Build And Test:
Now open the Developer PowerShell and run the following command:

This command will build and run the containers in the de-attached mode.
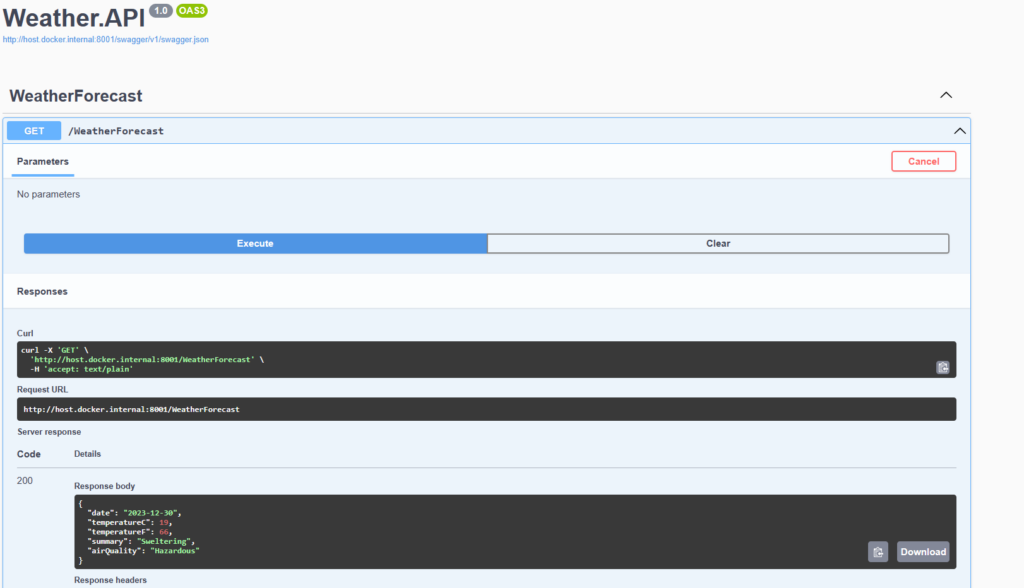
Open the following URL to run the api using the swagger
When you will execute a get request on WeatherForecast controller. You will receive response like this
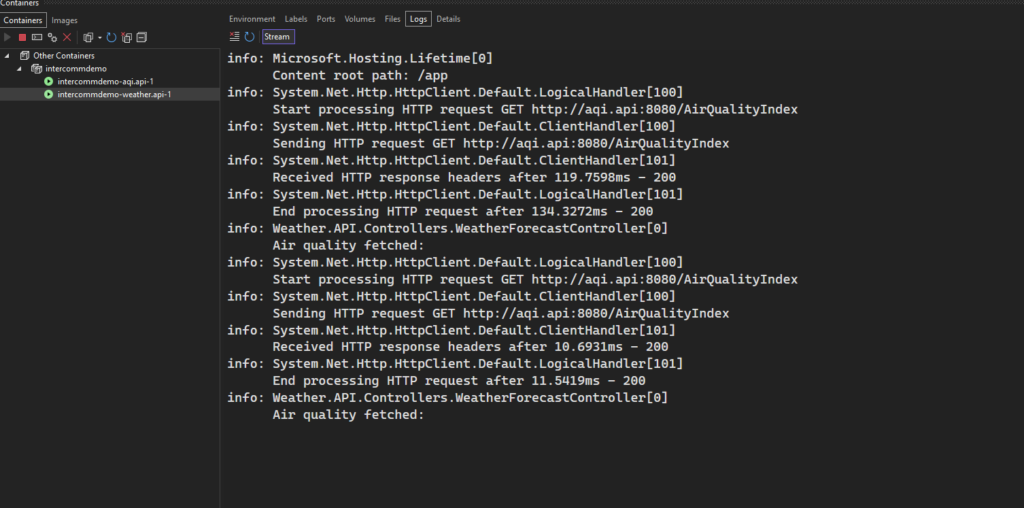
Container Tools: Simplify Containerized Applications
You can see additional information like ports, logs, files etc about the container using this. You can press Ctrl+K, Ctrl+O to open the container window or goto View> Other Windows> Containers.
Conclusion
In this post, I covered some changes comes to the .NET 8 Docker images. As Containerizing an application helps in simplifying the development and deployment process with the enhanced scalability. Now in .NET 8, it boosts the performance of the application with the support for Chiseled containers by default and increases the security by running the container images with non-root users. Also, we saw how we can upgrade our existing .NET 5 application to the .NET 8 without breaking the things.