


Introduction
Containerization is a great way to package and deploy Node.js applications. It allows you to create a self-contained environment that includes all of the dependencies your application needs to run. This makes it easy to deploy your application to any environment, whether it’s a local development machine, a staging server, or a production environment.
There are many different ways to containerize a Node.js application. In this blog post, we’ll walk through a simple process using Docker.
Prerequisite
Before begin, ensure that you have the following prerequisites set up on your development machine:
- Nodejs Installed
- Docker Installed
Creating Nodejs Application
In order to create a nodejs application, create a directory and open the directory with VS code (any editor). First, have to run the `npm init` command.
npm initThis will create a package.json file in root directory, which hold application and dependencies information.
Now, Let’s just add a simple express application in app.js file as given below
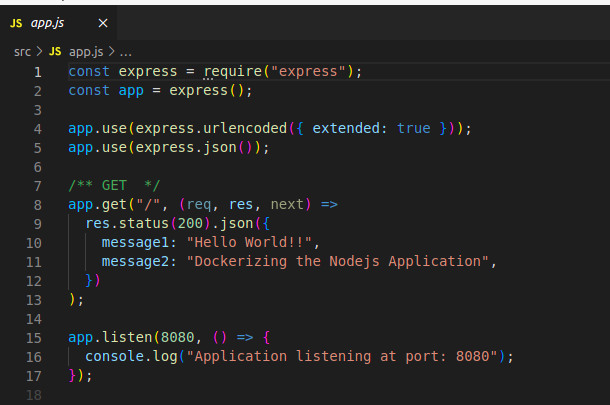
In the above code snippet, we build a simple express application, which consisting a GET endpoint to return a json data. The application is running on port 8080
Creating a Dockerfile
The first step towards containerizing a application is to create a Dockerfile. This is a text file that tells Docker how to build your image. The Dockerfile for a Node.js application is typically very simple. It might look something like this:
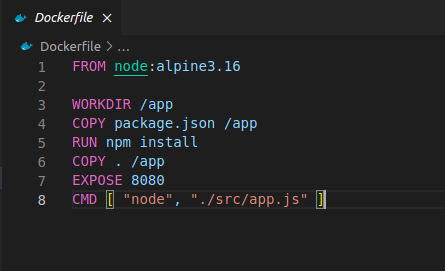
This Dockerfile tells Docker to use the official Node.js Alpine Linux version 3.16 image as the base image. It then creates a directory called /app and copies the application code into that directory. Finally, it runs npm install to install the application’s dependencies. The CMD instruction tells Docker to run the npm start command when the container starts.
Build the Docker Image
Once you have a Dockerfile, you can build the image using the docker build command. For example, to build the image from the Dockerfile we created above, you would run the following command:
$ docker build --tag nodejs-docker-app -f Dockerfile .This will create an image called nodejs-docker-app.
Run the Container
Once you have built the image, you can run the container using the docker run command. For example, to run the container and expose it on port 8080, you would run the following command:
$ docker container run -d -p 8080:8080 nodejs-docker-app
Stopping the Container
To stop the running container, you need to find its container ID or name. Use the following command to list all running containers:
$ docker psOnce you have the container ID or name, stop it by running:
$ docker stop <container_id>
Deploy on Production
Once you have tested your application locally, you can deploy it to production. To do this, you can push the image to a Docker registry. For example, to push the image to Docker Hub, you would run the following command:
$ sudo docker push <user-name>/nodejs-docker-appOnce the image is pushed to Docker Hub, you can deploy it to any environment that supports Docker.
Conclusion
Containerizing Node.js applications is a great way to make them portable, scalable, and secure. By following the steps in this blog post, you can easily containerize your Node.js application and deploy it to any environment.
For more such posts, please follow our LinkedIn page- FrontEnd Competency.