
Containerization has transformed the software development landscape, providing a standardized and portable way to package and deploy applications. While Docker has been a dominant player in this arena, alternative tools like Kaniko have gained traction, offering unique advantages in specific scenarios. In this comprehensive exploration, we will delve into the architecture and workflow of Kaniko, backed by practical code examples, shedding light on its containerized image building capabilities.
Unveiling Kaniko’s Purpose
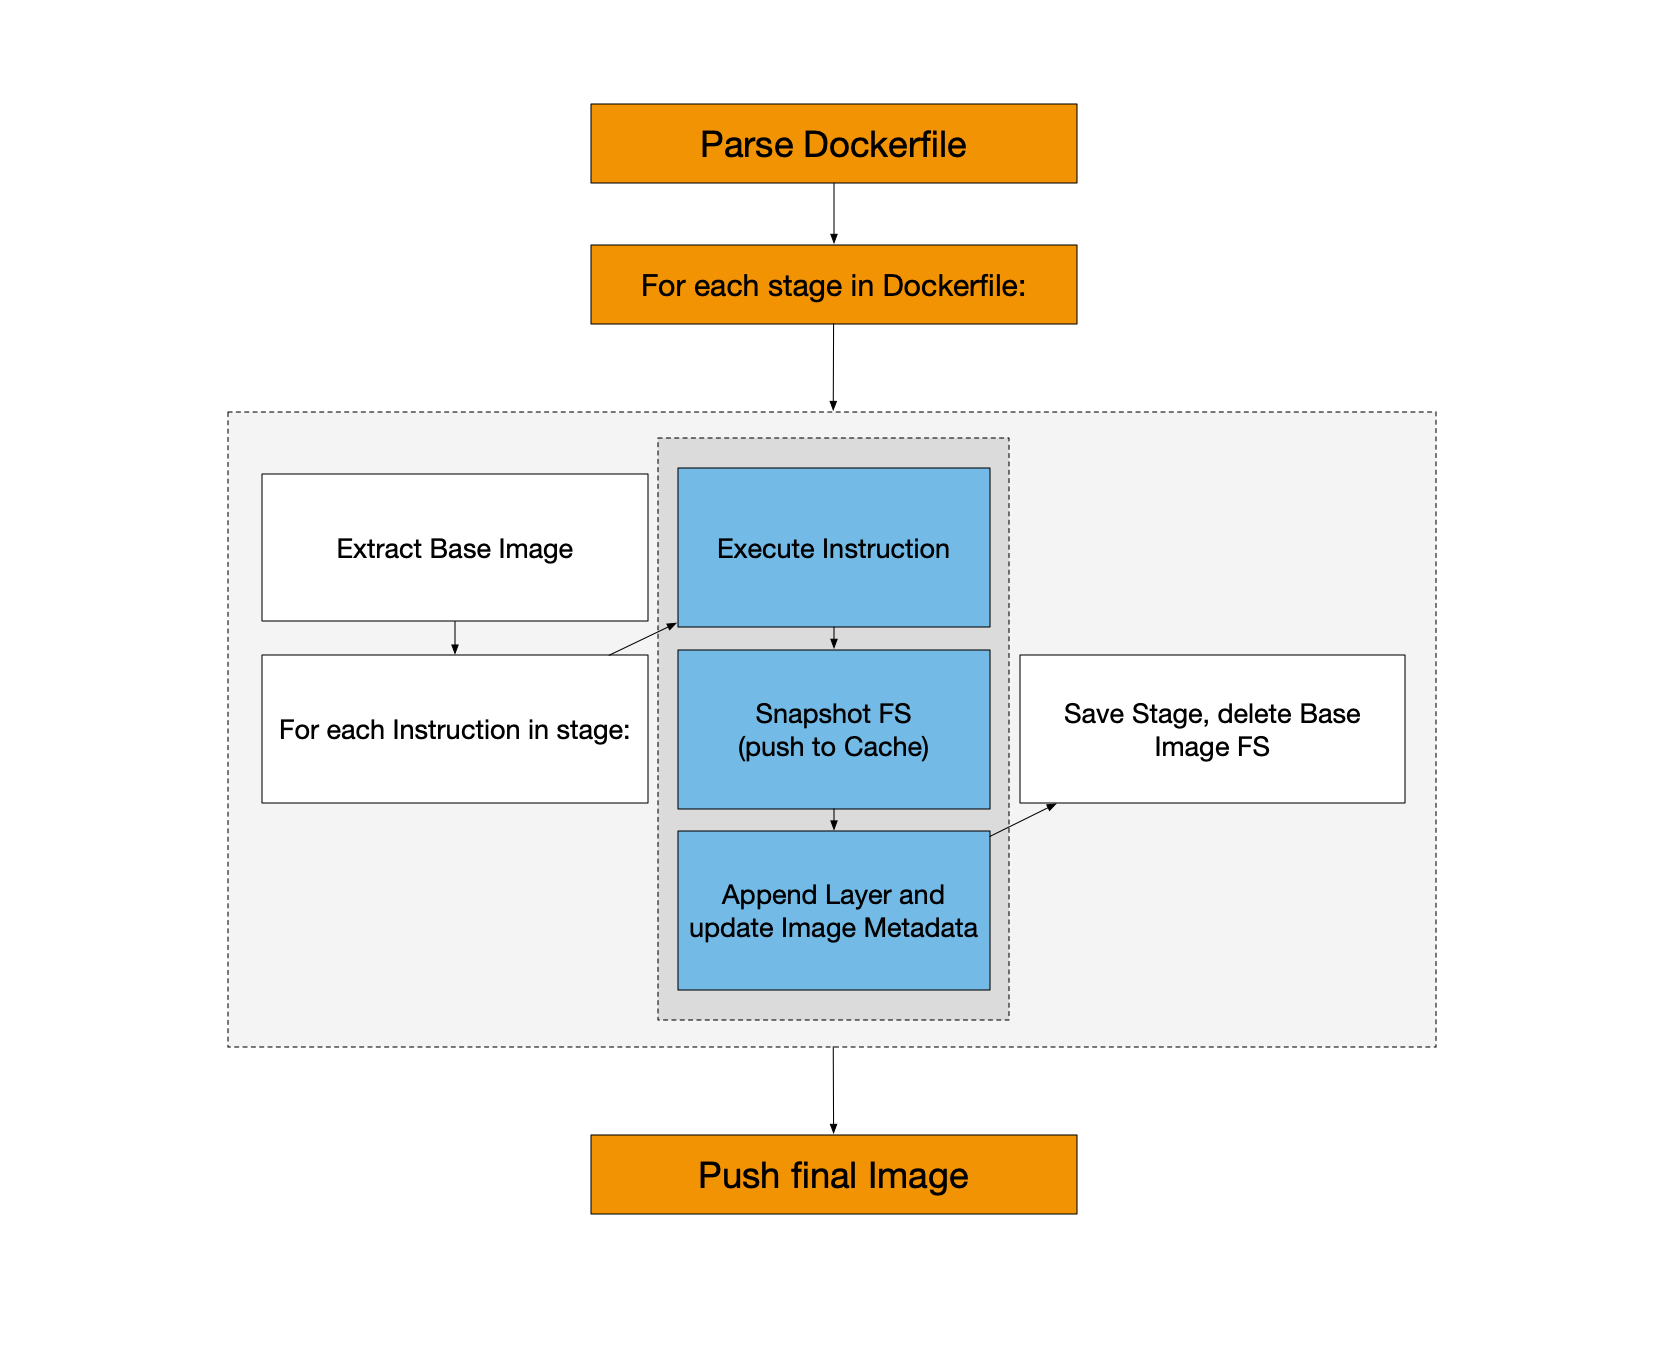
Kaniko, an open-source project from Google, stands out for its ability to build container images without relying on a Docker daemon. This is particularly crucial in environments where Docker daemon privileges are restricted or unavailable, such as Kubernetes clusters or CI/CD pipelines. Kaniko’s architecture is crafted to facilitate secure and efficient container image builds within containers.
Understanding the Architecture of Kaniko
1. Containerized Build Process
The heart of Kaniko lies in its containerized build process. Unlike traditional approaches that rely on a Docker daemon, Kaniko executes entirely within a container, ensuring a self-contained and isolated environment for image building. This design choice enhances security by minimizing dependencies and confining the build process within the boundaries of the container.
2. Layered Image Build
Kaniko adopts the layered image build approach, a concept familiar to Docker users. Each instruction in the Dockerfile results in a layer, and these layers are cached. This layering strategy improves build efficiency, as unchanged layers can be reused across builds, significantly speeding up the overall process. The result is a more streamlined and resource-efficient container image creation.
3. Context and Snapshot
The build process starts with a build context, which includes the source code, Dockerfile, and any other required files. Kaniko then creates a snapshot of the filesystem based on this context. This snapshot serves as the foundation for constructing the layers of the container image. By taking this approach, it ensures consistency and reproducibility across different environments, a critical requirement in the realm of containerization.
Workflow Breakdown with Code Examples
Let’s walk through a typical workflow of using Kaniko, accompanied by practical code examples:
1. Specify the Kaniko Image
The first step involves specifying the Kaniko executor image as the base image in your Dockerfile. This image contains the Kaniko binary and serves as the runtime for building container images.
FROM gcr.io/kaniko-project/executor:latest
2. Define Build Arguments
If your build process requires dynamic configuration, you can specify build arguments. We can set these arguments during the build, or we can also supply them from an external source which in turn offers flexibility.
ARG APP_NAME=myapp
3. Copy Build Context
Copy the build context into the Kaniko image. The build context typically includes the source code, Dockerfile, and any other necessary files. In this example, we copy the contents of the current directory into the /workspace directory within the Kaniko image.
COPY . /workspace
WORKDIR /workspace
4. Run Kaniko Build
Execute the build command, specifying parameters such as the build context, location of the Dockerfile, destination registry, image name, and optionally any build arguments.
RUN /kaniko/executor --context /workspace --dockerfile /workspace/Dockerfile --destination myregistry.com/myuser/${APP_NAME}:${TAG}
Practical Example: Building a Node.js Application
Let’s bring all these concepts together in a practical example. Consider a simple Node.js application with the following Dockerfile:
FROM gcr.io/kaniko-project/executor:latest

ARG NODE_VERSION=14
ARG APP_NAME=myapp
ARG TAG=latest

# Set the working directory
WORKDIR /workspace

# Copy package.json and package-lock.json
COPY package*.json ./

# Install dependencies
RUN npm install

# Copy the rest of the application
COPY . .

# Build the application
RUN /kaniko/executor --context /workspace --dockerfile /workspace/Dockerfile --destination myregistry.com/myuser/${APP_NAME}:${TAG}
In this example, we’re using Kaniko to build a Node.js application. The build arguments allow for customization of the Node.js version, application name, and image tag during the build process.
Conclusion
Kaniko emerges as a compelling solution for container image building, especially in environments where Docker daemon privileges are restricted. Its architecture, centered around a containerized build process, layered image builds, and efficient caching mechanisms, makes it a valuable addition to the containerization toolkit. By integrating it into your workflows with the provided code examples, you can enhance the security and efficiency of your container image builds, ensuring seamless deployment across diverse environments.
I hope this gave you some useful insights. Please feel free to drop any comments, questions or suggestions. Thank You !!!