


Introduction
Rust is a modern-level programming language known for its focus on security, performance and concurrency. It is popular among software developers due to its powerful features and strong ecosystem. If you want to learn more about Rust, this blog will help you start your journey to becoming a Rustacean.
1. Installing Rust
Before you can start coding in Rust, you need to install the Rust compiler and the Cargo package manager.. Rust provides an easy-to-use tool called “rustup” for managing Rust installations.Here’s how to get started and build Rust:
- Visit the official Rust website at https://www.rust-lang.org/.
- Click on the “Get Started” button to access the installation instructions.
- Follow the instructions to download and install Rust using rustup.
Once the installation is complete, you’ll have access to the Rust compiler (rustc) as well as the package manager and the Cargo build tool.
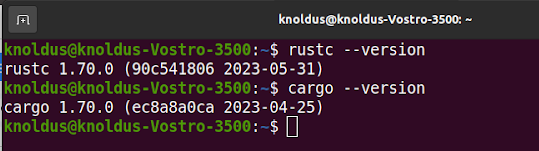
You can verify your Rust installation by opening a terminal and running:
$ rustc –version
$ cargo –version
This command should show the Rust and Cargo versions.
2. Writing Your First Rust Program
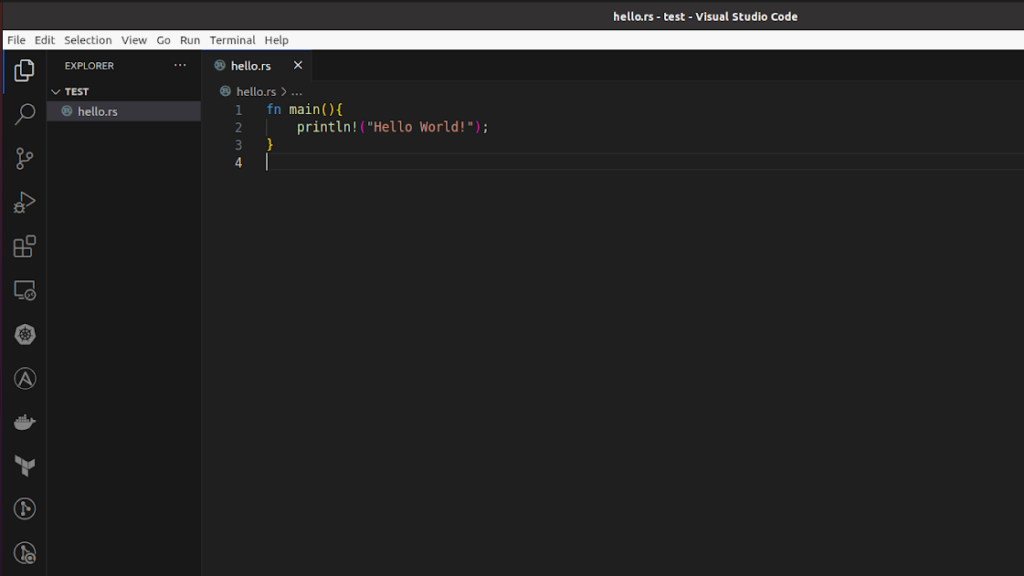
After you finish setting up Rust,, it’s time to write your first “Hello, World!” Rust program. Using a text editor or integrated development environment (IDE) of your choice, create a new file with the “.rs” extension (for example, “hello.rs”) Then, add the following code:
Save the file and open your system’s terminal or command prompt. Navigate to the directory where the “Hello.rs” file is stored. Compile and run your program using the following commands:

You should see “Hello, World!” printed to the console. You’ve executed your first Rust program.
3. Understanding Rust’s Syntax
Rust has a unique and expressive syntax. Let’s review some basic concepts:
- Functions: In Rust, programs start execution from the main function by default. Functions are declared using the fn keyword.
- Comments: You can add comments using // for single-line comments or /* */ for multi-line comments.
- Print Statements: The println! macro is used to print text to the console. Macros in Rust end with an exclamation mark !.
- Variable Declaration: Rust uses the let keyword to declare variables. By default, variables are immutable, meaning their values cannot be changed once they are set. To make a variable mutable, use the mut keyword
4. Variables and Data Types
Rust is a statically-typed language, which means you must declare the data type of your variables. Some common data types in Rust include integers (i32, i64, etc.), floating-point numbers (f32, f64), booleans (bool), and characters (char).
Here’s an example of declaring and initializing variables with different data types:
fn main() {
let age: i32 = 30;
let pi: f64 = 3.14159;
let is_rust_fun: bool = true;
let first_letter: char = ‘R’;
let greeting: &str = “Hello, Rust!”;
}
5. Understanding Rust’s Ownership System
A key feature of Rust is its ownership system, which ensures memory safety and prevents common programming errors like null pointer dereferencing and data races. It consists of three fundamental rules:
- Each value in Rust has a variable that is its “owner.”
- Values can have only one owner at a time.
- When the owner goes out of scope, Rust automatically deallocates the memory used by the value.
Ownership is central to Rust’s safety guarantees and might take some time to grasp fully. As you continue learning Rust, pay close attention to concepts like ownership, borrowing, and lifetimes.
6. Discover Cargo
Rust has a vibrant ecosystem with libraries and frameworks for a wide range of applications, from systems programming to web development. You can explore Rust’s package manager, Cargo, to manage dependencies and create projects.
It simplifies project management by handling dependencies, building your code, and running tests. To create a new Rust project using Cargo, run:
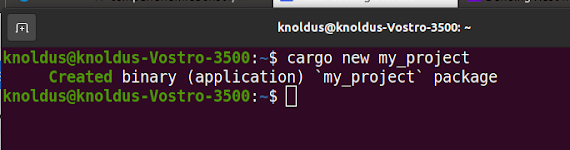
This command creates a new directory called my_project with a basic project structure. You can navigate into this directory and start working on your Rust project.
Learning to use Cargo is essential for building and sharing Rust projects effectively.
Conclusion
Getting started with Rust is an exciting journey, and it’s a language that rewards the effort you put into learning it. In this blog, we’ve covered the basics of installing Rust, writing your first program, understanding Rust’s syntax, and introducing you to some core concepts, exploring Rust’s unique features, such as ownership and borrowing, and discovering the rich ecosystem of libraries and frameworks available to Rust developers. Therefore, embrace the Rust programming language and enjoy the benefits of writing safe, efficient, and reliable code. Happy programming, Rustacean!