


Introduction:
In the world of distributed systems and containerized environments, ensuring data integrity and availability is paramount. Etcd, a distributed key-value store, is at the heart of many Kubernetes clusters, acting as the source of truth for critical configuration and state information. Like any critical system, etcd requires robust backup and restore mechanisms to safeguard against data loss or corruption.
One of the most effective ways to backup and restore an etcd cluster is by utilizing its built-in snapshot feature. In this guide, we’ll delve into the details of backing up and restoring an etcd cluster using these snapshots, ensuring the resilience of your infrastructure.
Understanding Etcd Snapshots:
Etcd snapshots provide a convenient and efficient way to capture the current state of the cluster’s key-value store at a particular moment in time. These snapshots are essentially point-in-time backups that can be used to restore the etcd cluster to a previous state in case of failures or data corruption.
Behind the scenes, etcd snapshots are taken by creating a consistent snapshot of the entire etcd data directory. This snapshot contains all the necessary information to restore the cluster to the exact state it was in when the snapshot was taken.
Pre-requisites:
Before we dive into the backup and restore process, let’s ensure we have the necessary prerequisites in place:
- A running etcd cluster: Ensure that your etcd cluster is up and running. This could be a standalone cluster, or a cluster deployed as part of a Kubernetes environment.
- Access to etcdctl: `etcdctl` is the command-line utility for interacting with etcd clusters. Make sure it’s installed and configured on your system.
- –endpoints=https://127.0.0.1:2379: This flag specifies the endpoints of the etcd cluster from which the snapshot will be taken. In this example, the snapshot will be taken from a cluster running on `https://127.0.0.1:2379`. Make sure to replace this with the actual endpoint of your etcd cluster.
- –cacert=/etc/etcd/ca.crt: This flag specifies the path to the CA (Certificate Authority) certificate file used to verify the authenticity of the etcd server’s certificate. It ensures secure communication with the etcd cluster.
- –cert=/etc/etcd/etcd-server.crt: This flag specifies the path to the certificate file used by `etcdctl` to authenticate itself to the etcd server. This certificate should be signed by the CA specified in `–cacert`.
- –key=/etc/etcd/etcd-server.key: This flag specifies the path to the private key file corresponding to the certificate specified in `–cert`. It is used for authentication purposes when communicating with the etcd server.
Note:
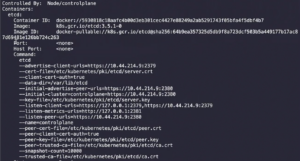
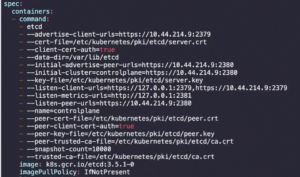
The values for the --endpoints, --cacert, --cert, and --key flags in the etcdctl command can typically be found in the configuration files and directories of your etcd cluster.
Or you can simply see these values in the Static-Manifest f
ile of ETCD pod which is present in “/etc/kubernetes/manifests/etcd.yaml”.
Also by below command:
"kubectl describe pod etcd-controlplane -n kube-system"
"cat /etc/kubernetes/manifests/etcd.yaml"
You will get an output which will look something like this:
Backup Process:
Taking a backup of an etcd cluster using snapshots is a straightforward process:
1. Connect to the etcd Cluster:
Use `etcdctl` to connect to one of the etcd cluster members.
ETCDCTL_API=3 etcdctl snapshot save <SNAPSHOT_FILE_PATH/snapshot.db> \
--endpoints=https://127.0.0.1:2379 \
--cacert=/etc/etcd/ca.crt \
--cert=/etc/etcd/etcd-server.crt \
--key=/etc/etcd/etcd-server.key
2. Wait for Snapshot to Complete:
Depending on the size of your etcd data and the cluster’s workload, the snapshot process may take some time. It’s essential to wait until the snapshot is complete before proceeding.
3. Verify Snapshot:
Once the snapshot process is finished, you can verify the integrity of the snapshot file if needed.
etcdctl snapshot status <SNAPSHOT_FILE_PATH/snapshot.db>
This command will display information about the snapshot, including its revision and total size.
Restoring an etcd cluster:
Note:
If any API servers are running in your cluster, you should not attempt to restore instances of etcd. Instead, follow these steps to restore etcd:
- stop all API server instances.
- restore state in all etcd instances.
- restart all API server instances.
We also recommend restarting any components (e.g. kube-scheduler, kube-controller-manager, kubelet) to ensure that they don’t rely on some stale data. Note that in practice, the restore takes a bit of time. During the restoration, critical components will lose leader lock and restart themselves.
Restoring:
1. Stop all API server instances.
service kube-apiserver stop
2. Restore state in all etcd instances.
etcd supports restoring from snapshots that are taken from an etcd process of the major.minor version. Restoring a version from a different patch version of etcd is also supported. A restore operation is employed to recover the data of a failed cluster.
Before starting the restore operation, a snapshot file must be present. It can either be a snapshot file from a previous backup operation, or from a remaining data directory.
When restoring the cluster, use the --data-dir option to specify to which folder the cluster should be restored:
ETCDCTL_API=3 etcdctl --data-dir <data-dir-location> snapshot restore <SNAPSHOT_FILE_PATH/snapshot.db> \
--endpoints=https://127.0.0.1:2379 \
--cacert=/etc/etcd/ca.crt \
--cert=/etc/etcd/etcd-server.crt \
--key=/etc/etcd/etcd-server.key
where <--data-dir-location> is a directory that will be created during the restore process.
3. Change ownership:
Set ownership on the new data directory:
sudo chown -R etcd:etcd <data-dir-location>
4. Update the <--data-dir-location>
As the data is restored, you need to modify the Etcd pod’s manifest file to use the new restored data directory as a volume. Open the Etcd manifest file for editing.
Update the <--data-dir-location> inside the manifest file of ETCD which is in “/etc/kubernetes/manifests/etcd.yaml”
5. Restart all API server instances.
systemctl daemon-reload
service etcd restart
service kube-apiserver start
Best Practices
Here are some best practices to keep in mind when working with etcd snapshots:
- Regularly Scheduled Backups: Schedule regular backups of your etcd cluster to ensure that you have recent snapshots available in case of emergencies.
- Secure Backup Storage: Store your snapshot files in a secure location, preferably on redundant and durable storage to mitigate the risk of data loss.
- Test Restoration Process: Periodically test the restoration process using your snapshots to ensure that everything is functioning correctly. This practice helps uncover any potential issues before they become critical.
- Monitor Snapshot Health: Monitor the health and integrity of your snapshot files to detect any anomalies or corruption early on.
Conclusion:
By leveraging etcd’s built-in snapshot feature, you can effectively backup and restore your etcd cluster, ensuring the integrity and availability of your critical data. Understanding the backup and restore processes and following best practices will help you maintain a robust and resilient infrastructure in your distributed environment. Remember to regularly review and update your backup strategies to adapt to changing requirements and environments. With proper planning and execution, you can confidently navigate the complexities of data management in distributed systems.