


Hello Learners, I am back with another blog about the AWS EKS Cluster creation using eksctl. So in this blog, we will go through the process of establishing an AWS EKS cluster by using eksctl. eksctl, This is a dedicated command-line tool for EKS cluster management and will be our primary focus. Moreover, we will extensively examine essential concepts pertaining to eksctl.
Requirements for EKS cluster:-
Prior to utilizing eksctl, it is necessary to have the following prerequisites configured on your computer:
- Install and properly configure the AWS CLI with appropriate permissions to create an EKS cluster.
- Ensure that the eksctl CLI is installed.
- Additionally, have kubectl installed on your workstation.
Work Flow of eksctl
When we use eksctl to deploy an EKS cluster through the execution of a YAML file or the cluster create command, it effectively deploys CloudFormation templates behind the scenes. So These CloudFormation templates are responsible for the creation of the EKS clusters.
Essentially, eksctl functions as a convenient layer around CloudFormation, streamlining the process of deploying EKS clusters. Upon executing the eksctl cluster create command, if you navigate to the CloudFormation dashboard, you will observe the creation and deployment of CloudFormation resources for your EKS cluster.
Creation of EKSCluster Using eksctl:-
There are two options available for launching an EKS cluster using eksctl:
- Using eksctl CLI and parameters: This approach entails utilizing the eksctl CLI and providing the required parameters while creating the cluster. It is a simple and direct method.
- Using eksctl CLI and YAML config: With this method, you can define the cluster configuration in a YAML file, which simplifies the management and version control of your cluster configuration.
Here is an example illustrating the usage of the YAML config approach:
- To create a file named “eks-cluster.yaml,” you can run the following command:
vi eks-test.yaml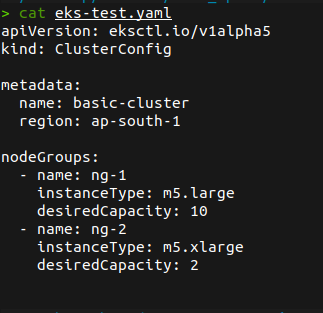
This is the simple one. You can see the below one and add the resource as per your need and requirements. As I am using Vi editor so to save the file, you can follow below instructions.
Certainly! Here are the contents you can copy into the “eks-test.yaml” file. Remember to replace the placeholder values with your actual VPC ID, CIDR, subnet IDs, and keypair name:
apiVersion: eksctl.io/v1alpha5
kind: ClusterConfig

metadata:
  name: eks-spot-cluster
  region: us-west-2

vpc:
  id: "<your_vpc_id>"
  cidr: "<your_vpc_cidr>"
  subnets:
    public:
      us-west-2a: { id: "<your_public_subnet_id_us-west-2a>" }
      us-west-2b: { id: "<your_public_subnet_id_us-west-2b>" }
      us-west-2c: { id: "<your_public_subnet_id_us-west-2c>" }

managedNodeGroups:
  - name: ng-db
    instanceType: t3.small
    labels: { role: builders }
    minSize: 2
    maxSize: 4
    ssh:
      allow: true
      publicKeyName: "<your_keypair_name>"
    tags:
      Name: ng-db
  - name: ng-spot
    instanceType: t3.medium
    labels: { role: builders }
    minSize: 3
    maxSize: 6
    spot: true
    ssh:
      allow: true
      publicKeyName: "<your_keypair_name>"
    tags:
      Name: ng-spot
To save the file and exit the text editor, follow the steps based on commonly used text editors:
- Press the Esc key to ensure you’re in command mode.
- Type
:wqand press Enter. This command will write the changes to the file and quit the editor.
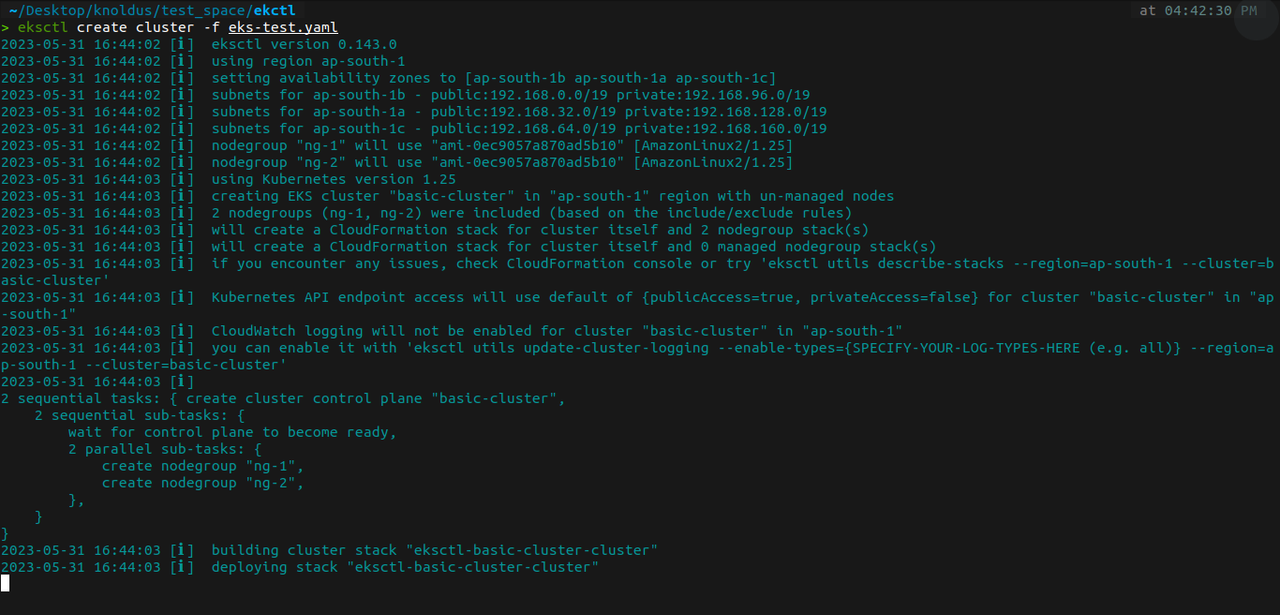
Certainly! You can use the eksctl CLI to create the EKS cluster using the YAML config file. Assuming you have eksctl installed and configured properly, run the following command:
eksctl create cluster -f eks-test.yaml
You will see this kind of log after run this command:-
Before using the AWS CLI and eksctl to create the cluster, it is important to ensure that you have the necessary AWS credentials and permissions configured. Here are the steps to follow:
- Install and configure the AWS CLI: If you haven’t already, install the AWS CLI on your machine. Then, use the
aws configurecommand to set up your AWS access key ID, secret access key, default region, and output format. This information can be obtained from your AWS account or administrator. - Verify AWS CLI configuration: After configuring the AWS CLI, you can verify your configuration by running the command
aws sts get-caller-identity. It should return information about your AWS account, indicating that your credentials are correctly set up. - Ensure necessary permissions: To create an EKS cluster, ensure that your AWS credentials have the necessary permissions. At a minimum, you should have the
AmazonEKSClusterPolicyandAmazonEKSServicePolicypolicies attached to your IAM user, role, or group. These policies allow you to manage EKS clusters and associated resources.
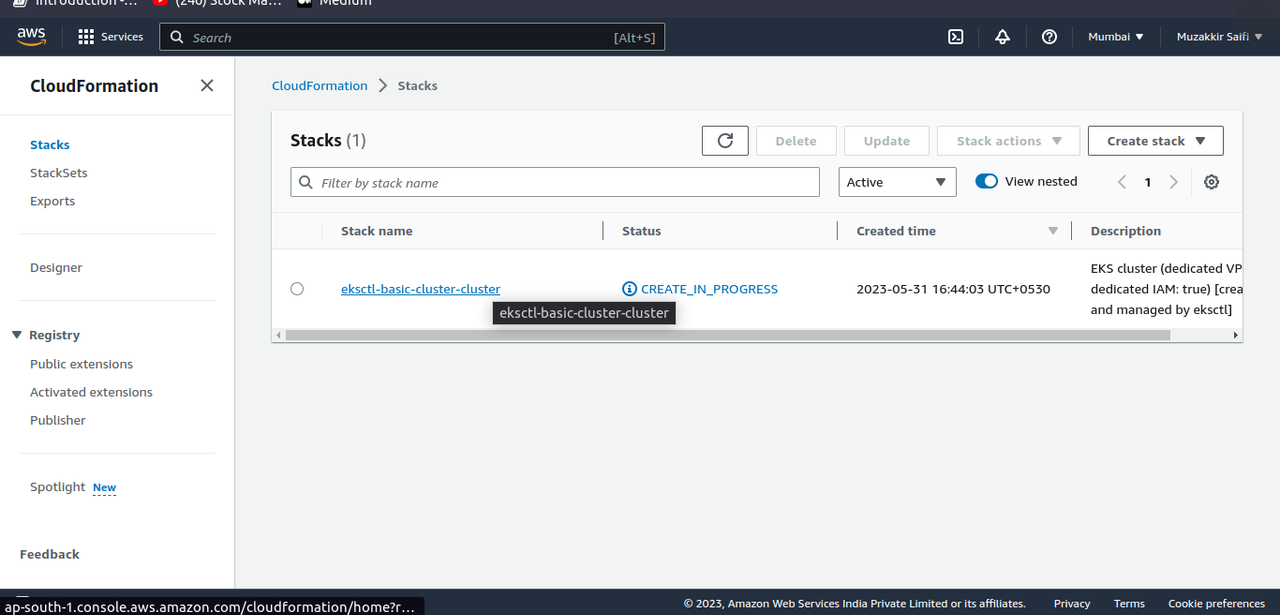
After running the command you can see the cloud formation on your AWS account. Cloud formation plays a very important role to create the EKS cluster. I am adding a photo of it. You can check this image:
By following these steps, you can ensure that your AWS CLI and eksctl have the necessary credentials and permissions to create the EKS cluster successfully.
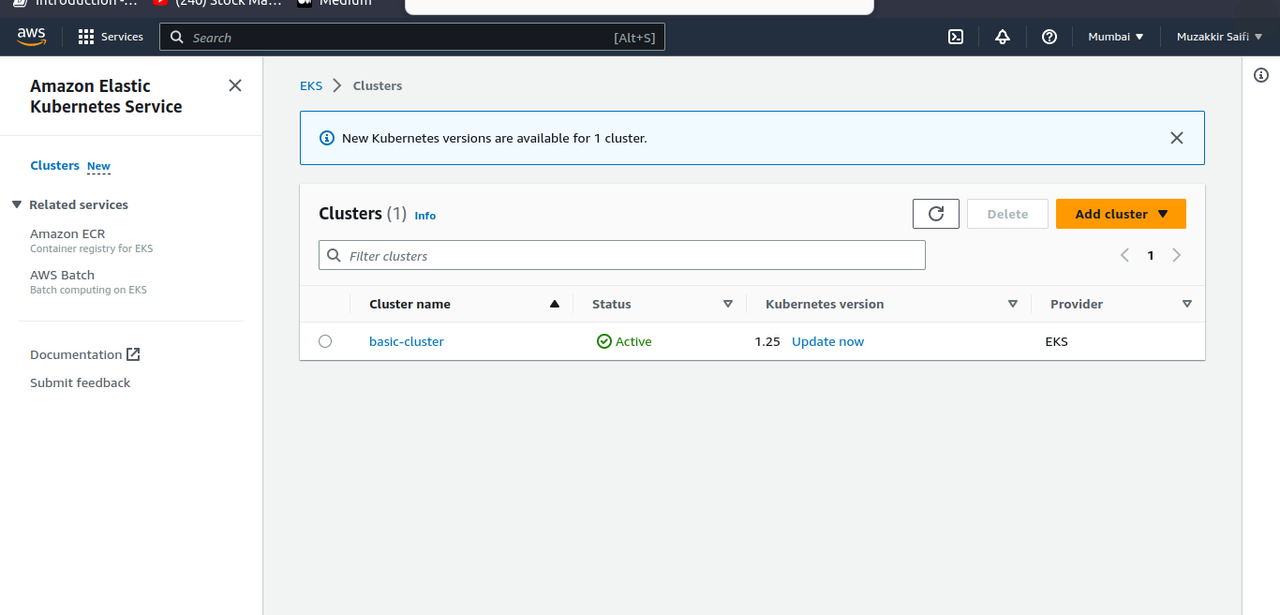
As you can see in the below image that EKs cluster has been created.
EKS cluster connection
Now. Its time to connect with the EKS cluster. you can run the below command to connect with EKS cluster or update the kuberconfig:-
aws eks update-kubeconfig --region us-west-2 --name basic-clusterNow you will see output like this :
Added new context arn:aws:eks:us-west-<.............................>To verify the connectivity to the cluster, you can execute the following kubectl commands:
Certainly! Here are the commands to provide information about the cluster, list the available nodes, and display the pods in the “kube-system” namespace:
- To get information about the cluster:
kubectl cluster-info
This command will display information about the Kubernetes cluster, including the API server endpoint and the cluster certificate authority.
- To list the available nodes in the cluster:
kubectl get nodes
Use for retrieving a list of the worker nodes in the cluster along with their status and other details.
- To display the pods in the “kube-system” namespace:
kubectl get pods -n kube-system
You can see a list of pods running in the “kube-system” namespace, which includes important system components of the Kubernetes cluster. Make sure you have the kubectl command-line tool properly configured and connected to the EKS cluster before running these commands.These commands will provide information about the cluster, list the available nodes, and display the pods in the “kube-system” namespace, respectively.
Conclusion:-
In this blog post, we discussed the process of launching an EKS cluster using eksctl. We explored eksctl CLI with a YAML config file. The YAML config file approach was recommended due to its ease of cluster configuration management.
Once the cluster was provisioned, we demonstrated how to update the kubeconfig file using the AWS CLI command. This step is necessary to interact with the cluster using kubectl. We also verified the cluster connectivity by running some basic kubectl commands to retrieve cluster information, node details, and pods in the “kube-system” namespace. You can follow this link to install eksctl in your system.
By following this blog, you should now have a clear understanding of how to create an EKS cluster using eksctl and perform basic operations with kubectl. This knowledge will empower you to utilize EKS for your Kubernetes deployments on AWS.
You can follow this link for more blogs.