


Hi folks, Welcome to the world of Android app testing with Appium and BrowserStack! Are you an Android app developer or a tester looking to automate your testing process and ensure your app works perfectly across a wide range of Android devices? No need to look any further! This step-by-step guide will walk you through the process of writing your first Android Appium test on BrowserStack, a powerful cloud-based platform for mobile app testing.
Mobile app testing is crucial for delivering a seamless user experience and ensuring your app performs optimally on different devices and operating systems. With the combination of Appium, a popular open-source framework for mobile app automation, and BrowserStack, a comprehensive testing platform, you can supercharge your testing efforts and achieve faster and more reliable results.
Why do we need BrowserStack?
We’ll introduce you to the incredible power of combining Appium with BrowserStack. two industry-leading tools that support seamless Android app testing. Get ready to discover the game-changing benefits of testing your app on real devices using the following:-
- Real Device Testing: With BrowserStack’s vast device lab, you gain access to a wide range of real Android devices. This allows you to replicate real-world user scenarios and ensure your app performs flawlessly across different devices, OS versions, and browsers.
- Comprehensive OS and Browser Support: BrowserStack supports a multitude of OS versions and browser combinations, enabling you to test your app’s compatibility on a diverse set of environments. This ensures that your app delivers consistent functionality and a seamless user experience across various Android configurations.
- Parallel Test Execution: BrowserStack empowers you to run multiple tests in parallel, significantly reducing testing time. . You can maximize test coverage and get faster feedback on your app’s performance.
- Detailed Test Reports and Insights: BrowserStack provides detailed test reports that offer comprehensive insights into your app’s behaviour. You can easily analyze test results, identify failures, and investigate potential issues.
By following this guide, you’ll not only gain a solid understanding of Appium and BrowserStack, Whether you’re a seasoned developer or new to Android app testing, this guide is designed to cater to all skill levels. We provide clear instructions and practical examples, making it easy for beginners to grasp the concepts and get started. You’ll be guided step by step, from setting up your development environment to configuring BrowserStack for Android testing and writing your first Appium test. You’ll learn how to interact with browser-based apps, locate elements, perform actions, and verify expected behaviours. So, let’s get started and unlock the full potential of your Android app with this comprehensive step-by-step guide!
To ensure a smooth flow and easy navigation, we have organized our comprehensive guide into the following sections:
Section 1: Setting up the Development Environment
In this section, we will walk you through the process of setting up your development environment. We’ll guide you step-by-step, from installing the necessary tools and dependencies to configuring your IDE. By the end of this section, you’ll have a fully prepared environment for Android app testing.
There are several things you need to consider and configure. Here are the key aspects to focus on:
- Install Java Development Kit (JDK): Appium requires Java to run. Ensure that you have the latest version of JDK installed on your machine.
- Install Android SDK: To interact with Android devices and emulators, you need to install the Android Software Development Kit (SDK). It provides the necessary tools, platform components, and system images for Android app development and testing.
- Set up Appium: Install Appium on your machine. You can download and install the Appium Desktop application or set it up using the command-line interface (CLI). Make sure you have the latest stable version of Appium installed.
- Install IDE and Appium Client Libraries: Choose an Integrated Development Environment (IDE) that suits your preferences, such as IntelliJ IDEA or Eclipse. Install the necessary plugins and dependencies for Appium testing. Additionally, install the required Appium client libraries for your chosen programming language (e.g., Java, Python, JavaScript).
Section 2: Configuring BrowserStack for Android Testing
Here, we will focus on configuring BrowserStack for Android testing. You’ll learn how to set up your BrowserStack account, define desired capabilities, and establish a connection with the BrowserStack device cloud. We’ll ensure you have all the necessary configurations to leverage the full potential of BrowserStack in your testing workflow.
BrowserStack offers multiple tools, and “App Automate” and “App Live” are two. It enables you to test native and hybrid mobile applications using the Appium automation framework on thousands of real Android and iOS devices.
There are several things and steps you need to consider. Here’s a breakdown of the key requirements and steps involved:
- BrowserStack Account: Ensure that you have a valid BrowserStack account. If you don’t have one, sign up for an account on the BrowserStack website.
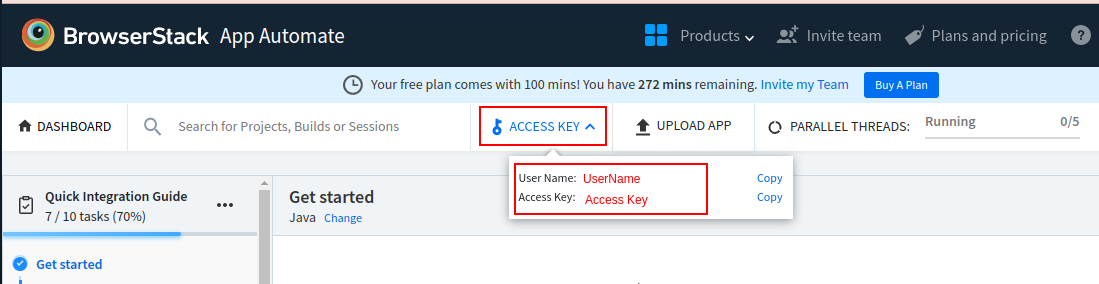
- Obtain Username and Access Key: After signing up, you will be provided with a unique username and access key. These credentials are required to establish a connection between your test scripts and the BrowserStack cloud.
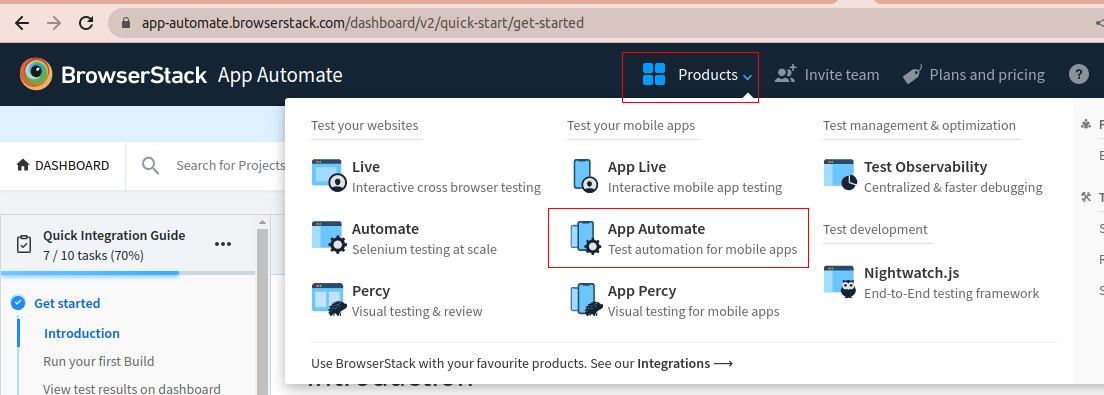
To begin the setup, first, you must register for a free trial or purchase a plan to obtain your access credentials. After completing those steps, you can proceed to launch BrowserStack App Automate, and as a result, you will be directed to the following page.
- Choose Desired Testing Environment: Determine the specific Android devices or emulators on which you want to run your tests. BrowserStack offers a wide range of real devices and emulators with different OS versions, manufacturers, and screen sizes. Identify the devices that match your target audience and test them. additionally, By using the following things, you can determine the device on BrowserStack:
- Device Name
- Os Version
- Platform Name
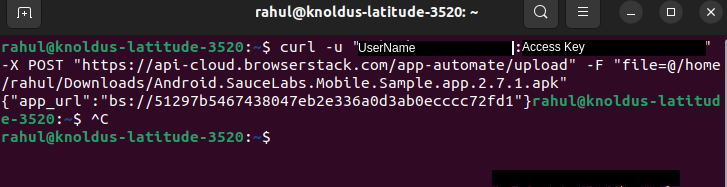
- Upload your app:
curl -u "USERNAME:AccessKey" -X POST "https://api-cloud.browserstack.com/app-

automate/upload" -F "file=@/full path of app along with App Name"
The sample app on BrowserStack is uniquely identified by its APP URL, which is encoded with bs://xxxxxxxxx, as seen in the picture below. therefore Once you do this curl call in the terminal, you will receive that information.
Section 3: Writing Your First Android Appium Test
In this section, the real action begins! Firstly, we will guide you through the process of writing your first Android Appium test. You’ll gain insights into how to interact with elements, perform actions, and make assertions using the powerful Appium framework. Furthermore, we’ll provide practical examples and share best practices to assist you in writing effective and reliable tests.
This section also has several steps that need to be considered and configured, as follows:
1. Setup your POM File:
You need to include certain Maven dependencies in your project. These dependencies provide the necessary libraries and tools to establish a connection with BrowserStack and execute your tests. Here are the main Maven dependencies required:
- Selenium WebDriver: Dependency:
org.seleniumhq.selenium:selenium-java
       <dependency>
            <groupId>org.seleniumhq.selenium</groupId>
            <artifactId>selenium-java</artifactId>
            <version>4.8.1</version>
       </dependency>
Purpose: Selenium WebDriver is used for automating browser interactions. It allows you to interact with web elements and perform actions on web pages.
- Appium Java Client: Dependency:
io.appium:java-client
        <dependency>
            <groupId>io.appium</groupId>
            <artifactId>java-client</artifactId>
            <version>8.3.0</version>
        </dependency>
Purpose: The Appium Java Client library provides a set of classes and methods to interact with mobile devices and applications using Appium. It enables you to write Appium tests in Java.
- JUnit(optional) : Dependency:
org.JUnit
       <dependency>
            <groupId>junit</groupId>
            <artifactId>junit</artifactId>
            <version>4.13.2</version>
        </dependency>
Purpose: JUnit is a testing framework that provides advanced features for test management, test configuration, and reporting. It allows you to organize and execute your Appium tests more efficiently.
- Browser-stack: Dependency: com.BrowserStack–BrowserStack-local-java
        <dependency>
            <groupId>com.browserstack</groupId>
            <artifactId>browserstack-local-java</artifactId>
            <version>1.0.6</version>
        </dependency>
As you can see in the POM file, I built a framework based on Appium and JUnit. At the bottom, I also use an additional dependency that enables me to run the BrowserStack locally.
2. Configure Appium Server:
Configure your Appium server to connect with BrowserStack. This involves setting the BrowserStack URL, username, and access key in the desired capabilities or Appium server configuration.
        HashMap<String, Object> browserstackOptions = new HashMap<String, Object>();
             browserstackOptions.put("userName", "$UserName");
             browserstackOptions.put("accessKey", "$AccessKey");
             browserstackOptions.put("buildName", "$buildName");

        URL remoteUrl = new URL("http://hub.browserstack.com/wd/hub");
The $UserName, $AccessKey, and $BuildName variables are all adjustable as desired.
3. Define Desired Capabilities:
Desired capabilities are a set of parameters that define the testing configuration for your Appium tests. These include details such as the device name, platform version, browser name, orientation, and other specific settings required for testing on BrowserStack. Ensure that you define the desired capabilities correctly based on your chosen devices and testing needs.
DesiredCapabilities desiredCapabilities = new DesiredCapabilities();
        desiredCapabilities.setCapability("appium:deviceName", "Samsung Galaxy S22");
        desiredCapabilities.setCapability("appium:os_version", "12.0");
        desiredCapabilities.setCapability("appium:app", "bs://51297b5467438047eb2e336a0dxxxxx");
        desiredCapabilities.setCapability("platformName", "Android");
        desiredCapabilities.setCapability("bstack:options", browserstackOptions);
AndroidDriver driver = new AndroidDriver(remoteUrl, desiredCapabilities);
As I already mention that we can replace the following desired capabilities value as per our needs.
4. Test Script Setup:
Set up your test scripts to utilise BrowserStack’s capabilities. This process involves several steps, including initializing the Appium driver, interacting with app elements, writing assertions, and, last but not least, handling waits. Additionally, it requires setting up the desired capabilities and incorporating the necessary logic for interacting with the BrowserStack devices during test execution.
For your convenience, I’ve included some straightforward appium code here that executes the signIn() method in an Android app.
public static AndroidDriver driver;

public void  signIn(String userName, String password) {
        wait.until(ExpectedConditions.visibilityOfElementLocated(TestUserName));
        driver.findElement(TestUserName).sendKeys(userName);
        driver.findElement(TestUserPassword).sendKeys(password));
        wait.until(ExpectedConditions.visibilityOfElementLocated(clickOnLoginButton)).click();
        if (signOutButton.isDisplayed()){
        System.out.printf("user is successfully sign in");
        }else {
          System.out.printf("user is not sign in");
          Asser.fail():
           }
    }

// function call
signIn("standard_user", "secret_sauce")
Section 4: Executing the Test on BrowserStack
Once your test is ready, it’s time to execute it on the BrowserStack platform. In this section, we’ll demonstrate how to effectively manage your Appium tests on real Android devices or emulators provided by BrowserStack. Additionally, we’ll explore how you can maximize the benefits of BrowserStack’s infrastructure by running tests in parallel, thereby saving valuable time and achieving comprehensive device coverage.
You can execute your test by simply entering the below maven command.
mvn test
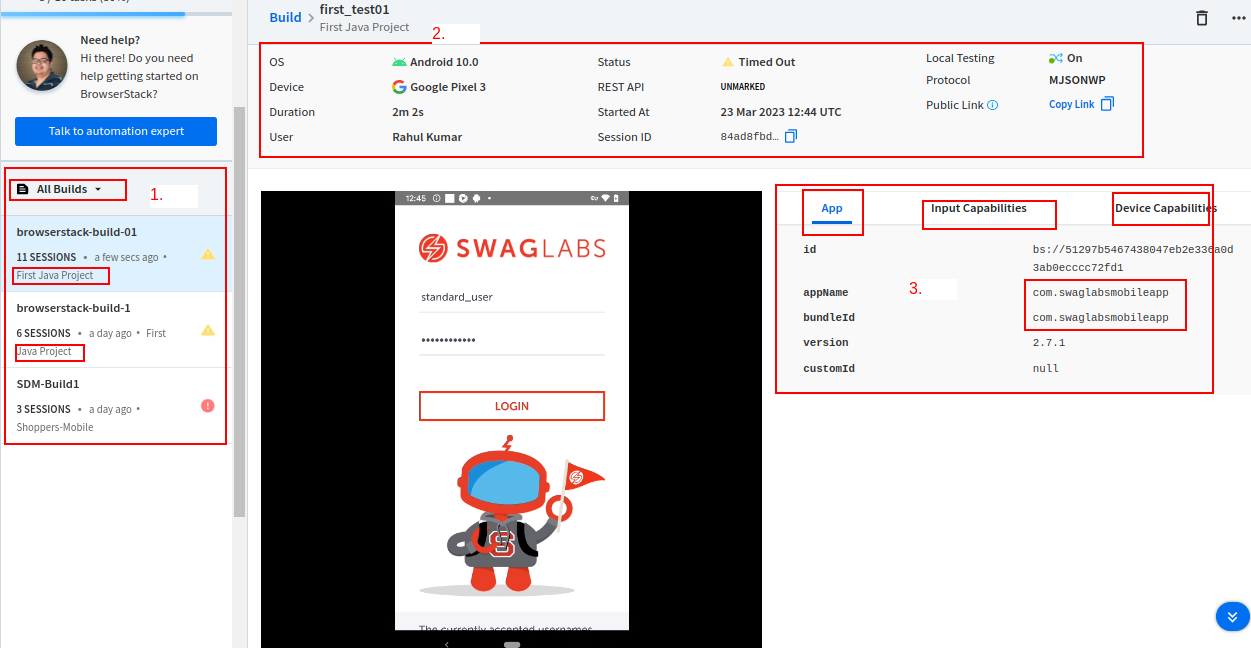
When you run the above command, you will see the live execution on the terminal, and because we are using BrowserStack, it will perform your test in interactive mode on the BrowserStack dashboard, as seen below.

Section 5: Analyzing Test Results
After executing your tests, it’s crucial to analyze the results effectively. In this section, we’ll explore how to interpret the test reports generated by BrowserStack. You’ll learn how to identify test failures, investigate issues, and extract valuable insights to improve the quality of your app.
Here are some key points to consider when analyzing test results in BrowserStack:
- Detailed Test Reports: BrowserStack generates comprehensive test reports that provide a wealth of information about the test execution. These reports include test status (pass/fail), execution time, screenshots, console logs, network logs, and device-specific information.
- Screenshots and Visual Comparison: BrowserStack captures screenshots during test execution, allowing you to visually inspect the state of your app on different devices. Visual comparison helps ensure consistent UI/UX across various devices and screen sizes.
- Console Logs and Error Messages: The console logs captured by BrowserStack provide valuable insights into the test execution process. Analyze the logs to identify any error messages, exceptions, or warnings thrown during the test run. This information can help pinpoint the root cause of failures and assist in debugging and troubleshooting.
- Network Logs and Performance Metrics: BrowserStack captures network logs that reveal the network activity and performance of your app during the test. Analyzing network logs can help detect issues related to API calls, network latency, or data transfer. In order to help you optimise the speed of your app, BrowserStack also offers performance metrics including page load time, resource timings, and network waterfall charts.
- Test Comparison and Regression Analysis: If you have multiple test runs, use BrowserStack’s comparison features to analyze the differences in test results between runs. This allows you to identify any regressions or unexpected changes in your app’s behaviour.
- Collaborative Issue Tracking: BrowserStack integrates with popular issue-tracking and collaboration tools like JIRA and Slack. Make use of these integrations to quickly report and monitor any problems or defects found throughout the testing process.
By carefully analyzing the test results in BrowserStack with Appium, you can gain valuable insights into your app’s behaviour, detect potential issues, and make data-driven decisions to improve its quality and performance. Use the various reports, logs, and comparison features available in BrowserStack to ensure a thorough analysis of your tests and drive continuous improvement in your app.
Conclusion
In this comprehensive guide, we have delved into the powerful combination of Appium and BrowserStack for Android app testing. Moreover, stay tuned for upcoming detailed posts and resources. These include a tech hub with Appium Android code, as well as a brief step-by-step tutorial for automating iOS using BrowserStack or a suitable alternative. By leveraging Appium’s capabilities and taking advantage of BrowserStack’s extensive device coverage, you can ensure your app delivers a flawless user experience across diverse Android devices and configurations.
Till then, Happy learning, and happy sharing!
Reference
https://www.browserstack.com/docs/app-automate/appium/set-up-tests/set-appium-version