


1. Introduction
Integration testing plays a crucial role in software development, ensuring that various components of an application work seamlessly together. However, conducting integration tests can be challenging, especially when dealing with external dependencies such as databases or APIs. Traditional approaches often involve setting up and maintaining complex testing environments, which can be time-consuming and error-prone.
Fortunately, test containers offer a solution to these challenges.
In this blog post, we’ll explore the concept of test containers and learn how to leverage them for seamless integration testing in .NET projects. We’ll walk through the process of setting up test containers, integrating them into our projects, and automating test environment management. By the end of this post, you’ll have a solid understanding of how test containers can improve the efficiency and reliability of your integration testing workflow.
2. What are Test Containers?
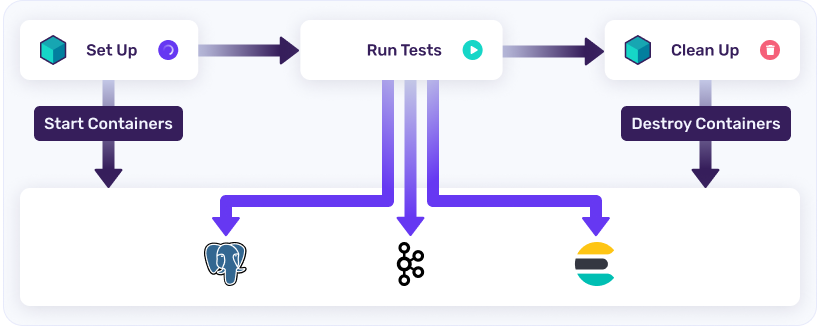
Test containers are lightweight, portable, and self-contained environments used for running integration tests. They encapsulate dependencies such as databases, message brokers, or web servers within isolated containers, allowing developers to test their applications against these dependencies in a controlled and reproducible manner.
3. Why do we need Test Containers?
You could argue that we can use InMemory database for testing. But in production you are not going to use InMemoryDb, right? You will use a real database like SQL Server, Postgres, etc. But setting it up for tests requires a lot of setup. To solve that Test containers address several challenges that arise during integration testing:
- Test containers are a game-changer for developers tackling integration testing. They solve several key issues:
- Isolation: Test containers provide separate environments for each test, preventing interference and ensuring consistent results.
- Reproducibility: They make it easy to recreate test environments, allowing developers to pinpoint and fix issues more effectively.
- Consistency: With test containers, everyone works in the same environment, eliminating discrepancies between development setups.
- Efficiency: Test containers streamline environment setup and teardown, saving time and effort during testing.
- Portability: Tests can be easily shared and run in various environments, promoting collaboration and integration into workflows.
4. Prerequisites
- Installation of Docker and basic understanding of it.
- Understanding of xUnit.
5. Project Setup
5.1 Setting up Integration Tests
- Create a new class CustomWebApplicationFactory inheriting from WebApplicationFactory like following:
public class CustomWebApplicationFactory : WebApplicationFactory<Program> { } - Overide ConfigureWebHost method with following code:
protected override void ConfigureWebHost(IWebHostBuilder builder)
{
  builder.ConfigureTestServices(services =>
  {
    services.RemoveAll(typeof(DbContextOptions<ApplicationDbContext>)); // Remove AppDbContext
    //var connectionString = ""; //We will fix this connection string later on from the container

    services.AddDbContext<ApplicationDbContext>(options =>
    {
      options.UseNpgsql(connectionString);  // Add DB context pointing to test container
     });
    var serviceProvider = services.BuildServiceProvider();
    using var scope = serviceProvider.CreateScope();
    var scopedServices = scope.ServiceProvider;
    var context = scopedServices.GetRequiredService<ApplicationDbContext>();
    context.Database.Migrate();
    context.Posts.AddRange(new BlogPost { Content = "", Title = "" });
    context.SaveChanges();
  });
}
Here, we are removing the existing DbContextOptions since we will need to change connection string and not use our local database but use it from the docker container that we are going to create. Rest of the code, migrates the database and seed it with some values.
- Since we are dealing with real databases and docker containers, creating them is an expensive and time taking task. That’s why we will share the database, between different tests. Later on, we will also see how we can reuse the database by resetting them. Create a new class SharedTestCollection as following:
[CollectionDefinition(nameof(SharedTestCollection))]
public class SharedTestCollection : ICollectionFixture<CustomWebApplicationFactory>
{
}
4. Next we need to annotate our tests to be in this test collection. For that, our test class is going to look something like following:
[Collection(nameof(SharedTestCollection))]
public class BlogTests
{
 ///Rest of the code
}
5. Optional: If you are using VS Code, you can install CSharp Dev Kit extension or you can use following tasks.json file:
{
"version": "2.0.0",
"tasks": [
  {
    "type": "dotnet",
    "task": "build",
    "group": {
    "kind": "build",
    "isDefault": true
     },
    "problemMatcher": [],
    "label": "dotnet: build"
  },
  {
    "label": "Run Tests",
    "command": "dotnet",
    "type": "shell",
    "args": [
      "test"
     ],
     "group": {
     "kind": "test",
     "isDefault": true
      },
     "presentation": {
       "reveal": "silent"
      },
     "problemMatcher": "$msCompile"
    }
  ]
}
5.2 Adding Test Containers
-
- Add a NuGet package to the project with command : dotnet add package Testcontainers.PostgreSql
- Inside CustomWebApplicationFactory class, we will define our container image as:
private readonly PostgreSqlContainer _dbContainer = new PostgreSqlBuilder()
.WithImage("postgres:latest")
.WithDatabase("blog-db")
.Build();
_dbContainer will be a field in CustomWebApplicationFactory.cs. We will use it to start our container.
- Create a new method InitializeAsync() as following:
public async Task InitializeAsync()
{
    await _dbContainer.StartAsync();
    HttpClient = CreateClient();
}
This method will be called automatically when the test starts and it will spin up our container according to the image we defined earlier.
- Since we are dealing with expensive resources, we are going to inherit IAsyncLifetime which will allow us to dispose off this container as soon as tests are completed.
public class CustomWebApplicationFactory : WebApplicationFactory<Program>, IAsyncLifetime
public new async Task DisposeAsync() { await _dbContainer.DisposeAsync(); } - Now, we need to pass this database’s connection string to UseNpgsql inside ConfigureTestServices method. The reason why we are doing this is to isolate tests runs. And by ports will also be randomly assigned, so we can’t statically determine it.
var connectionString = _dbContainer.GetConnectionString();
- To see all this in action, we can put a breakpoint inside our test like following:
 If we open Docker Desktop, we’ll see two containers running and one with some random name for PostgresSql db.

 If we open Docker Desktop, we’ll see two containers running and one with some random name for PostgresSql db.
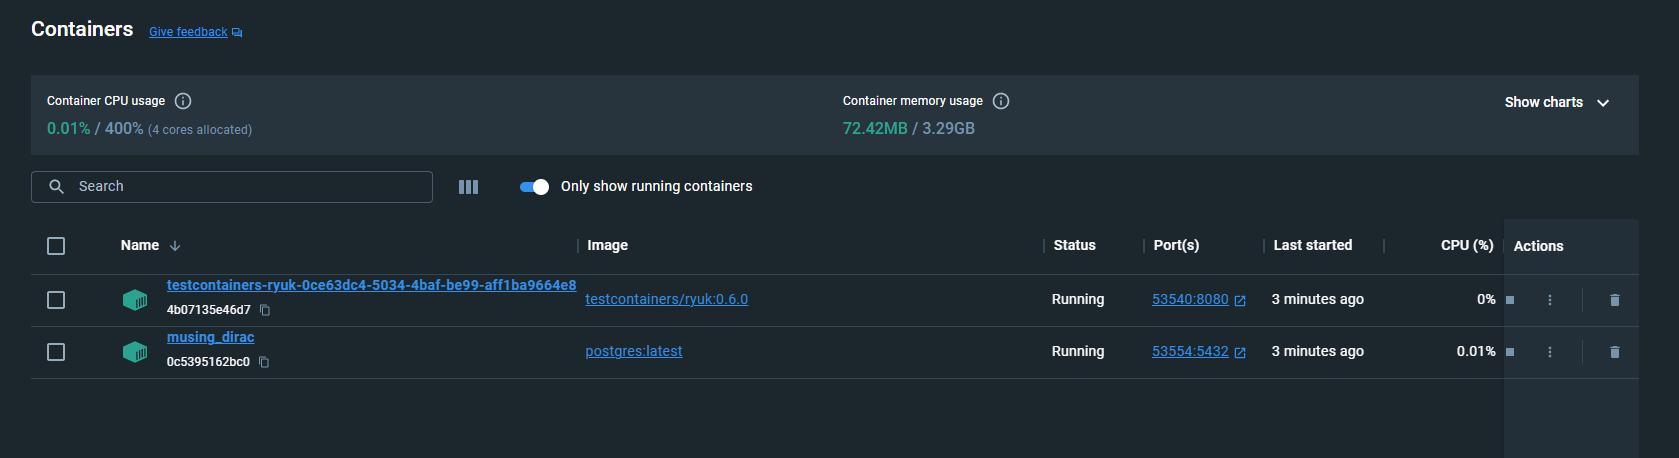
5.3 Adding Respawner
Now, if we want to isolate our tests truly, we need to make the database in the same state as starting point. We can write the boiler plate ourselves and then reset the database after every test suite run. We’ll leverage Respawn libary to do that for us.
-
- Install the package with command : dotnet add package Respawn
- Create a new field inside CustomWebApplicationFactory.cs
private Respawner _respawner = default!;
- Create a new method ResetDatabaseAsync(), which we will call after each test
public async Task ResetDatabaseAsync() { await _respawner.ResetAsync(_connection); } - Update our InitializeAsync method with following code :
public async Task InitializeAsync()
{
  await _dbContainer.StartAsync();
  _connection = new NpgsqlConnection(_dbContainer.GetConnectionString());
  HttpClient = CreateClient();
  await _connection.OpenAsync();
  _respawner = await Respawner.CreateAsync(_connection, new RespawnerOptions
  {
    DbAdapter = DbAdapter.Postgres,
    SchemasToInclude = ["public"],
    TablesToIgnore = [new Table("__EFMigrationsHistory")],
  });
}
Here, we are creating a new connection and passing it down to respawner to use. You can configure SchemasToInclude and TablesToIgnore according to your needs.
- Update Test class with following code by creating a new field and initialising it in the constructor :
private Func<Task> _resetDatabase = default!; public BlogTests(CustomWebApplicationFactory customWebApplicationFactory) { _httpClient = customWebApplicationFactory.HttpClient; _resetDatabase = customWebApplicationFactory.ResetDatabaseAsync; } - We also need to Inherit from IAsyncLifetime interface and implement the methods DisposeAsync and InitializeAsync as following:
public async Task DisposeAsync() => await _resetDatabase();
public Task InitializeAsync() => Task.CompletedTask;
DisposeAsync will be called automatically and thus, database will be reset.
6. Conclusion
In conclusion, test containers offer a powerful solution for simplifying integration testing in .NET projects. By encapsulating dependencies within isolated environments, test containers enable developers to create consistent and reliable testing environments with ease.
Throughout this blog post, we’ve seen how test containers can streamline the setup and management of integration test environments, allowing developers to focus more on writing and executing tests rather than dealing with infrastructure complexities.
By adopting test containers into your integration testing workflow, you can ensure that your applications are thoroughly tested against real-world dependencies, leading to more robust and reliable software releases. So why wait? Start leveraging test containers today and take your integration testing to the next level! Happy Testing!
Here’s link to repository with complete code – https://github.com/NashxDivyesh/dotnet-integration-tests-setup