


Front-end development can pose unique challenges for automated testing. Unlike back-end processes, the quality of the user interface can be perceived differently by users. This subjectivity can make it difficult to write clear and consistent test scripts. Additionally, traditional unit testing approaches may not fully capture the real-world behavior of a web application. This is where Puppeteer shines.
1. What is Puppeteer?
Puppeteer is an open-source Node.js library developed by Google. It provides a high-level API for programmatically interacting with headless Chrome or Chromium browsers. In simpler terms, Puppeteer allows you to write code that can control a browser like a human user would, but with far greater efficiency and repeatability.
1.1 Features of Puppeteer
- SPA (Single-Page Application) Testing: Puppeteer excels at testing single-page applications, ensuring they function smoothly.
- Comprehensive Browser Automation: Like Selenium, Puppeteer allows you to automate virtually any action a user can perform within a browser.
PDF Generation: Produce PDF representations of webpages, ideal for documentation or archiving. - Fast performance with DevTools Protocol: Leverage the DevTools Protocol for exceptionally fast testing, streamlining your development workflow.
- In-Depth Performance Analysis: Capture timeline traces of your website to pinpoint performance bottlenecks and optimize user experience.
- Framework Integration: Puppeteer can integrate with popular testing frameworks like Jest, CodeceptJS, and WebDriverIO, enhancing your existing testing infrastructure.
1.2 Puppeteer advantages
- Effortless Setup: Install Puppeteer with just npm or Yarn, no additional configuration needed.
- Blazing Speed: Run tests faster with Puppeteer’s headless mode and tight Chrome integration.
- Testing Flexibility: Integrate Puppeteer seamlessly with popular frameworks like Mocha, Jest, and Jasmine for your testing needs.
- Wide Browser Support: Automate tasks on both Chrome and Firefox browsers.
- Strong Community Backing: Get help and share knowledge with a large and active community.
1.3 Supported browsers
Puppeteer Supports Chromium-Based Browsers and Firefox. Below are the supported browsers.
- Chromium
- Google Chrome
- Microsoft Edge
- Firefox
1.4 Puppeteer Vs. Selenium comparison
| FEATURE | PUPPETEER | SELENIUM |
|---|---|---|
| Browser support |
Chromium browsers (Chrome, Edge, Opera, …), Safari (Webkit) and Firefox (experimental) |
Multiple browsers such as Firefox, Safari, IE, Opera, etc. |
| Speed | Faster, runs headless by default, more control over Chrome | Slower, may require additional tools for performance testing. |
| Use cases | Web scraping, screenshot testing, PDF generation, performance analysis | Cross-browser testing, mobile testing, integration with other frameworks |
| Programming language | JavaScript only | Multiple languages such as Java, Python, C#, etc. |
| Community support | Smaller and newer | Larger and more active |
2. Getting started with Puppeteer
2.1 Setting up environment
- Prerequisites: Please make sure you’ve installed Node.JS on your machine
- Install Puppeteer package:
npm i –save-dev puppeteer - We will use Mocha for the test framework and Chai for our assertions, to install Mocha and Chai:
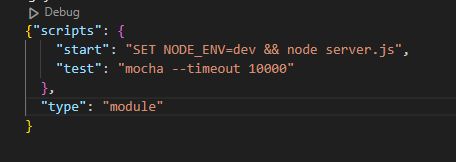
npm i –save-dev mocha chai - While it might seem like a small step now, adding a test script to your package.json file will save you time and effort in the long run. This script allows you to execute your automated tests with a single command: npm test.
2.2 Writing our first testcase
Once you’ve set up your test environment, we can begin to write some code. Remember the test script we added to package.json This script uses Mocha to automatically run all .spec.js files within the tests directory. To get started with Puppeteer testing, simply create a file named tests/puppeteer.spec.js. This file will be automatically included when you execute your tests using npm test.
Let’s try a basic test suite that leverages the power of Mocha, Chai, and Puppeteer. We’ll examine the code within tests/puppeteer.spec.js to understand how these tools work together for effective web automation testing. We will test this on the demoqa.com website.
2.2.1 Set up and Tear down
Instead of launching the browser and navigating every time, Puppeteer offers a more organized approach with before() and after() hooks. These hooks, as their names suggest, execute code before and after your test suite runs. This way, you can manage browser setup and teardown tasks efficiently.
The smoke test starts by launching a browser using puppeteer.launch(). It then opens a new tab and navigates to the target website. Finally, after the tests are complete, it closes the tab and then the browser window itself.
2.2.2 Making assertions
We’ve discussed the setup for the test. But what exactly are we testing for? In this case, we’re making four independent checks:
- Is the retrieved browser version valid?
- Does the page title match the expected value?
- Is the specific page header present with the correct text?
- Does the page have only one footer element? Let’s delve deeper into these scenarios.
Let’s confirm Puppeteer is set up correctly. We’ll do a quick check to see if browser.version() returns a text value. While technically not a true browser version, this simple test ensures Puppeteer is functioning as expected. Any other data type or error would indicate an issue. It’s a basic smoke test, but it helps us get off on the right foot.
Next, let’s verify the page title (https://demoqa.com/booksthis one should be pretty simple. Puppeteer offers a nifty title() function to retrieve the page title
While checking page titles is a good start, Puppeteer lets us tackle more complex tasks. Its $eval() function allows us to target specific elements using CSS selectors and then interact with them using regular JavaScript functions. For example, we can easily verify if a button tag exists with the ID “#login” and the text content “Login”. This avoids unnecessary complexity.
In the final test, instead of grabbing just the first element found with $eval(), we want to get all elements matching a specific CSS selector. The $$() function comes in handy for this task. To verify our page only has one footer, we can use $$() to retrieve all footer elements and then check if the resulting list has exactly one element.
2.2.3 Execute test cases
With our complete test suite in place, it’s time to put the npm test command we defined earlier to use! This command runs all the .spec.js files in the tests/ directory using Mocha as the test runner. Just a heads-up, we’ve set a 10-second timeout for Mocha because even headless browsers can be slow sometimes. We don’t want a sluggish internet connection to falsely fail our tests!
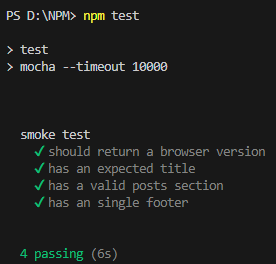 Four tests and four passes
3. Best practices for optimizing your tests with Puppeteer
Before diving into optimization, let’s explore Puppeteer’s strengths. It automates browser interactions, mimicking real users. To leverage its full potential, understand Puppeteer’s features like headless mode, network control, and screenshot capture.
- Speed Up Tests with Headless Mode:
Puppeteer’s headless mode runs without a graphical interface (GUI), making it ideal for CI/CD pipelines that don’t require visual rendering. This reduces resource usage and speeds up test execution.
- Manage Resources Wisely:
Puppeteer creates a new browser instance for each test, which can be resource intensive. Optimize by reusing browser instances or pages when possible. Always close them after tests are complete.
- Streamline Page Interactions:
Focus on automating essential actions. Avoid unnecessary navigation and leverage features like waitForSelector to ensure elements are loaded before interaction. This minimizes unreliable tests and improves overall stability.
- Run Tests in Parallel:
Parallel testing can significantly reduce execution time. Puppeteer allows running multiple browser instances concurrently. However, be mindful of your system’s limitations to avoid performance drawbacks.
- Handling Errors:
Robust error handling and logging are crucial for troubleshooting automated tests. Use try-catch blocks to gracefully handle exceptions, and log errors for easier debugging. This helps you quickly identify and fix issues in your Puppeteer scripts.
By following these best practices, you can optimize your Puppeteer tests for performance, reliability, and maintainability. Understanding Puppeteer’s capabilities and using its features effectively are essential for successful test automation.
4. Conclusion
Puppeteer is a super-effective tool for automating tasks in web browsers. This article only gives you a glimpse of what it can do. Beyond checking a webpage’s layout and code, Puppeteer can test how users interact with it. Imagine mimicking finger taps on a touchscreen or uploading files – Puppeteer lets you automate all these actions and more! The only limit to how thorough your tests is your own imagination.
Reference:
Lambdatest: Puppeteer Tutorial: Complete Guide to Puppeteer Testing
SauceLabs: Getting Started with Puppeteer