


In the ever-evolving world of web development, developers are constantly on the lookout for new and efficient ways to build web applications. If you’re a Kotlin enthusiast or simply curious about exploring a modern, asynchronous, and lightweight framework for building web servers, look no further than Ktor. Ktor is an open-source framework developed by JetBrains, the creators of Kotlin, and it’s gaining popularity for its simplicity and flexibility.
In this blog post, we’ll introduce you to Ktor and guide you through the process of building a basic web server using Kotlin. By the end, you’ll have a solid understanding of how Ktor works and be well on your way to creating your own web applications.
What is Ktor?
Ktor is a framework for building asynchronous servers and clients in connected systems using Kotlin. It is designed to be simple, lightweight, and easy to use. Ktor’s architecture is built around Kotlin’s powerful features, such as coroutines, which make handling asynchronous operations a breeze.
Some key features of Ktor include:
- Asynchronous: Ktor is built from the ground up to be asynchronous, making it highly efficient for handling many concurrent connections.
- Extensible: Ktor provides a modular architecture that allows you to add the components you need for your specific project, without being burdened by unnecessary features.
- Lightweight: Ktor is known for its small footprint, making it a great choice for microservices and resource-efficient applications.
Now, let’s dive into the process of building a basic web server using Ktor.
Setting Up Your Project
Before we start coding, make sure you have Kotlin installed on your system. If not, you can download it from Kotlin’s official website.
We’ll also use the Gradle build system for this project. If you don’t have Gradle installed, you can follow the installation instructions on the Gradle website.
Step 1: Create a New Kotlin Project
Let’s create a new Kotlin project. Open your terminal and run the following command:
gradle init --type kotlin-applicationThis command initializes a new Kotlin application project using Gradle.
Step 2: Add Ktor Dependency
Open the build.gradle.kts file in your project directory and add the Ktor dependency:
dependencies {implementation("io.ktor:ktor-server-core:1.6.7") implementation("io.ktor:ktor-server-netty:1.6.7") }These dependencies include Ktor’s core components and the Netty server engine, which is a popular choice for running Ktor applications.
Step 3: Create a Basic Ktor Application
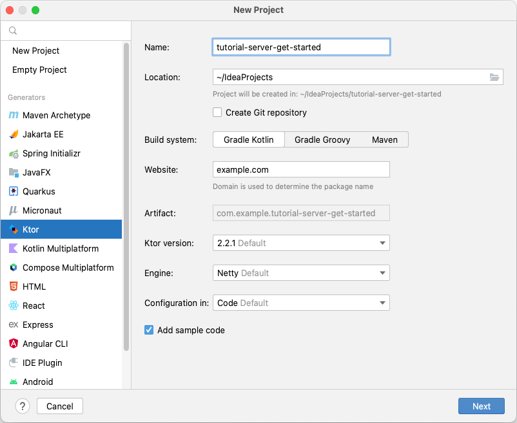
3.1 Creating a ktor application
- Open the https://start.ktor.io/ link in your browser.
- Provide a valid project name (e.g.: ktor-sample).
- Users can see the default project configurations by clicking on the adjust project settings link.

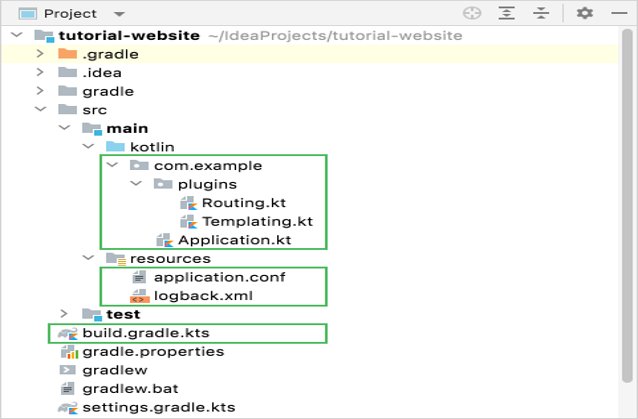
3.2 Ktor Project Structure
Ktor project structure can vary depending on your project’s complexity and organization preferences, but a typical Ktor project structure might look something like this:

Now, let’s create a simple Ktor application. In your project directory, create a file named Application.kt:
3.3 Examine the project
To look at the structure of the generated project, let’s invoke the Project view:
import io.ktor.application.*
import io.ktor.response.*
import io.ktor.routing.*
import io.ktor.server.engine.embeddedServer
import io.ktor.server.netty.Netty

fun Application.module() {
    routing {
        get("/") {
            call.respondText("Hello, Ktor!")
        }
    }
}

fun main() {
    embeddedServer(Netty, port = 8080, module = Application::module).start(wait = true)
}
In this code, we define a Ktor application using Application.module(). We create a simple route that responds with “Hello, Ktor!” when you access the root path (“/”). The main() the function sets up and starts the Ktor server using the Netty engine on port 8080.
Step 4: Run Your Ktor Application
To run your Ktor application, open your terminal and navigate to your project directory. Then, run the following command:
./gradlew runYour Ktor application should now be running, and you can access it by opening a web browser and navigating to http://localhost:8080. You should see the “Hello, Ktor!” message displayed in your browser.
Conclusion
Congratulations! You’ve just built a basic web server using Ktor and Kotlin. While this is a simple example, Ktor is capable of handling much more complex web applications with ease.
In future blog posts, you can explore how to add routing, authentication, database integration, and more to your Ktor application. The flexibility and simplicity of Ktor make it a fantastic choice for modern web development with Kotlin.
Now that you’ve taken your first steps with Ktor, it’s time to explore the official documentation and dive deeper into the world of asynchronous web development with Kotlin.