


In software engineering, performance testing is of paramount importance to make sure that your application can withstand high loads and perform at its best. K6 is a performance testing tool that can be used for load testing and scripting, and it is a powerful open source. This blog post aims to show how K6 can effectively perform performance testing.
1. What is k6?
K6 is a Cloud service by LoadImpact that implements a highly-developed JavaScript syntax for writing load test scripts. It is created with the end-user in mind, it is highly scalable, and it can be used and sat. by developers, and QA engineers alike.
2. Why k6?
Use cases
K6 users are typically Developers, QA Engineers, SDETs, and SREs. They use k6 to test the performance and reliability of APIs, microservices, and websites. Common k6 use cases are:
- Load testing: k6 has been optimized for as little resource usage as possible and is made to run with a high load. (spike, stress, soak tests).
- Browser testing: Through k6 browser, you can run browser-based performance testing and catch issues related to browsers only which can be skipped entirely from the protocol level.
- Chaos and resilience testing: You can use k6 to simulate traffic as part of your chaos experiments, trigger them from your k6 tests or inject different types of faults in Kubernetes with xk6-disruptor.
- Performance and synthetic monitoring: With k6, you can automate and schedule to trigger tests very frequently with a small load to continuously validate the performance and availability of your production environment. You can also use Grafana Cloud Synthetic Monitoring for a managed solution built specifically for synthetic monitoring that supports k6 test scripts.
Benefits of k6
- Ease of Use: Using JavaScript as the scripting language makes writing and maintaining test scripts easy.
- High Performance: k6 can handle thousands of requests per second on a single machine.
- CI/CD Integration: Easily integrates with CI/CD systems like Jenkins, GitLab CI, and others.
- Detailed Reporting: Provides detailed and comprehensible reports on application performance.
K6 or Jmeter?
| Criteria | k6 | Jmeter |
| Year of release | 2017 | 1998 |
| Scripting Language | JavaScript | Java, Groovy, JavaScript, and others |
| Performance | High performance, low resource consumption, capable of handling thousands of virtual users efficiently | Good performance, can consume more resources, especially with large-scale tests |
| Usability | Simple and intuitive JavaScript-based scripting, command-line interface, integrates well with CI/CD pipelines | GUI-based approach, supports multiple scripting languages, can be more complex to learn and use |
| Help and Support | Growing community, good documentation, active development, commercial support available through Grafana | Large and active community, extensive documentation, many third-party tutorials and plugins, commercial support available through various providers |
In general, both k6 and JMeter are powerful tools for performance testing, each with its own strengths and areas of focus. K6, being more modern, offers a streamlined experience with its JavaScript-based scripting, high performance, and ease of integration with CI/CD pipelines. It’s an excellent choice for teams looking for a lightweight, developer-friendly tool that aligns with contemporary development practices.
3. Installing k6
k6 has packages for Linux, Mac, and Windows. Alternatively, you can use a Docker container or a standalone binary.
On Windows: download and run the latest official installer.
On macOS:
brew install k6On Linux: Using apt on Ubuntu:
sudo apt update
sudo apt install k6
To check if it was successful, run the command:
k6 version4. Writing the first performance test
A simple JavaScript file used for testing with k6 will look like this:
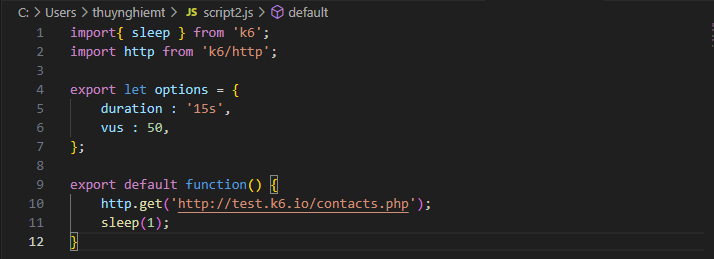
The test process describes 50 users accessing the page https://test.k6.io over 15 seconds.
To run the test, you should:
- Save the code as a JavaScript file, for example, “demo.js”.
- (I use cmd) Open cmd from the folder containing the JavaScript file and run the following command:
k6 run demo.js5. Running performance testing using k6
I will practice writing performance tests with k6 according to the script: Simulate 5 concurrent users Register new account on Nopcommerce (local installation). Ramp up 10 seconds to 5 users. Loading 1 minutes, then ramp down in 10 seconds. A JavaScript file used for testing with k6 will look like this:

The script emulates the user activity on a web application, for example, visiting a webpage and registering a new user. Let’s break down and explain each part of the script.
Importing Required Modules
import http from 'k6/http';
import { check, sleep, abortTest, group, fail } from 'k6';
import { htmlReport } from "https://raw.githubusercontent.com/benc-uk/k6-reporter/main/dist/bundle.js";
http: Used to make HTTP requests.check: Used to validate conditions in the response.sleep: Pauses the script execution for a specified time.abortTest: Stops the test execution.group: Groups a set of operations.fail: Marks the test as failed.htmlReport: Generates an HTML report of the test results.
Defining Constants
const BASE_URL = "http://localhost:5000";
const REGISTER_URL = `${BASE_URL}/register`;
let token = undefined;
BASE_URL: The base URL of the application under test.REGISTER_URL: The URL for the registration endpoint.token: A variable to store the CSRF token extracted from the registration page.
Defining Test Options
export let options = {
  stages: [
    { duration: '10s', target: 5 }, // Ramp-up to 5 users in 10 seconds
    { duration: '10s', target: 5 }, // Stay at 5 users for 10 seconds
    { duration: '10s', target: 0 }, // Ramp-down to 0 users in 10 seconds
  ],
};
stages: Defines the load stages for the test:- Ramp-up to 5 users in 10 seconds.
- Maintain 5 users for 10 seconds.
- Ramp-down to 0 users in 10 seconds.
Default Function
export default function () {
  group('01.GoToHomepage', function () {
    GoToHomepage();
  });
  group('02.RegisterNewUser', function () {
    GoToRegisterPage();
    RegisterNewUser();
  });
  sleep(10);
}
- The default function is the main entry point for the script.
- It uses `
group` to organize different sets of operations:- `
GoToHomepage`: Simulates visiting the homepage. `RegisterNewUser`: Simulates the user registration process.
- `
- The script sleeps for 10 seconds after performing the operations.
Function Definitions
`GoToHomepage`
export function GoToHomepage() {
  let responseBody = http.get(REGISTER_URL);
  token = extractValueFromXMLResponse(responseBody, `input[name="__RequestVerificationToken"]`);
  check(token, { 'Token exists': (t) => t !== undefined });
}- Sends a GET request to the registration URL.
- Extracts the CSRF token from the response.
- Checks if the token exists.
`GoToRegisterPage`
export function GoToRegisterPage() {
  console.log('test');
}
This function is currently a placeholder and only logs “test” to the console.
`RegisterNewUser`
export function RegisterNewUser() {
  let registerResponse;
  const randomEmail = generateRandomEmail();
  const userName = 'nghiemth' + generateUniqueNumber();

  const payload = {
    FirstName: 'thuy',
    LastName: 'nghiem',
    Email: randomEmail,
    ConfirmEmail: randomEmail,
    Username: userName,
    CountryId: 466,
    TimeZoneId: 'Central Standard Time',
    Newsletter: true,
    Password: '123456',
    ConfirmPassword: '123456',
    hpinput333: '',
    Details: {
      CompanyIndustryId: 1,
      NopCommerceIntendedUseId: 0,
      NopCommerceIntendedUseText: '',
      CompanyRoleId: 10,
      KindOfExistingStoreId: 0,
      CompanyBusinessModelId: 0,
      WebsitesDevelopmentPeriodId: 2,
      ExtensionsDevelopmentPeriodId: 0,
      HasCreatedNopCommerceStore: false,
      CompanySizeId: 1,
      CompanyWebsiteUrl: 'test'
    },
    __RequestVerificationToken: token,
  };

  registerResponse = http.post(REGISTER_URL, payload);

  const checkOutput = check(
    registerResponse,
    {
      'Register status is 200': (r) => r.status === 200,
      'Register success': (r) => r.body.includes('Your registration completed'),
    }
  );

  if (!checkOutput) {
    fail(`Registration failed with email: ${randomEmail}. Status code: ${registerResponse.status}`);
  }
}- Generates random email and username.
- Constructs the payload for the registration request.
- Sends a POST request to the registration URL with the payload.
- Check if the registration was successful.
Utility Functions
`generateUniqueNumber`
function generateUniqueNumber() {
  return new Date().getTime();
}
Generates a unique number based on the current timestamp.
`generateRandomEmail`
function generateRandomEmail() {
  return generateUniqueNumber() + '@example.com';
}
Generates a random email address using the unique number.
`extractValueFromXMLResponse`
function extractValueFromXMLResponse(responseBody, key) {
  return responseBody.html().find(key).val();
}
Extracts a value from an XML response based on the provided key.
Handling Summary
export function handleSummary(data) {
  return {
    "summary.html": htmlReport(data),
  };
}
Generates an HTML report of the test results using the `htmlReport` function.
6. Understanding Test Results
After running the test script, K6 provides various statistics in the terminal. Key metrics include:


- Check (check): The success rate of checks. In this example, no checks passed (✓ 0 ✗ 676).
- data_received / data_sent: The amount of data received and sent.
- Request rate (http_reqs): The total number of HTTP requests sent.
- Response time (http_req_duration): The average time to complete an HTTP request, including average, minimum, median, and maximum values.
- Failed request (http_req_failed): The rate of failed HTTP requests.
- Iteration duration (iteration_duration): The average time to complete one script iteration.
- Connecting (http_req_connecting): time to establish a TCP connection with the server
- TLS handshaking (http_req_tls_handshaking): time to complete the TLS handshake with the server
- Receiving (http_req_receiving): time to receive response data from the server
- Sending (http_req_sending): time to send response data from the server
- Block (http_req_blocked): time blocked (waiting for a free TCP connection) before starting the request
- Waiting (http_req_waiting): server response time
- Iteration (iterations): total number of times VUs execute the default function
- VUs (vus): number of active users
- VUs max (vus_max): maximum number of VUs
7. Conclusion
Performance testing is critical to keep the performance applications at a level that is expected and interesting. K6 gives you the flexibility to write and run performance tests quickly and easily. In this way, you’ll be able to spot and fix issues that could slow down your application early in development. By following the steps outlined in this guide, you can start using K6 to improve the performance and reliability of your applications.