


Before you can build intelligent agents or retrieval-based AI applications, you need to properly prepare the environment for Langchain. Whether you’re a beginner exploring Large Language Models (LLMs) or an experienced developer integrating with OpenAI, setting up the right tools and dependencies is the first critical step. In this guide, we’ll walk through everything you need to install, configure, and validate your Langchain setup in Python.
Langchain Python setup: Install Miniconda
To prepare the environment for Langchain, we will use Miniconda to manage the Python environment.
Run this command to download the latest version of Miniconda
wget https://repo.anaconda.com/miniconda/Miniconda3-latest-Linux-x86_64.shAfter downloading the Miniconda package, we will run bash Command to execute the installation process.
bash ~/Miniconda3-latest-Linux-x86_64.shAfter finishing, run this command:
source ~/.bashrcThe command source ~/.bashrc reloads your Bash configuration file (.bashrc) without restarting the terminal. This is useful when you’ve made changes to environment variables, PATH settings, or aliases and want them to take effect immediately.
✅ Verify that conda is working:
After completing the installation and environment setup, run the following command to check if Conda is functioning correctly:
conda listThis command lists all installed packages in the current environment, confirming that Conda is active and your environment is configured correctly.
💡 If you see the package list displayed, you’re ready to start working with Langchain.
Create a Python env with conda
When installing packages in a Conda environment, especially those related to modern machine learning or LLM frameworks like Langchain, it’s strongly recommended to use the conda-forge channel.
conda-forge is a community-driven channel that provides up-to-date, well-maintained, and open-source Conda packages. Many of the newer or more actively maintained libraries, including dependencies required by Langchain, are published there first. Additionally, some packages that may have licensing constraints or are not available through the default anaconda channel can be accessed more easily via conda-forge.
To ensure compatibility and avoid potential conflicts, it’s a good practice to set conda-forge as the highest priority channel:
conda config --add channels conda-forge
conda config --set channel_priority strict
conda create -n langchain-training -c conda-forge python=3.11
Now that the environment is set up, let’s activate it with the following command:
conda activate langchain-trainingChoose Python in Visual Studio Code
Click CTRL + Shift + P
Choose -> Python: Select Interpreter
Choose the Python environment in the list. If there’s no Python env, click “Enter interpreter path.”
~/miniconda3/envs/langchain-training/bin/pythonUse Azure Services for Langchain.
Create Azure OpenAI
To integrate Langchain with powerful language models, you’ll first need to create a new Azure OpenAI resource. This provides the necessary API access and deployment endpoints required for Langchain to function appropriately with Azure-hosted models.

Step 1: Configure Basic
In the Basics tab, you’ll provide the essential configuration details for your Azure OpenAI resource. This includes:
- Subscription: Select the Azure subscription you want to use.
- Resource Group: Choose an existing group or create a new one to logically organize your resources.
- Region: Pick a supported region (e.g., East US) where Azure OpenAI is available.
- Name: Set a unique name for your OpenAI resource.
These settings define where and how your resource is provisioned. Be sure to select a supported region, as not all Azure regions currently support OpenAI.
📌 Once this step is completed, you can proceed to configure networking and security settings.
We need to choose or create a resource group that suits our Azure solution. In this example, we will create a resource group named “langchain-training”.

We should choose a suitable pricing tier for our solution.

Step 2: Configure Network
In this step, you’ll define how your Azure OpenAI resource can be accessed. The Network tab enables you to select between public access, specific virtual networks, or private endpoints.
For most development and testing purposes, selecting “All networks” (public access) is sufficient. However, in production environments, it’s recommended to use private endpoints or VNet integration to enhance security and restrict access to trusted services only.
🔒 Proper network configuration ensures your Langchain application communicates securely with the Azure OpenAI endpoint.

Step 3: Create Tags
In the Tags step, you can assign key-value pairs to help categorize and manage your Azure resources. While optional, using tags is a recommended best practice, especially in environments with multiple teams, projects, or billing units
Examples of proper tags include:
Project: langchain-trainingEnvironment: development/productionOwner: your-nameCostCenter: AI-Initiatives
🧩 Tags make it easier to filter, track, and apply policies to resources across your Azure environment.

Step 4: Review + submit
In this final step, you review all the information you’ve entered—such as region, network settings, and resource name—and manually confirm that everything is correct. Azure then validates your configuration and prepares to deploy the OpenAI resource.
If the validation is successful, click “Create” to initiate the deployment process. Within a few minutes, your Azure OpenAI resource will be ready for use.
🚀 Once deployed, you can access the resource, retrieve API keys, and integrate it with Langchain.

You’ve successfully created the Azure OpenAI resource, completing a key step to prepare the environment for Langchain integration.
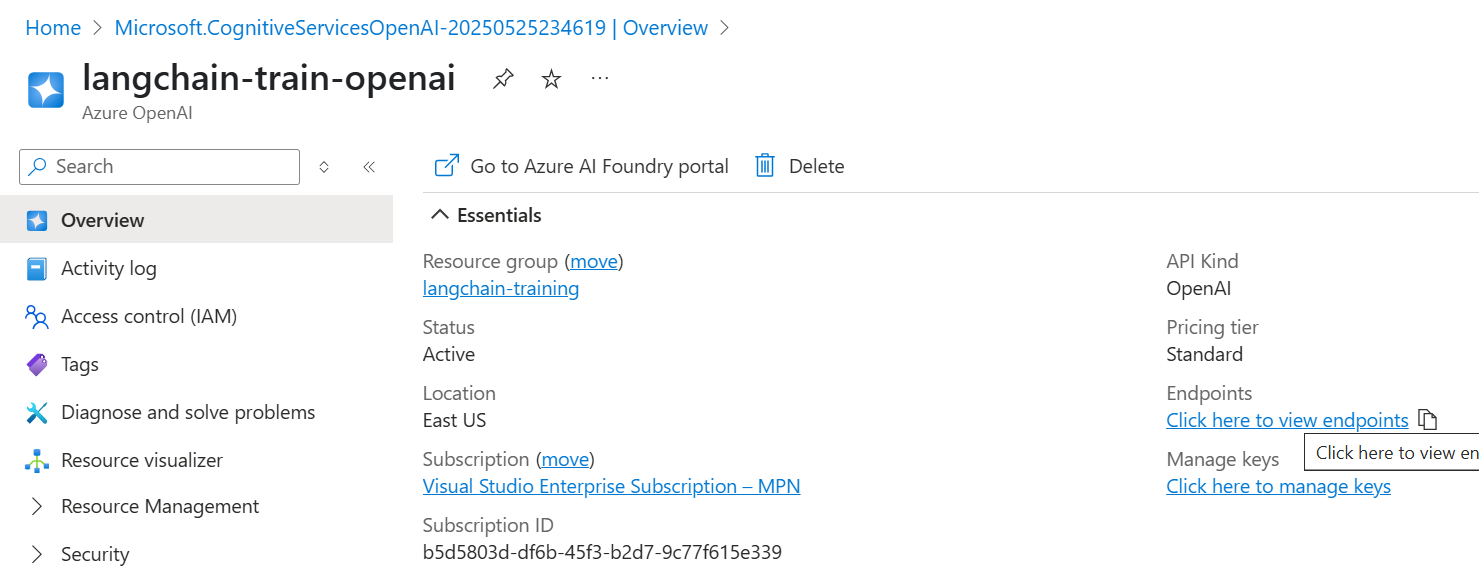
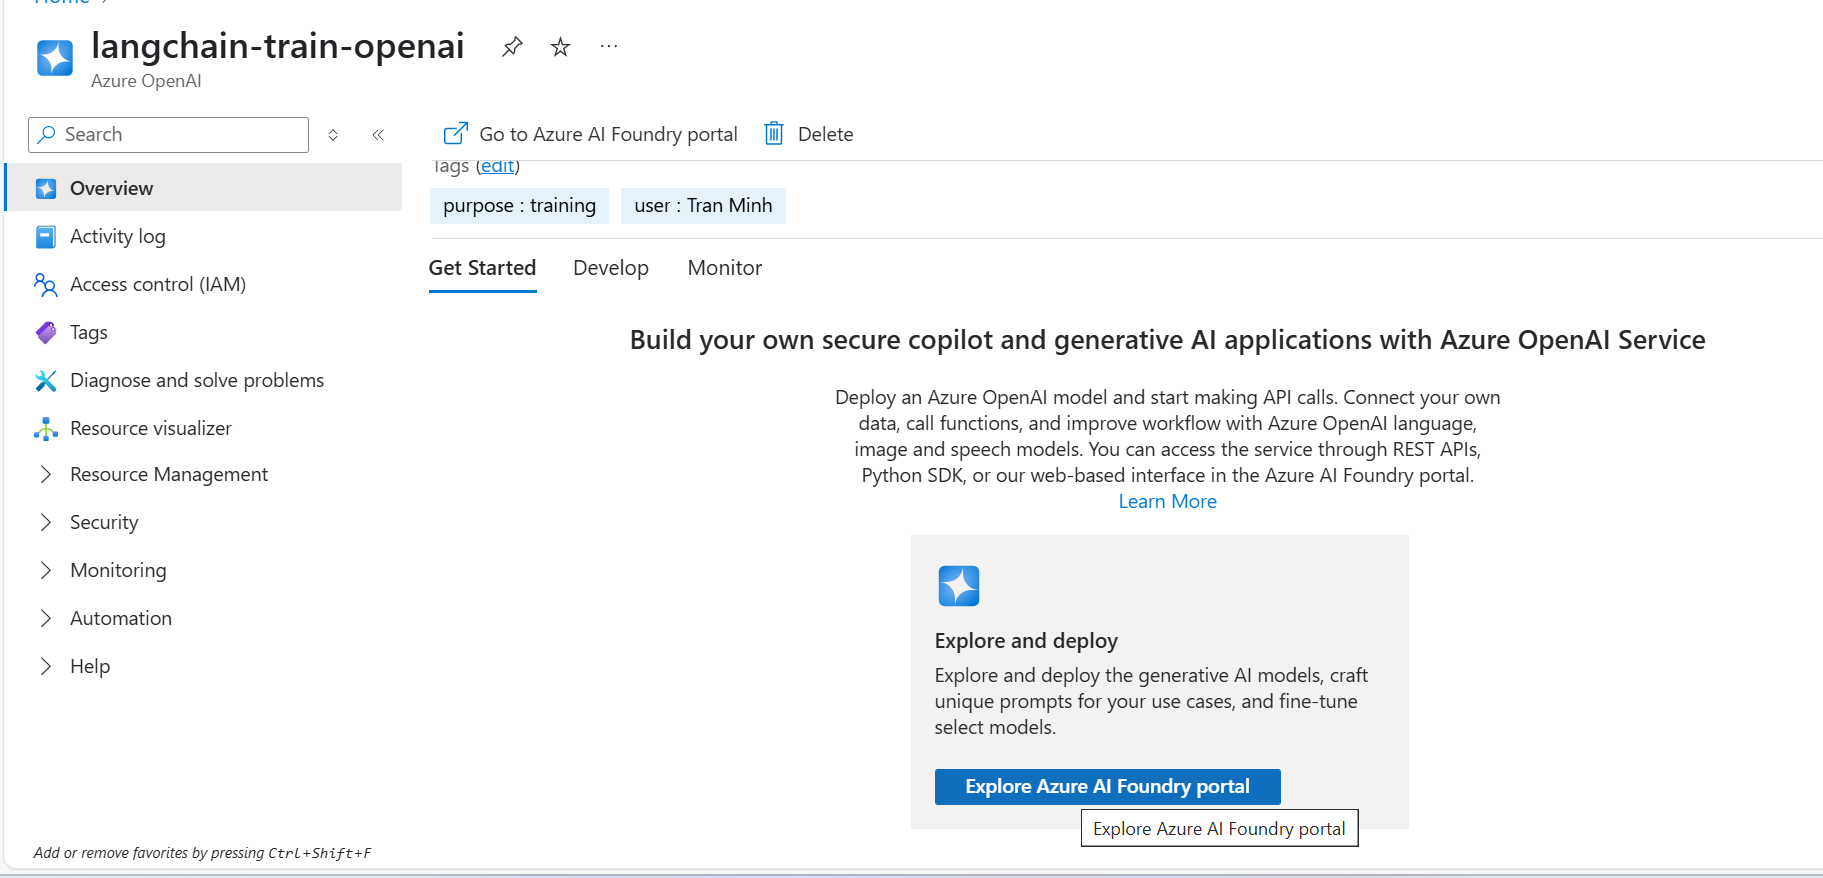
Access the Azure AI Studio (Foundry Portal)
Next, you need to access the Azure AI Studio (also known as the Azure AI Foundry portal). This platform offers a centralized interface that enables you to manage, test, and deploy your OpenAI models more efficiently.
By entering the Foundry portal, you can:
- Deploy model versions (like
gpt-35-turbo,gpt-4, etc.) - View and copy your endpoint and deployment name
- Test prompts directly in-browser before using them with Langchain
- Monitor usage, quotas, and performance metrics
In short, the Foundry portal bridges the gap between your Azure OpenAI resource and real-world usage. You use it to prepare and manage the connection between Langchain and your Azure-hosted models.
Create deployment models
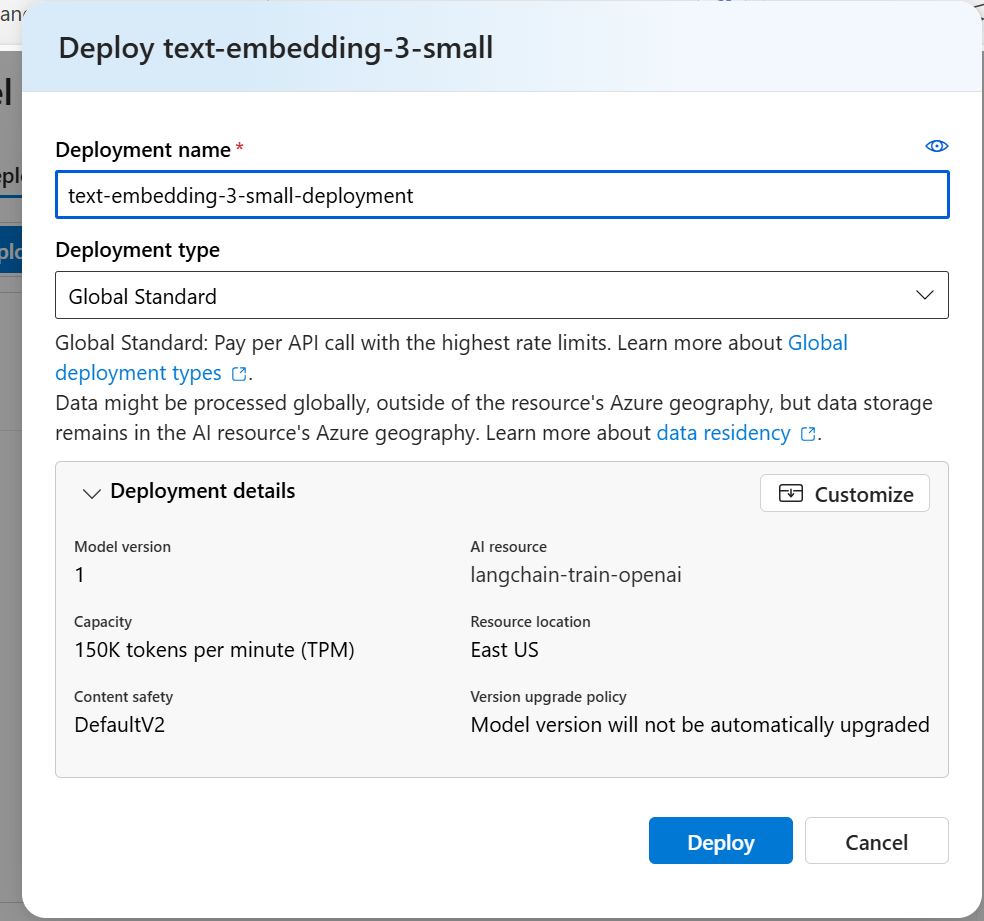
After accessing the Azure AI Studio, the next step is to deploy a model so Langchain can interact with it. Since you’ll use embeddings for tasks like document search or semantic retrieval, you should deploy an embedding model.
In this case, choose the text-embedding-3-small model. It offers high performance with lower latency and cost, ideal for most Langchain RAG use cases.
To do this, simply click “Deploy Model”, select the model family text-embedding-3, then choose embedding-3-small, give it a unique deployment name (e.g., embedding-deploy), and confirm.
🔗 You’ll later use this deployment name and endpoint when configuring Langchain to send embedding requests.

text-embedding-3-small for embedding modelTo enable natural language interaction in your Langchain application, you’ll need to deploy a Chat Completion model. At this step, it’s highly recommended to select gpt-4o — OpenAI’s most advanced and efficient model is available on Azure.
Compared to previous versions, gpt-4o delivers faster response times, better performance in multilingual understanding, and lower cost per token. This makes it ideal for real-time conversational agents, chatbots, and dynamic assistants built with Langchain.
Simply choose the gpt-4 model family, select gpt-4o from the dropdown, and assign a deployment name (e.g., gpt-4o-chat), and complete the deployment process.
🧠 You’ll use this deployment later when initializing the
ChatOpenAIclass in Langchain to perform dialogue-based tasks.

Set Up Azure AI Search (AISearch) for Langchain Integration
To enable powerful retrieval capabilities in Langchain, you’ll also need to set up Azure AI Search. This service allows you to index and search through large volumes of unstructured data—such as documents, PDFs, or knowledge bases—with speed and relevance.
Once configured, AI Search works seamlessly with Langchain to support RAG (Retrieval-Augmented Generation) pipelines. You can embed documents, store vectors, and quickly retrieve relevant content based on semantic similarity.
🧩 In short, Azure AI Search provides the foundation for Langchain to retrieve contextual data and enrich your AI responses with real-world content.


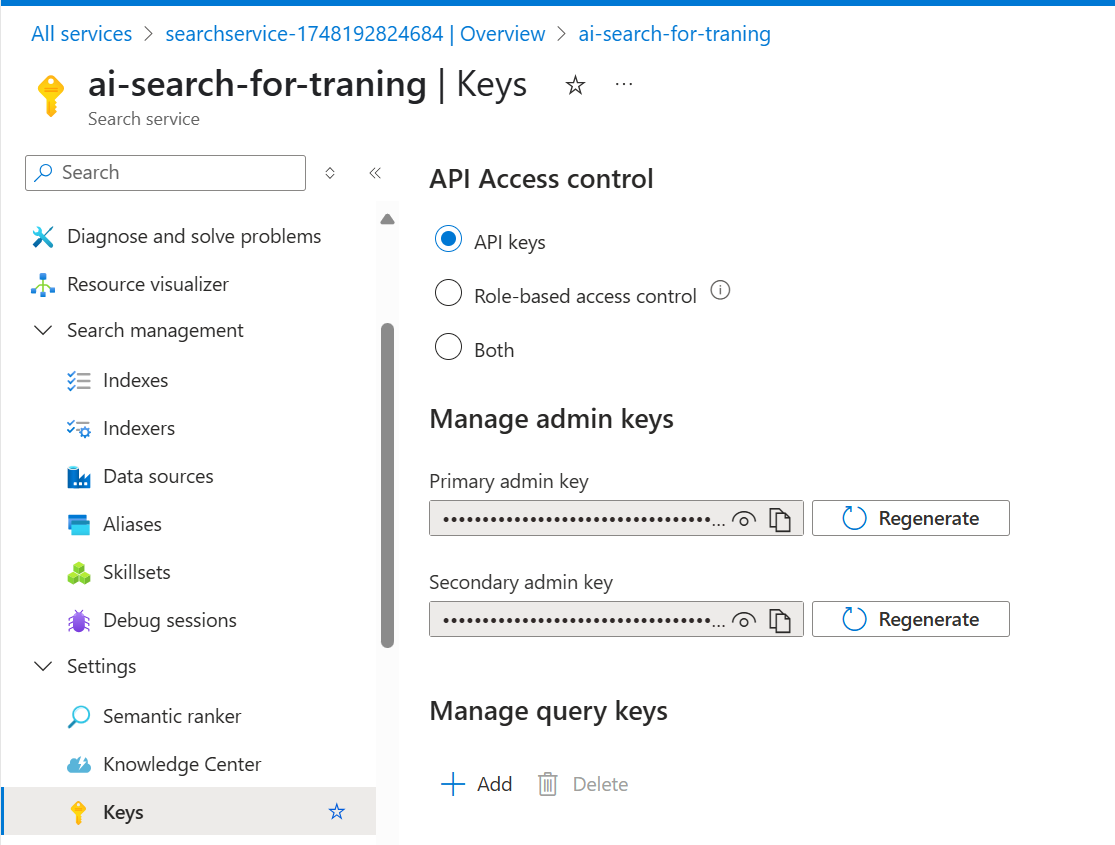
Retrieve the Admin Key from AI Search Settings
After successfully creating your Azure AI Search service, you need to retrieve the admin key to allow Langchain (or your backend) to securely connect to the search index.
To do this, navigate to your AI Search resource in the Azure portal. Then, in the left-hand menu, click “Keys” under the Settings section. There, you’ll find two admin keys. You can copy either one for use in your Langchain application.
🔑 This key acts as your authentication credential when sending queries or indexing documents via the Azure Search API.
API Version của AzureChatOpenAI
Azure OpenAI in Azure AI Foundry Models API version lifecycle – Azure AI services | Microsoft Learn

Conclusion
By now, you’ve walked through all the essential steps to prepare environment for Langchain—from setting up your Python or Conda environment to provisioning key Azure resources like OpenAI, AI Search, and deploying models like gpt-4o or embedding-3-small.
Creating a solid foundation is essential for building reliable, scalable, and intelligent applications with Langchain. Whether you’re building a chatbot, a RAG-based search tool, or a workflow automation system, these setup steps ensure everything is connected, authenticated, and ready to go.
🚀 With your environment ready, you can now move on to designing your chains and agents in Langchain with confidence.
You can also explore the following resources to deepen your understanding of Generative AI: