


This blog will help us with Security Testing: Integrating ZAP with Jenkins.
OWASP ZAP is an integral part of our Application Security Testing toolkit. As a free and open-source scanner, it conducts real-time penetration tests on web applications and services, uncovering potential vulnerabilities.While ZAP is versatile enough to manually test specific web applications, its true power lies in its seamless integration and automation within a Continuous Integration pipeline. With ZAP, you can identify compromised authentication, exposure of sensitive data, security misconfigurations, SQL injection, and cross-site scripting (XSS).
Visualisation this: during the development of our website, ZAP acts as a vigilant security guard, constantly on the lookout for potential threats. It doesn’t wait until the end; it scrutinises every step of the way. This proactive approach means we catch and rectify problems much earlier, ensuring our website is secure right from the outset. It’s akin to having an ever-vigilant safety net that never ceases its protective efforts!.
SETTING UP ZAP
- Download and Install:
- Visit the official Jenkins website to download and install the Jenkins server. It typically runs on port 8080.
- Launch the Jenkins server, and open your web browser. Go to
localhost:8080. - Proceed by setting up the necessary plugins and credentials in the Jenkins interface.
- Install the ZAP Jenkins Plugin:
- Begin by integrating ZAP with Jenkins using the ZAP Jenkins plugin. Select Manage Jenkins option and then select Manage Plugins.
- In the “Available” tab, locate and install the OWASP ZAP Official plugin.
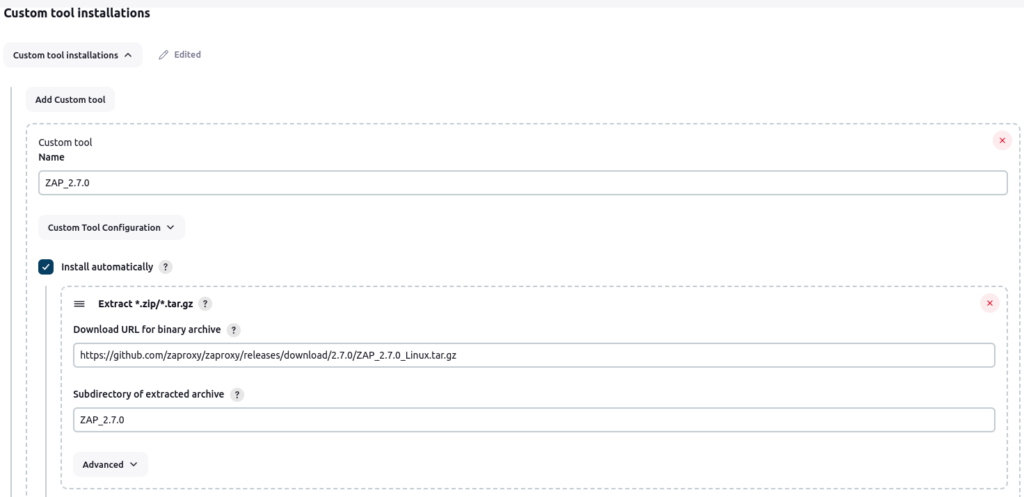
- Installing ZAP Locally:
- Start by installing ZAP locally on your system.
- Next, configure the binary archive download URL of ZAP on a Linux environment.
Integrating ZAP with Jenkins
Security Testing: Integrating ZAP with Jenkins involves several steps to seamlessly incorporate security testing into your Continuous Integration/Continuous Deployment (CI/CD) pipeline. Below is a concise guide to help you through the process.
- Create a new Jenkins job (or configure an existing one) that you want to integrate with ZAP.
- Go to the Configure Option in Job and Select the “ZAP Execution” from the build step.
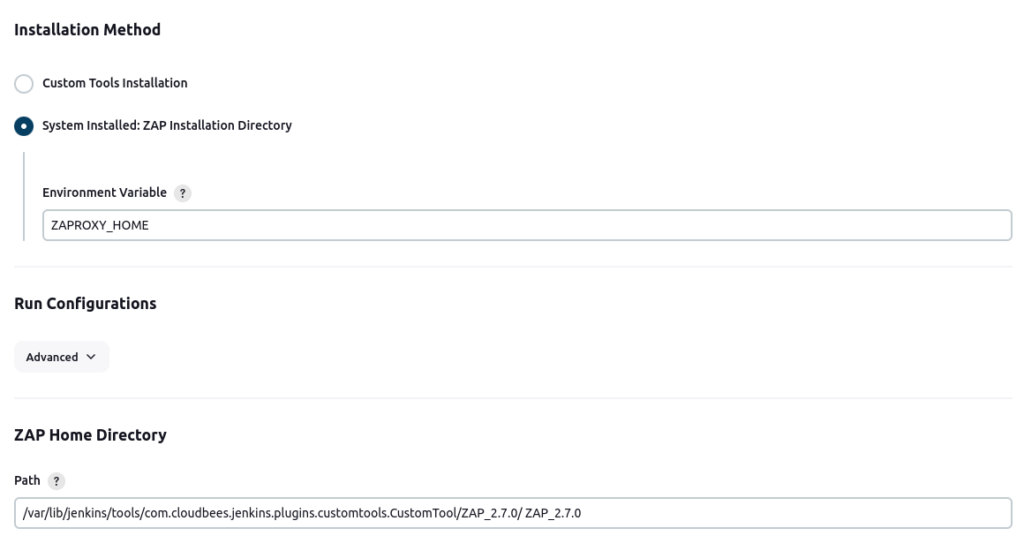
- Go to the Installation method and select “System Installed: ZAP Installation Directory”.
- Setup the Environment Variable and added the ZAP path in “ZAP Home Directory”.
- Select the “Persist Session” in Session Management. Added the template name in filename of Persist Session.
- Navigate to Session Properties and add the website URL that requires security testing in both the “Context Name” and “Include in Context” fields.
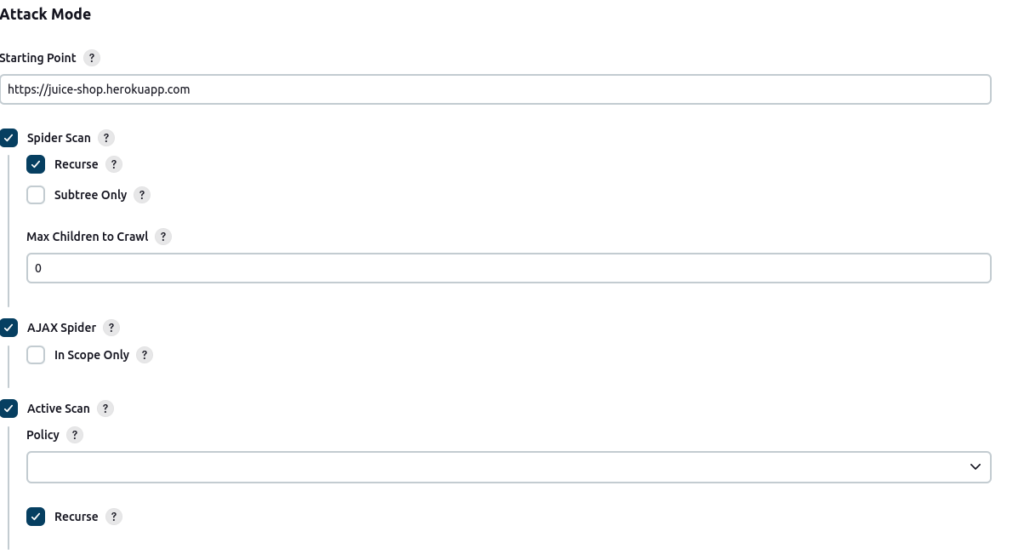
- Go to the “Attack Mode”,
- In attack mode, designate the website URL once more as the starting point.
- Choose the type of scan – be it an active scan, passive scan, or spider scan – to initiate the testing process.
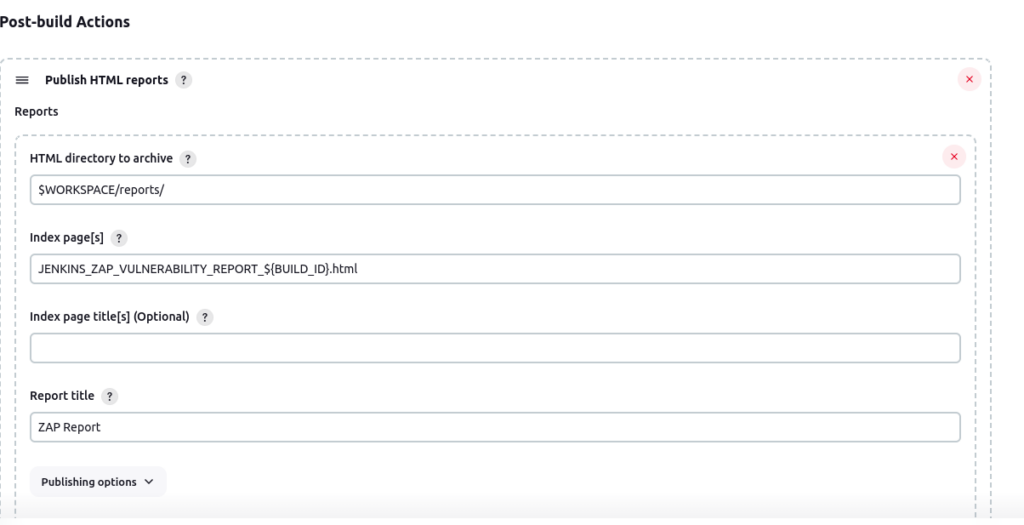
- Configure the “Generate Report” section. Specify the desired file name and choose the format for the generated report.
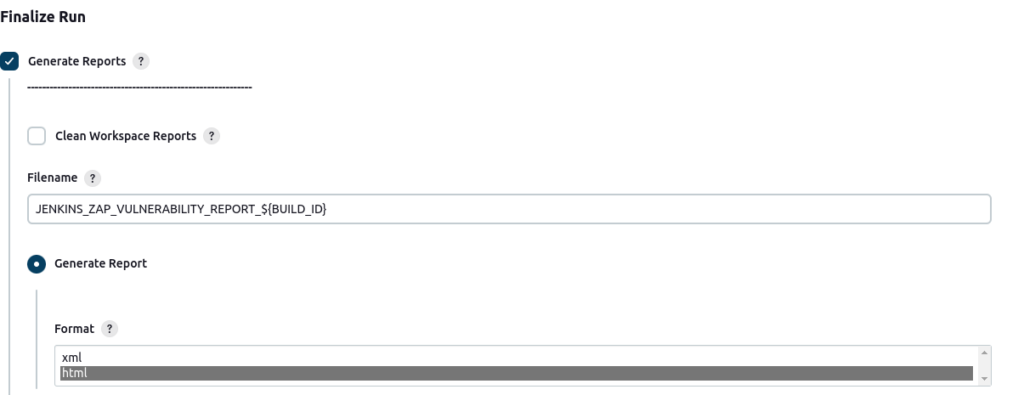
- Include a “Post-Build Step” to publish the generated HTML/XML report.
Architecture of Security Test with ZAP in Jenkins
This architecture ensures that security testing with ZAP is seamlessly integrated into the Jenkins CI/CD pipeline. It enables automated and continuous security assessments of web applications, contributing to the overall security posture of the software development process.
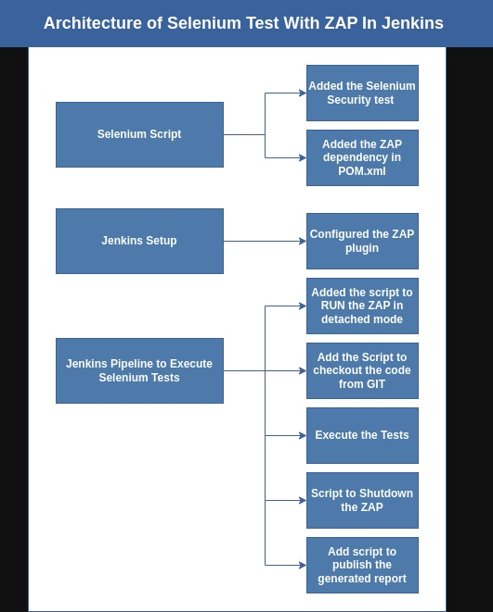
Running Selenium Security Test with ZAP in Jenkins
Running a Selenium security test with ZAP in Jenkins involves setting up a Jenkins job that integrates Selenium for functional testing and OWASP ZAP for security testing.
These prerequisites are required before executing the Selenium test with ZAP in any Jenkins job.
- OWASP ZAP Installation:
- Make sure that OWASP ZAP (Zed Attack Proxy) is installed and correctly configured on your Jenkins server.
- Selenium WebDriver Script:
- Ensure you have a Selenium WebDriver script prepared. This script is intended for conducting functional tests on your web application. Ensure the code is available in a source code management tool like Git.
- Ensure you have a Selenium WebDriver script prepared. This script is intended for conducting functional tests on your web application. Ensure the code is available in a source code management tool like Git.
Pipeline Script to Run Test with ZAP in Jenkins
To run tests with ZAP in a Jenkins pipeline, you’ll need to set up stages for the test execution and ZAP integration. Here’s an example pipeline script:
pipeline {
    agent any

    stages {
        stage('Run ZAP in Detached Mode') {
            steps {
                script {
                    // Define your ZAP installation path
                    def zapPath = "/var/lib/jenkins/tools/com.cloudbees.jenkins.plugins.customtools.CustomTool/ZAP_2.7.0/ZAP_2.7.0/zap.sh"  // Modify this with the actual path to your ZAP installation

                    // Start ZAP in detached mode
                    sh "nohup ${zapPath} -daemon -host 0.0.0.0 -port 8082 > zap.log 2>&1 &"

                    // Wait for ZAP to start (you may need to adjust the sleep duration)
                    sleep(time: 60, unit: 'SECONDS')

                    // Check if ZAP has started (example command to check ZAP's API)
                    def zapStarted = sh(script: "curl -s http://localhost:8082/JSON/core/view/version", returnStatus: true)

                    if (zapStarted == 0) {
                        echo "ZAP has started successfully"
                    } else {
                        error "ZAP failed to start"
                    }
                }
            }
        }
        stage('Checkout Git Repository'){
            steps{
                script{
                    git branch: 'main', credentialsId: '"added the credentials here"', url: 'https://github.com/prajjawal98/security-testing-selenium.git'
                    echo 'Git Checkout has completed'
                }
            }
        }
        stage('Execute ZAP Tests'){
            steps{
                script{
                    sh 'mvn clean install'
                }
            }
        }
        stage('ShutDown the ZAP'){
            steps{
                script{
                    sh "curl http://localhost:8082/JSON/core/action/shutdown/"

                }
            }
        }
        stage('Publish the HTML Report'){
            steps{
                publishHTML([allowMissing: false, alwaysLinkToLastBuild: false, keepAll: false, reportDir: '', reportFiles: 'target/zap-security-report.html', reportName: 'ZAP Report', reportTitles: 'ZAP SCAN REPORT FOR SELENIUM TEST', useWrapperFileDirectly: true])

            }
        }

    }
}
This Jenkins pipeline script performs a series of steps to automate the execution of security tests using OWASP ZAP (Zed Attack Proxy) in combination with Selenium.
- Pipeline Definition:
- The
pipelineblock defines the entire pipeline.
- The
- Agent:
agent anyspecifies that the pipeline can run on any available agent (Jenkins node/agent).- Stages:
- The pipeline is divided into several stages, each representing a distinct phase of the process.
zapPathvariable specifies the path to the ZAP installation on the Jenkins server. – Theshcommand executes a shell command to start ZAP, redirecting output tozap.log. – It then waits for ZAP to start (60 seconds in this case). – Checks if ZAP has started successfully using a CURL command to query ZAP’s API. - Checkout Git Repository: – This stage checks out the source code from a Git repository. – The
gitcommand specifies the branch, credentials, and URL of the repository. - Execute ZAP Tests: – This stage executes ZAP tests. In this case, it runs Maven (mvn) with
clean installto trigger the security tests. - Shut Down the ZAP: – This stage sends a CURL command to ZAP’s API to shut down the ZAP instance.
- Publish the HTML Report: – This stage publishes the HTML report generated by ZAP as a build artifact. – It uses the
publishHTMLplugin to display the report in the Jenkins UI.
This pipeline automates the process of running security tests with ZAP alongside Selenium and incorporates key features like Git integration and HTML report publishing.