


Hello readers, today we will learn about how to set up the basic selenium grid environment.
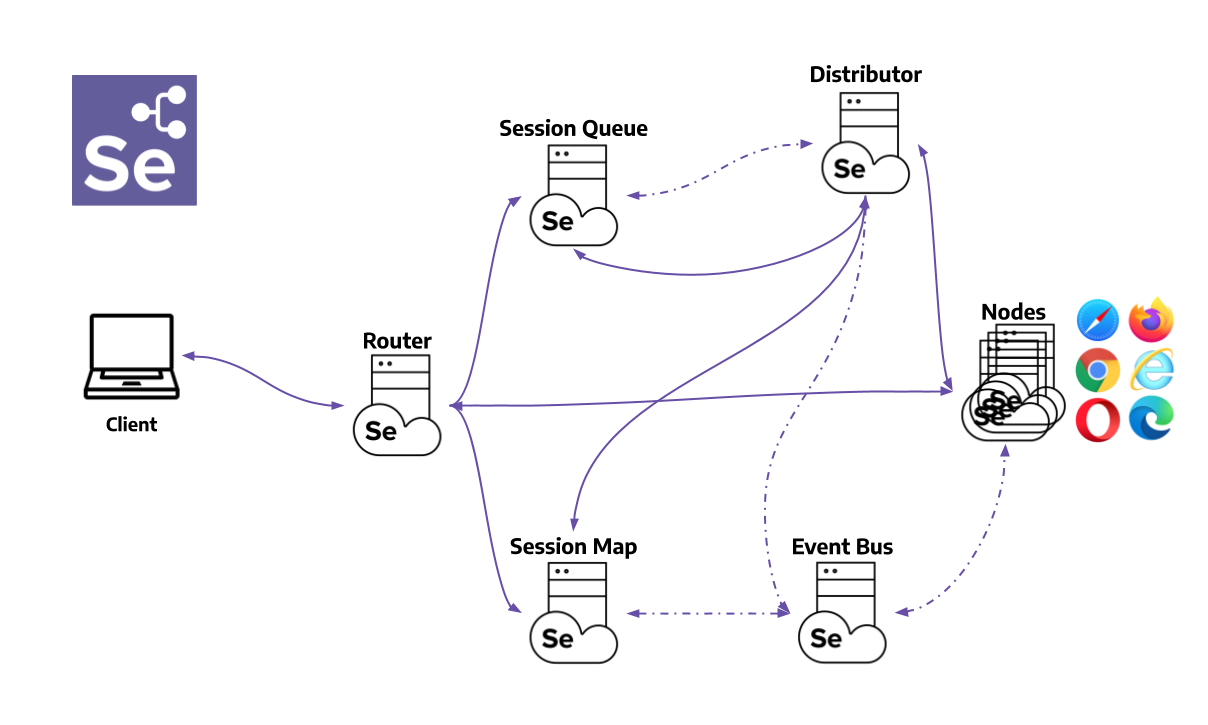
Brief Introduction to Selenium Grid
To know about the selenium grid and its features please refer to the following link:-https://www.selenium.dev/documentation/grid/
In this blog post, we will guide you through the step-by-step process of setting up a Grid environment, enabling you to run tests concurrently on different platforms and browsers, all managed from a central hub.
Prerequisites for Setup
To understand how to install a selenium grid on your local machine please refer to the attached link https://www.selenium.dev
Step 1: Configuring the Hub
Create a new directory on your local machine to store the Grid files.
Copy the Grid standalone server jar file to this directory.
Open the terminal and move it to the desired directory
Start the Grid Hub by executing the following command: –
java -jar selenium-server-standalone.jar -role hub This command will initialize the server as a Hub
Step 2: Configuring the nodes
Copy the Selenium WebDriver binary for the specific browser to the machine.
Open a terminal or command prompt on that machine.
Start the Selenium Grid Node by executing the following command
java -Dwebdriver. chrome.driver=path/to/chromedriver -Dwebdriver.gecko.driver=path/to/geckodriver -jar selenium-server-standalone.jar -role node -hub http://hub_ip:4444/grid/register In this command replace the path/to/chrome driver and path/to/gecko driver with the paths to the WebDriver binaries on the node machine.
Also, replace hub_ip with the IP address or hostname of the machine running the Hub.
Step 3: Setup Verification
Open a web browser and navigate to the Selenium Grid console using the following URL
http://hub_ip:4444/grid/consoleYou should see the Hub console showing available nodes and their capabilities.
How customized node or register node can be added with JSON
Adding a customized node or registering a node in a JSON file typically refers to defining a new node type or extending existing node types in a JSON-based configuration format used in certain applications or frameworks, such as a node-based editor or a graph representation.
The specific implementation details and syntax may vary depending on the application or framework you are working with. I’ll provide a general example of how this could be done, assuming you have a JSON-based configuration for defining nodes in your application.
Let’s understand this concept with an Example:-
{
  "nodes": [
    {
      "type": "StandardNode",
      "name": "Node 1",
      "position": {
        "x": 100,
        "y": 100
      }
    },
    {
      "type": "StandardNode",
      "name": "Node 2",
      "position": {
        "x": 100,
        "y": 200
      }
    },
    {
      "type": "CustomNode",
      "name": "My Custom Node",
      "position": {
        "x": 500,
        "y": 300
      },
      "customProperty": "Some custom data",
      "anotherCustomProperty": 40
    }
  ]
}
In this example, we have three nodes defined in the nodes array:
- Two
StandardNodes with propertiesnameandposition. - One
CustomNodewith additional custom propertiescustomPropertyandanotherCustomProperty.
When loading this JSON configuration into your application, you would typically have a node factory that creates instances of different node types based on the "type" field in the JSON. For example, when processing the JSON configuration
Demo for Selenium Environment
package Selenium;

import org.openqa.selenium.WebDriver;
import org.openqa.selenium.chrome.ChromeOptions;
import org.openqa.selenium.firefox.FirefoxOptions;
import org.openqa.selenium.remote.RemoteWebDriver;

import java.net.MalformedURLException;
import java.net.URL;

public class SeleniumGrid {

    public static void main(String[] args) throws MalformedURLException {
        // Define the Hub URL
        URL hubUrl = new URL("http://localhost:4444/wd/hub");

        // Create ChromeOptions and FirefoxOptions
        ChromeOptions chromeOptions = new ChromeOptions();
        FirefoxOptions firefoxOptions = new FirefoxOptions();

        // Create WebDriver instances using RemoteWebDriver
        WebDriver chromeDriver = new RemoteWebDriver(hubUrl, chromeOptions);
        WebDriver firefoxDriver = new RemoteWebDriver(hubUrl, firefoxOptions);

        // Run test on Chrome
        testWithBrowser(chromeDriver, "Chrome");

        // Run test on Firefox
        testWithBrowser(firefoxDriver, "Firefox");

        // Quit the WebDriver instances
        chromeDriver.quit();
        firefoxDriver.quit();
    }

    public static void testWithBrowser(WebDriver driver, String browserName) {
        // Your test logic here
        driver.get("https://www.example.com");
        System.out.println("Title of " + browserName + " browser: " + driver.getTitle());
    }
}
Explanation of the code
In the above code snippet, we have added the necessary packages
importing the necessary classes from the Selenium library and other required Java packages.
The code defines a class named SeleniumGrid, which will contain the main method to run the Selenium Grid example.
main Method:
The main method is the entry point of the Java program, and it throws a MalformedURLException, which indicates that a malformed URL has occurred while trying to connect to the Selenium Grid Hub.
Selenium Grid Hub URL:
A URL object named hub URL is created with the address of the Selenium Grid Hub. http://localhost:4444/wd/hub.
Desired Capabilities is a class that represents the desired capabilities for the WebDriver, specifying browser and platform-related properties. Here, two Desired Capabilities objects are created.
RemoteWebDriver is a class that provides a WebDriver implementation that controls browsers running on remote machines (Selenium Grid Nodes). Two WebDriver objects are created: one for Chrome (chrome Driver) and another for Firefox (Firefox Driver).
The testWithBrowser method is a custom method that takes a WebDriver instance and a String representing the browser name as input.
Running the Test:
The test is executed by calling the testWithBrowser method twice, once for Chrome and once for Firefox. This will open the example.com page on each browser, and the title of the page will be printed for both Chrome and Firefox.
Quitting WebDriver Instances:
Finally, after the tests have been executed, the WebDriver instances for Chrome and Firefox are closed using the quit () method, which will release the resources associated with each browser session.
Conclusion
In this blog, we have learned about the basic Selenium Grid environment setup and how to configure the hub and Nodes I hope this blog post is helpful