


Section 1: Understanding the Need for API Documentation
In the fast-paced world of software development, effective communication is paramount. APIs (Application Programming Interfaces) act as bridges between different software components, enabling them to interact seamlessly. However, the mere existence of APIs isn’t enough; understanding how to use them correctly is equally vital. This is where API documentation comes into play, serving as the guiding light for developers, stakeholders, and consumers alike.
The Significance of API Documentation
Imagine a scenario where you’ve been given access to a treasure trove of valuable resources, but there’s no map or instructions on how to navigate through them. Similarly, APIs provide a wealth of functionalities, but without proper documentation, developers are left in the dark, struggling to make sense of how to utilize these capabilities effectively.
API documentation acts as the blueprint that provides detailed insights into the various endpoints, request parameters, response formats, and authentication methods that an API supports. It serves as a comprehensive guidebook that enables developers to integrate external services, build new functionalities, and troubleshoot issues.
Benefits of Robust API Documentation
- Clarity and Consistency: API documentation ensures that everyone involved in the development process has a common understanding of the API’s behavior. This consistency minimizes confusion, reduces errors, and fosters collaboration.
- Ease of Onboarding: New team members or external developers can quickly grasp how to interact with an API, reducing the learning curve and expediting their contribution to the project.
- Efficient Communication: Instead of relying solely on verbal or written explanations, developers can refer to well-structured documentation to get accurate and up-to-date information about the API.
- Effective Testing: Comprehensive documentation aids in writing thorough test cases, enabling developers to validate the API’s functionality during the development and integration phases.
- Troubleshooting and Debugging: Inevitably, issues arise during development. With detailed documentation, developers can identify the root causes of problems more efficiently, expediting the debugging process.
- Streamlined Collaboration: Developers working on different parts of a project can work harmoniously by referring to the API documentation as a single source of truth.
- Enhanced User Experience: For APIs consumed by external parties, robust documentation ensures that users can seamlessly integrate and utilize the API’s features, leading to a positive experience.
The Perils of Inadequate Documentation
On the flip side, inadequate or non-existent API documentation can lead to a slew of problems:
- Miscommunication: Developers may misunderstand how an API should be used, leading to errors in integration and unexpected behavior.
- Wasted Time: Developers may spend valuable time reverse-engineering an API’s functionality, leading to inefficient development cycles.
- Frustration: Without clear instructions, users may become frustrated with the API and choose alternative solutions.
- Errors and Bugs: Inaccurate usage of APIs due to a lack of documentation can result in bugs, security vulnerabilities, and performance issues.
In essence, API documentation is not a mere formality; it’s a fundamental pillar of successful software development. It bridges the gap between technical capabilities and practical usage, empowering developers to create robust and reliable applications. In the following sections, we’ll explore how to leverage Swagger UI within the Ktor framework to craft comprehensive and interactive API documentation.
Stay tuned as we dive into the exciting world of Swagger UI and Ktor, discovering how these tools can revolutionize the way you document and interact with APIs.
[Note: This section provides an overview of the importance of API documentation. You can further expand on specific examples, case studies, or industry trends to enrich the content.]
Section 2: Introducing Swagger UI and Ktor
In the realm of modern software development, where agility and efficiency are paramount, the tools we use can make a significant difference. Swagger UI and Ktor are two such tools that stand out, offering developers a seamless way to create and document APIs. Let’s delve into what makes these tools so essential and how they can revolutionize the way we approach API development.
Swagger UI: The API Documentation Powerhouse
Swagger UI is a user-friendly and interactive tool designed to simplify the process of creating, visualizing, and documenting APIs. Developed by the OpenAPI Initiative, Swagger UI has become a cornerstone in the API development ecosystem. It automates the generation of documentation from API specifications, allowing developers to focus on building robust endpoints rather than spending countless hours writing documentation.
Key features of Swagger UI include:
- Interactive Documentation: Swagger UI automatically generates interactive documentation based on API specifications. This documentation is not just static text; it provides a playground where developers can explore endpoints, test requests, and view responses in real time.
- API Testing: Developers can use Swagger UI to send sample requests and receive actual responses, allowing them to validate endpoints without leaving the documentation page.
- Visualizing API Structure: Swagger UI presents a visual representation of the API’s structure, making it easier to understand the relationships between different endpoints, request parameters, and responses.
- Code Generation: Swagger UI can generate client code in various programming languages based on the API specifications. This accelerates integration for developers using different platforms.
- Authentication Simulation: Developers can simulate authentication mechanisms and see how the API responds to authorized and unauthorized requests.
Ktor: The Lightweight Kotlin Framework
Ktor is a Kotlin-based framework developed by JetBrains that specializes in building asynchronous and non-blocking web applications. It provides a clean and intuitive API for building web services, allowing developers to create efficient and scalable applications with minimal overhead.
Key features of Ktor include:
- Asynchronous Nature: Ktor’s asynchronous architecture enables it to handle a large number of concurrent connections with minimal resource consumption.
- Modularity: Ktor follows a modular design philosophy, allowing developers to choose and include only the components they need. This keeps the application lightweight and tailored to its requirements.
- DSL-based Syntax: Ktor utilizes Kotlin’s Domain-Specific Language (DSL) capabilities, enabling developers to define routes, handlers, and middleware using a concise and expressive syntax.
- Flexible Routing: Ktor’s routing system is highly flexible, supporting path parameters, query parameters, and even regular expressions. This makes it easy to create complex routing structures for APIs.
- Content Negotiation: Ktor supports content negotiation, allowing APIs to respond with different data formats (JSON, XML, etc.) based on the client’s preferences.
A Powerful Synergy
Combining the strengths of Swagger UI and Ktor creates a powerful synergy for API development. Ktor’s ease of use and asynchronous capabilities complement Swagger UI’s documentation and testing features. With Ktor, developers can focus on implementing business logic while Swagger UI automatically generates interactive documentation that fosters collaboration and accelerates development cycles.
In the next sections, we’ll explore how to integrate Swagger UI into a Ktor project, providing step-by-step instructions to set up, configure, and utilize these tools effectively.
Get ready to witness the magic unfold as we dive into the practical aspects of integrating Swagger UI within the Ktor framework.
[Note: This section introduces readers to the core concepts of Swagger UI and Ktor, highlighting their individual features and advantages. You can enhance this section by providing real-world examples of organizations or projects that have benefited from using these tools.]
Section 3: Setting Up Your Ktor Project
Before we embark on the exciting journey of integrating Swagger UI into your Ktor project, we need to ensure that our project is set up correctly. In this section, we’ll guide you through the steps of preparing your Ktor project for the seamless integration of Swagger UI.
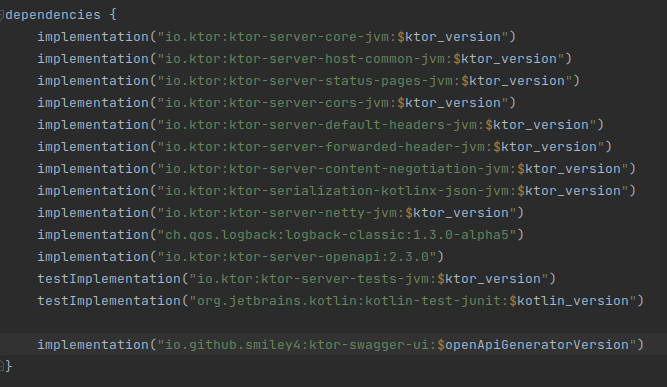
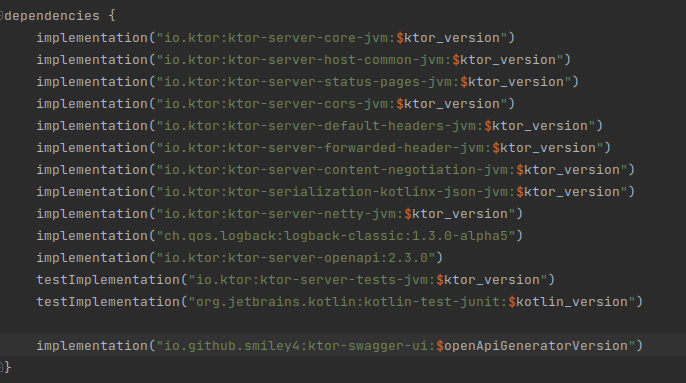
Step 1: Defining Dependencies
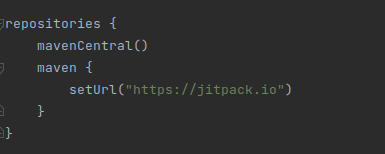
Step 2: Specifying Repositories
Ensure that you have the required repositories defined in your build.gradle.kt file. These repositories are essential for fetching the specified dependencies. Add the following repositories within the repositories block:
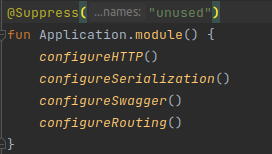
Step 3: Application Configuration
In your src/main/kotlin directory, locate the Application.kt file. This is where you configure your Ktor application. The module function is the heart of your application’s configuration. Here, you integrate Swagger UI and other essential components.
In the next sections, we’ll dive deeper into each aspect of the configuration process, starting with the integration of Swagger UI.
Section 4: Configuring Swagger UI in Ktor
Now that you have your Ktor project set up and ready, let’s delve into the exciting process of integrating Swagger UI into your application. Swagger UI will empower you to generate interactive API documentation effortlessly, enhancing both developer experience and communication. In this section, we’ll explore the configureSwagger function and break down its various components.
Step 1: Including Swagger UI Dependencies
Prior to proceeding, confirm the accurate inclusion of the Swagger UI dependency in your build.gradle.kt file, as demonstrated earlier.
implementation("io.github.smiley4:ktor-swagger-ui:$openApiGeneratorVersion")Step 2: Customizing Swagger UI
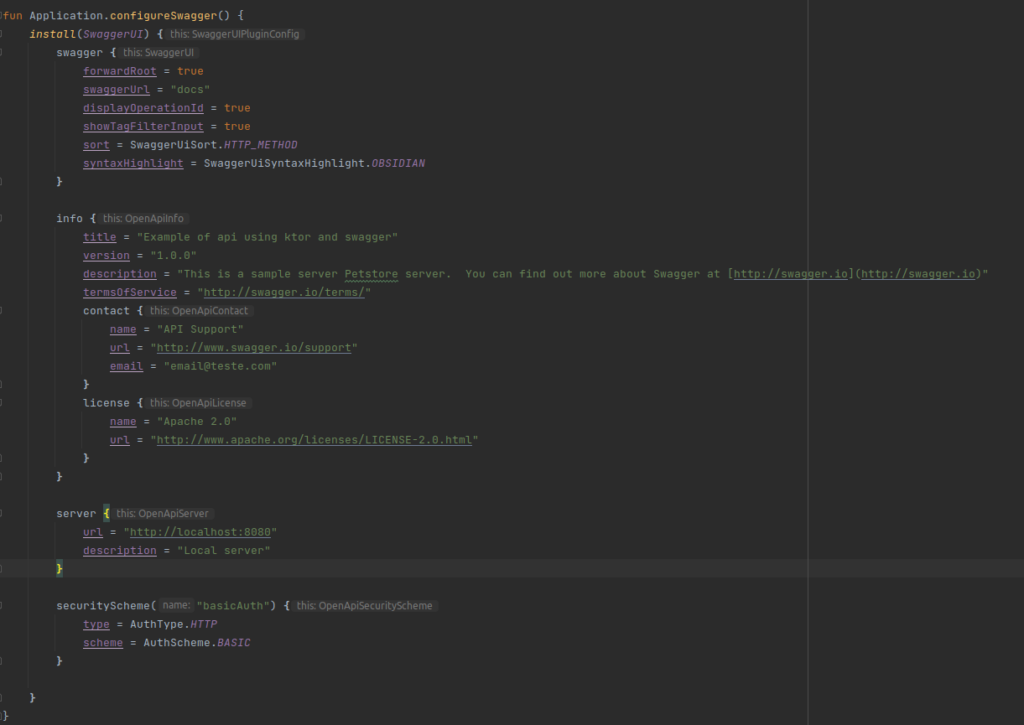
Open your Swagger.kt file located in the plugins directory. This is where the magic happens. The configureSwagger function is where you’ll define the appearance, information, and security of your Swagger documentation.
In the above code snippet, we’re using the install function to add Swagger UI to our Ktor application. Within the SwaggerUI block, we’re customizing various aspects of Swagger UI:
- Swagger Configuration: We’re configuring details like whether the root path should be forwarded, the URL to access the Swagger documentation, and more.
- API Information: This section provides metadata about your API, such as its title, version, description, terms of service, contact information, and license.
- Server Information: Here, we specify the base URL of our API and provide a description.
- Security Scheme: We’re defining a basic authentication security scheme for our API.
By completing this step, you’ve successfully integrated and configured Swagger UI within your Ktor application. In the next section, we’ll explore HTTP configuration, an essential component for smooth API communication.
Section 5: HTTP Configuration in Ktor
In the world of web development, proper HTTP configuration is paramount for secure and efficient communication between clients and servers. In this section, we’ll uncover the intricacies of setting up Cross-Origin Resource Sharing (CORS), handling headers, and ensuring your Ktor application is ready to handle HTTP requests.
Step 1: Cross-Origin Resource Sharing (CORS)
Cross-Origin Resource Sharing (CORS) is a security feature that controls how web browsers allow scripts to make requests to different domains. To configure CORS in your Ktor application, we’ll utilize the install(CORS) plugin.
Open your HTTP.kt file located in the plugins directory, and add the following code to the configure HTTP function:
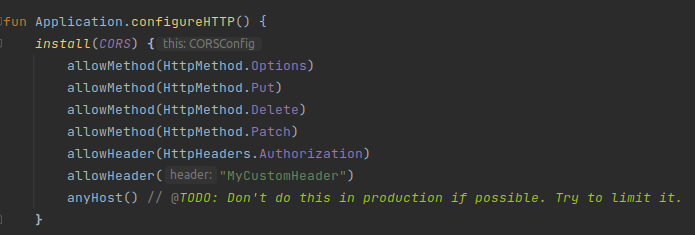
In the above code snippet, we’ve installed the CORS plugin and defined the allowed HTTP methods and headers. The anyHost() function allows requests from any host, but be cautious when using this in a production environment. You should replace it with the appropriate host restriction.
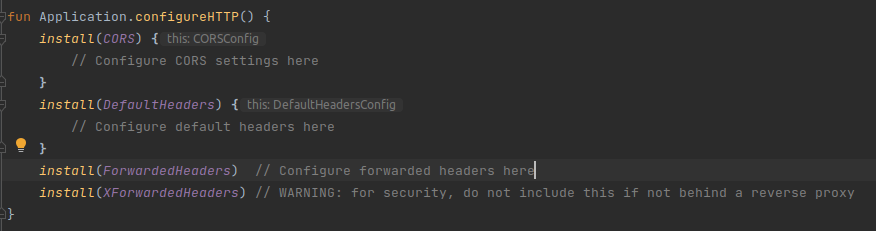
Step 2: Handling Default and Forwarded Headers
HTTP headers play a vital role in request and response communication. By handling headers properly, you ensure that your API operates smoothly.
Continuing in your HTTP.kt file, add the following code to the configure HTTP function:

In the code above, the DefaultHeaders plugin adds a custom header to each response, which can be useful for tracking requests. The ForwardedHeaders and XForwardedHeaders plugins are important when your application is behind a reverse proxy, as they handle forwarded headers securely.
Final Thoughts
By now, you’ve mastered the art of HTTP configuration in your Ktor application. Proper CORS setup and header handling ensure that your API communicates effectively, paving the way for seamless interactions between clients and servers. In the next section, we’ll tie everything together and see how you can test and visualize your API documentation using Swagger UI.
Section 6: Routing and Exception Handling
In this section, we’ll explore the key concepts of routing and exception handling in your Ktor application. Effective routing ensures that incoming requests are directed to the appropriate endpoints, while robust exception handling ensures graceful error responses. We’ll dive into the configureRouting function, which is responsible for setting up routing and handling exceptions using status pages.
Step 1: Routing Your Application
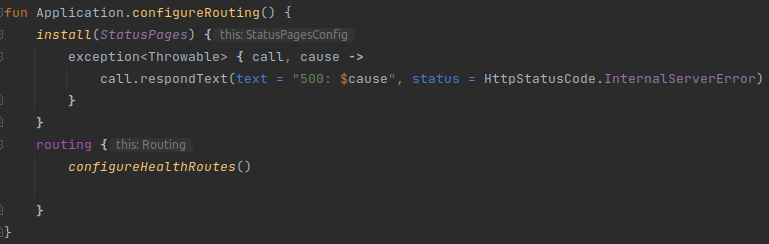
Routing in Ktor defines how different paths or URLs map to specific actions or responses. Open your Routing.kt file located in the plugins directory and navigate to the configureRouting function:
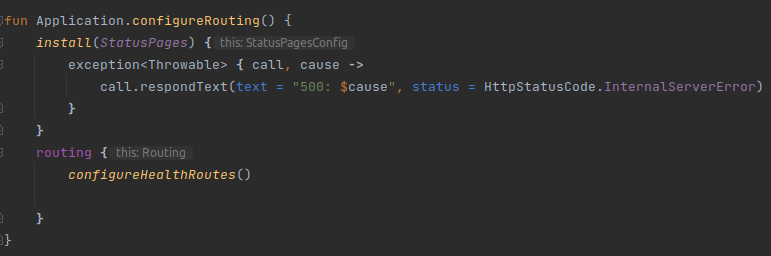
In the code above, we’re installing the StatusPages plugin, which provides the capability to handle exceptions and respond with appropriate status codes and messages. The exception<Throwable> block catches all types of exceptions and responds with a generic internal server error message.
Step 2: Handling Routing
Within the configureRouting function, we configure the routing of our application. In your case, you have already defined the health route using the configureHealthRoutes function.
Routing is where you map incoming HTTP requests to the appropriate code block that handles them. You can define multiple routes using the routing block, each corresponding to different endpoints and HTTP methods. By keeping your routes organized, your application becomes more maintainable and understandable.
Final Thoughts
Routing and exception handling are essential aspects of building a stable and user-friendly application. Configure routes, handle exceptions to improve app responses, and in the next section, we’ll integrate Swagger UI to test and document your API.
Section 7: Integrating Serialization
Serialization plays a crucial role in modern web development, enabling the conversion of data between different formats, such as JSON, XML, or binary. Here, we’ll explore serialization and introduce Kotlin Serialization, crucial for our Ktor app.
Understanding Serialization
Serialization converts structured data (objects or data classes) into a format for easy network transmission or file storage.This serialized data can then be deserialized back into its original format when needed. Serialization is essential for communication between client and server, as well as for persisting data in databases or files.
Introducing Kotlin Serialization
Kotlin Serialization is a powerful library that provides a seamless way to serialize and deserialize Kotlin data classes to and from various formats, particularly JSON. It’s built on Kotlin’s type-safe and concise syntax, making it a natural choice for Kotlin developers.
Configuring Serialization in Ktor
In our previous sections, you’ve seen how we’ve used data classes to represent our API’s responses and errors. Now, let’s integrate Kotlin Serialization into our Ktor application to ensure that our data classes can be easily converted to and from JSON.
In your application.conf file, you’ve already included the serialization plugin:
ktor {
    deployment {
    }
    features {
        serialization {
        }
    }
}
With this configuration, Ktor’s serialization feature is enabled for our application.
Defining Serializable Data Classes
To use Kotlin Serialization, we need to annotate our data classes with the @Serializable annotation. For example, consider your HealthDTOInterface and ErrorResponse data classes:
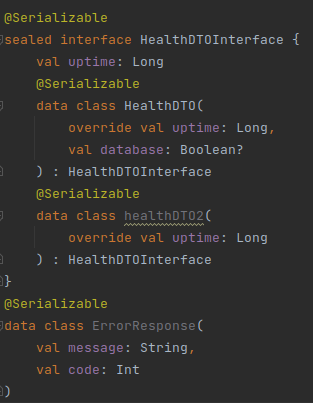
By adding the @Serializable annotation, we’re telling the Kotlin Serialization library that these classes can be converted to and from JSON.
Conclusion
Serialization is a fundamental part of modern web development, enabling seamless data communication and persistence. With Kotlin Serialization integrated into our Ktor application, we can confidently work with data classes, ensuring efficient data conversion for our API’s responses and requests. In the next section, we’ll explore how to use Swagger UI to interact with our API. And leveraging the power of serialization to test and visualize data interchange.
Section 8: Step-by-Step Implementation Guide
In this section, we’ll guide you through the practical implementation of integrating Swagger UI into your Ktor application. We’ll break down the code snippets for the Swagger.kt, http.kt, Routing.kt, and Application.kt files, explaining each step along the way. This step-by-step guide will give you a clear understanding of how to set up Swagger UI and create interactive API documentation.
Step 1: Setting Up Dependencies
Before diving into the code, make sure you have set up your project’s dependencies correctly. In your build.gradle.kt file, including the required dependencies for Ktor, Swagger UI, and Kotlin Serialization.
Step 2: Configuring Swagger UI
Create a file named Swagger.kt in your plugin package to set up Swagger UI. This is where you’ll configure various aspects of the Swagger UI interface.

Step 3: Configuring HTTP Settings
In the http.kt file, configure HTTP settings such as CORS and default headers. These settings ensure secure and smooth communication between your API and clients.
Step 4: Configuring Routing and Exception Handling
In the Routing.kt file, set up routing for your application, and handle exceptions using status pages. This ensures that incoming requests are directed to the appropriate endpoints and that errors are properly handled.
Section 9: Testing Your API with Swagger UI
In this guide, we’ve witnessed how Swagger UI documents APIs and enables direct testing through its interactive interface. Here, we’ll explore using Swagger UI to test your APIs and ensure their functionality.
Step 1: Accessing Swagger UI
To access Swagger UI, you need to run your Ktor application and navigate to the Swagger UI interface in your web browser. By default, the Swagger UI interface can be accessed at the /docs endpoint of your application’s URL. For example, if your application is running on http://localhost:8080, you can access Swagger UI at http://localhost:8080/docs.
Step 2: Exploring the Documentation
Once you access the Swagger UI interface, you’ll see a user-friendly interface displaying all your API endpoints. You can explore the different routes, methods, and request/response parameters. The intuitive layout allows you to quickly grasp the structure of your API.
Step 3: Testing Endpoints
One of the most valuable features of Swagger UI is its ability to allow you to test your endpoints directly from the documentation. For each endpoint, you’ll find a “Try it out” button that enables you to input parameters and send requests to the API.
- Click the “Try it out” button next to the endpoint you want to test.
- Input any required parameters or data in the provided form fields.
- Click the “Execute” button to send the request to the API.
Swagger UI will display the response from the API, including the status code, headers, and the response body. This immediate feedback helps you ensure that your API is behaving as expected.
Step 4: Viewing Request and Response Examples
Swagger UI also provides request and response examples based on the documentation you’ve provided in your code. These examples help you understand the expected format of requests and the structure of responses. By following these examples, you can ensure that your requests are properly formatted and that your responses match the expected structure.
Step 5: Iterative Testing and Development
As you develop and make changes to your API, you can use Swagger UI to iteratively test your endpoints. Each time you make modifications to your code, you can return to Swagger UI to test how those changes impact the behavior of your API. This iterative testing process is crucial for catching errors, ensuring functionality, and maintaining the reliability of your API.
Step 6: Documentation and Collaboration
In addition to testing, Swagger UI serves as a single source of truth for your API’s capabilities. This documentation becomes invaluable when collaborating with other developers, stakeholders, or clients. It reduces the learning curve for new team members and provides a clear understanding of how to interact with your API.
Section 10: Conclusion
In this guide, we integrated Swagger UI with Ktor to enhance API development. We acknowledged API doc importance and Swagger UI’s transformative role.
We explored the core concepts of Swagger UI and Ktor, understanding how they complement each other to create a seamless developer experience. With a solid foundation, we delved into the practical steps of setting up a Ktor project and configuring Swagger UI within it.
Our exploration of the configureSwagger function enabled us to customize the appearance, include essential server information, and implement security schemes. We learned how to leverage Swagger UI’s interactive interface to test our APIs efficiently, ensuring their accuracy and reliability.
HTTP configuration in Ktor was another crucial aspect covered in this guide. We examined Cross-Origin Resource Sharing (CORS) and how to manage headers effectively for smooth API communication.
Our journey continued by understanding the structure of a Ktor application, including the main application entry point and the integration of HTTP settings, serialization configuration, and Swagger UI.
In the step-by-step implementation guide, we dissected the code for Swagger.kt, http.kt, Routing.kt, and Application.kt, ensuring a comprehensive understanding of the integration process.
Concluding the Swagger UI Integration Journey with Ktor
Finally, we explored how Swagger UI facilitates iterative testing and enhances collaboration among developers and stakeholders. This powerful tool empowers us to build APIs with confidence, streamlining the development process and fostering effective communication.
As you venture forth, remember that well-documented and thoroughly tested APIs are the backbone of successful software projects. Integrate Swagger UI with Ktor for advanced API development. Whether experienced or new to programming, this guide’s knowledge is invaluable.
Thank you for joining us on this enlightening journey of configuring Swagger UI with Ktor. With this newfound knowledge, you’re now poised to create exceptional APIs that empower innovation and collaboration. Happy coding!
Salil Kumar Verma is the owner of this blog, If you’re interested in exploring more you can find it on WebSite.. here! and on Salil’s LinkedIn here!