


Introduction
In my previous post How To List All 3rd Packages Being Used In Your Project, I demonstrated how to list Nuget packages and Npm packages for C# and ReactJs projects by creating and executing Console application, but rather than executing manually, Isn’t it cooler if we can pack and install the application as a global CLI tool so that we can execute it anywhere in any folder. In this article, I’m gonna show you how.
Pack The Console Application as a NuGet Package
Let’s create another Console application named CheckNugetPackages.DotNetCliTool using Visual Studio 2022 or Visual Studio Code.
Copy the code inside the Program.cs class of the CheckNugetPackages application in the previous post and paste it into the Program.cs class of the CheckNugetPackages.DotNetCliTool application, then we have the code as below:
using System.Xml.Linq;

var packages = new List<(string Name, string Version, string Project)>();

var directories = new[]
{
    @"D:\Project1\API",
    @"D:\Project2\API",
};

foreach (var directory in directories)
{
    var packagesInPackagesConfigureFiles = ScanPackagesInPackagesConfigureFiles(directory);
    var packagesInCsProjectFiles = ScanPackagesInCsProjectFiles(directory);
    packages.AddRange(packagesInPackagesConfigureFiles);
    packages.AddRange(packagesInCsProjectFiles);
}

var packageGroups = packages.GroupBy(x => new { x.Name, x.Version })
    .Select(g => new
    {
        g.Key.Name,
        g.Key.Version,
        Projects = string.Join(", ", g.Select(x => x.Project)),
        Url = $"https://www.nuget.org/packages/{g.Key.Name}/{g.Key.Version}"
    })
    .OrderBy(x => x.Name)
    .ThenBy(x => x.Version).ToList();

var ignoredPackages = new List<string>
{
    //"System.",
    //"Microsoft."
};

using (var fileStream = File.Open("packages.csv", FileMode.Create))
{
    using (var streamWriter = new StreamWriter(fileStream))
    {
        foreach (var package in packageGroups)
        {
            if (ignoredPackages.Any(x => package.Name.StartsWith(x)))
            {
                continue;
            }

            streamWriter.WriteLine($"{package.Name},{package.Version}, ,\"{package.Url}\",\"{package.Projects}\"");
        }
    }
}

static List<(string Name, string Version, string Project)> ScanPackagesInPackagesConfigureFiles(string directory)
{
    var files = Directory.GetFiles(directory, "packages.config", SearchOption.AllDirectories);
    var packages = new List<(string Name, string Version, string Project)>();
    foreach (var file in files)
    {
        var projectName = new DirectoryInfo(Path.GetDirectoryName(file)).Name;
        XDocument xdoc = XDocument.Load(file);
        var packagesNode = xdoc.Descendants("packages").First();
        var packageNodes = packagesNode.Descendants("package");
        foreach (var node in packageNodes)
        {
            var packageName = node.Attribute("id")?.Value;
            var packageVersion = node.Attribute("version")?.Value;

            packages.Add((packageName, packageVersion, projectName));
        }
    }

    return packages;
}

static List<(string Name, string Version, string Project)> ScanPackagesInCsProjectFiles(string directory)
{
    var files = Directory.GetFiles(directory, "*.csproj", SearchOption.AllDirectories);
    var packages = new List<(string Name, string Version, string Project)>();
    foreach (var file in files)
    {
        var projectName = new DirectoryInfo(Path.GetDirectoryName(file)).Name;
        XDocument xdoc = XDocument.Load(file);
        var ItemGroupNodes = xdoc.Descendants("ItemGroup");
        foreach (var ItemGroupNode in ItemGroupNodes)
        {
            var packageNodes = ItemGroupNode.Descendants("PackageReference");
            foreach (var node in packageNodes)
            {
                var packageName = node.Attribute("Include")?.Value;
                var packageVersion = node.Attribute("Version")?.Value;

                if (string.IsNullOrWhiteSpace(packageName))
                    continue;

                packages.Add((packageName, packageVersion, projectName));
            }
        }

    }

    return packages;
}
Let’s change the below code:
var directories = new[]
{
    @"D:\Project1\API",
    @"D:\Project2\API",
};
to:
var directories = args;So rather than hard coding the input, now the application can receive input from the arguments being passed from outside before executing.
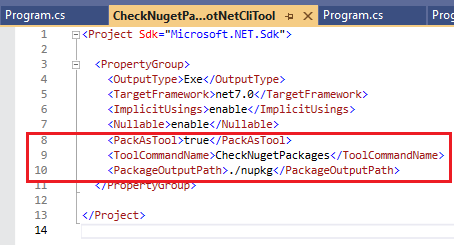
Next, we need to update the CheckNugetPackages.DotNetCliTool.csproj to add some instructions:
<PackAsTool>true</PackAsTool>
<ToolCommandName>CheckNugetPackages</ToolCommandName>
<PackageOutputPath>./nupkg</PackageOutputPath>
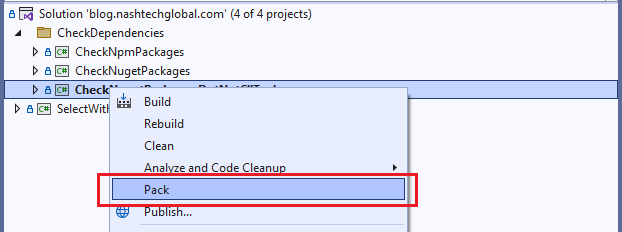
Let’s publish the NuGet package by right clicking and select Pack, or we can simply type dotnet pack command.
Install The NuGet Package as a .Net CLI Tool
Now we have the NuGet package published, let’s open the CheckNugetPackages.DotNetCliTool folder, open cmd and type:
dotnet tool install CheckNugetPackages.DotNetCliTool --global --add-source ./nupkg

To test the new CLI tool, let’s use the same GitHub code Repo in the previous post:
cd D:\Phong.NguyenDoan\GitHub\Practical.CleanArchitecture\src\Microservices
CheckNugetPackages ./

Wait for it to execute successfully, now we have the same packages.csv file generated exactly in the previous post.

Wrap Up
Up until now, our tool has been improved a lot and is much more reusable, in the next article, I’ll show you how we can publish the tool to the official NuGet website so that we can integrate and run it as a Task in an Azure DevOps CICD Pipeline.
As usual, the full source code for this demo is published at https://github.com/phongnguyend/blog.nashtechglobal.com please check that out.