


Overview
A visual workspace that facilitates collaboration for distant teams is called MURAL. Modern teams and individuals may interact across time zones and regions and graphically explore complicated problems thanks to the capability of digital whiteboards. No matter where they are in the globe, MURAL’s cloud-based platform enables users to conduct research, generate ideas, and create designs that produce better experiences faster. A monthly subscription grants you access to sizable, collaborative canvases made to assist you and your peers in mapping content, exchanging ideas, and defining solutions.
Mural can be integrated with the following software:
- One Drive
- Dropbox
- Microsoft Teams
- Jira
- Github
- Slack
- Google Calendar
- The noun project
- Spreadsheets
- Documents
User Stories
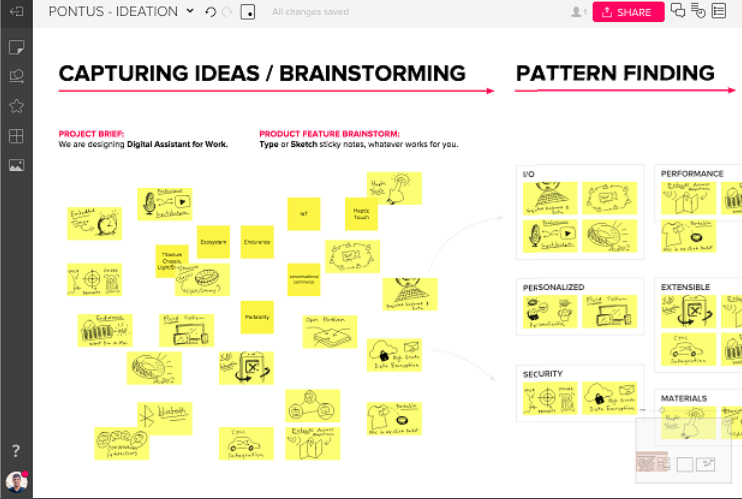
Modern teams from all over the world are collaborating on projects, implementing lean, agile, and design thinking techniques, and providing better goods, services, and experiences by using digital technologies like MURAL.
Key Features
- Directly import onedrive files
- Easily find content inside a mural
- Send all murals in a room to a touchscreen display
- Build flows faster
- Link elements in the same canvas
- Decide who can end your voting sessions
- Visibility of facilitators
- Templates with instructions
- Collaborate, give input, and stay up to date on your projects
- Create simple flow charts, faster
- Guide colleagues step-by-step through a workshop or meeting
- Make changes to methods you use regularly
- Find the perfect method to solve the right problem, etc.
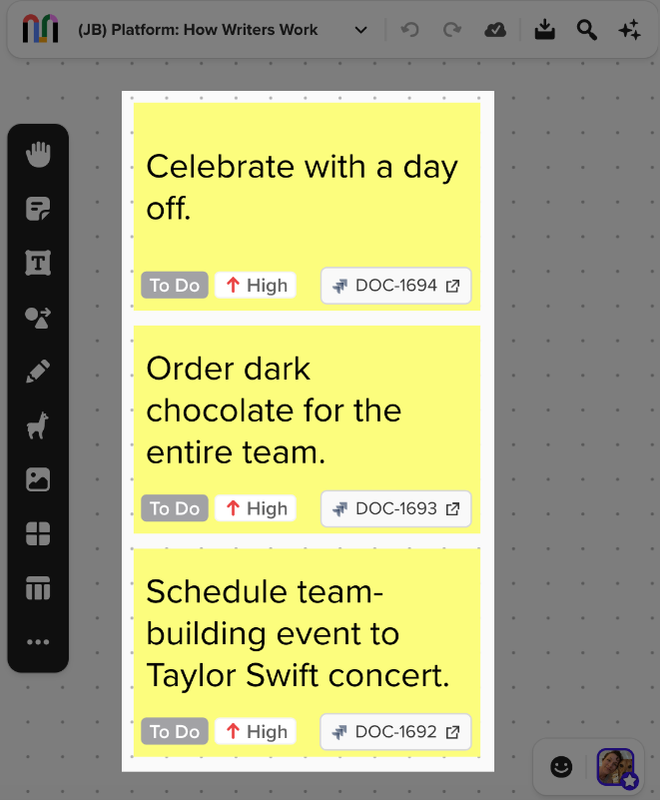
Connect MURAL to JIRA
How to Use the JIRA Integration
No more copying and pasting repeatedly! With only a right click, you can now simply switch from planning your projects in a mural to tracking and developing them in JIRA.
To create JIRA issues from sticky notes and text fields in MURAL, follow these steps:
- Select several items by holding SHIFT while you click and drag the text boxes and/or stickies you want to send to JIRA.
- Select “Send to JIRA” with the right-click menu after making multiple selections. You must install the JIRA connection if you don’t see the ‘Send to JIRA’ option in the right-click menu.
- Select the project, problem type, and priority using the drop-down menus. Once the issues are in JIRA, these are always subject to change.
- ‘Send to JIRA’ should be clicked.
- To view every problem you just added to JIRA, click the link. Additionally, you can click the tag to go directly to that issue in JIRA.
- Every JIRA problem has a connection to the mural from which it originated.
How to Install JIRA Integration
Step 1 – JIRA Admin – Install the JIRA integration
To be able to create JIRA issues straight from sticky notes and text boxes in your murals, follow these instructions.
Submitting the JIRA URL
- A JIRA admin must sign in to their JIRA account and select “Settings” from the menu on the left. Next, select “Products” and then “Application Links.”
- Click “Create new link” after entering https://mural.co/ in the appropriate field.
- ‘Continue’ should be clicked.
- Fill in “MURAL” for the Application name, scroll all the way down, make sure the “Create incoming link” checkbox is selected, and then click “Continue.”
- Click “Continue” after entering the data into the three fields.
- Consumer Key: MURAL
- Consumer Name: MURAL
- Done! Now the Mural’s Workspace Admin should take care of the next step.
Step 2 – Workspace Admin – Connect your workspace to a JIRA instance
Complete these steps to be able to create JIRA issues directly from sticky notes and text boxes in murals.
Part one: Submitting the JIRA URL
**NOTE: A workspace admin must go to https://app.mural.co/me/integrations. If you aren’t the workspace admin, you can send this article to somebody who is so they can complete the steps.
- Under the JIRA integration, click ‘Connect’. Choosing the workspace where you want to generate JIRA issues should be done if options for several workspaces are visible.
- Click “Next” after entering the URL of your JIRA organization.
- Next to the URL you connected through JIRA, click ‘Connect’.
- ‘Allow’ should be clicked.
- Done! Now, you may easily generate JIRA issues from your artwork.
CONCLUSION
Create epics, stories, and tasks in Jira from the output of product planning and strategy in MURAL without having to transcribe a single sticky note. Jira issues may be imported for more efficient sprint planning, backlog prioritization, and even stand-ups that are MURAL-visualized. Connecting MURAL with Jira Cloud makes all processes—from user story mapping through retrospectives—more efficient and enjoyable.